🧶 Free PDF Pattern:
Want to save this pattern for later? I’ve included a FREE printable PDF version at the bottom of this article. Keep reading, then download your copy below!
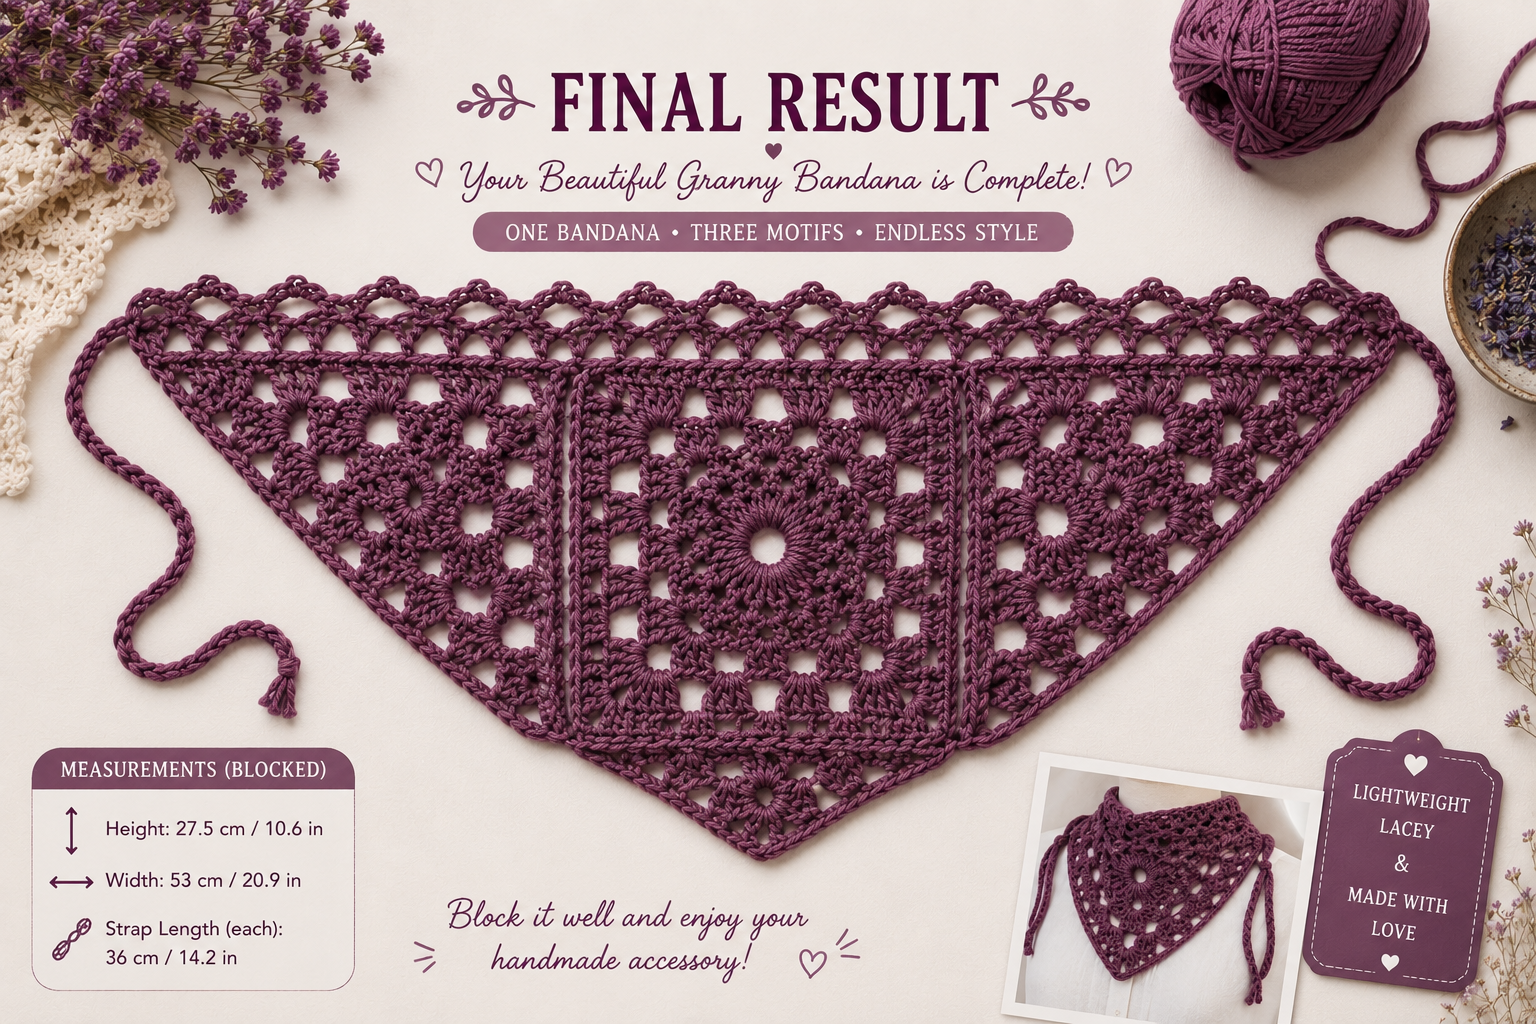
A crochet bandana made from one granny square, two granny triangles, a lace top edge, and two long ties. One size. Medium weight yarn, 4 mm hook. Here’s exactly how to make it.
Beginner Goal
Best for confident beginners — you should already know chain, slip stitch, single crochet, and double crochet, and ideally have made one granny square before. New techniques here: back-loop-only crochet, front-loop/back-loop joining, a little treble crochet, and one “rotate, don’t turn” step.
What You’ll Need
Yarn
Medium weight (worsted/aran) cotton-viscose-linen blend. Sample used Sandnes Garn, Line, colorway 9004 — 50 g / 1.76 oz skeins, 110 m / 120 yd each, 53% cotton / 33% viscose / 14% linen. Total used: ~44 g / 1.55 oz. That’s roughly 95–100 m / 105–110 yd (calculated, not stated directly) — one skein covers it.
Hook
4 mm / US G-6
Notions
- Yarn/tapestry needle
- Scissors
- Measuring tape
Stitches Used (US Terms)
- ch – chain
- sl st – slip stitch
- sc – single crochet
- dc – double crochet
- tr – treble crochet
- ch-sp – chain space
- sk st – skipped stitch
- blo – back loop only
Also used: magic ring (chain-loop alternative given) and front loop (during assembly).
Finished Measurements
One size, flat, blocked:
- Height: 27.5 cm / 10.6 in
- Width: 53 cm / 20.9 in
- Strap length: 36 cm / 14.2 in each
Before You Begin
Gauge: 16 dc x 9 rows = 10 x 10 cm / 4 x 4 in. One finished square (through Round 7) = 14.5 x 14.5 cm / 5.5 x 5.5 in. Adjust hook size if off.
Order of construction:
- Granny square (in the round)
- Two granny triangles (turned rows)
- Assemble with slip stitches
- Top edge (3 rows)
- Bottom edge + 2 straps
- Weave in ends, block
US terms throughout.
Step-by-Step Instructions
Part 1: Granny Square
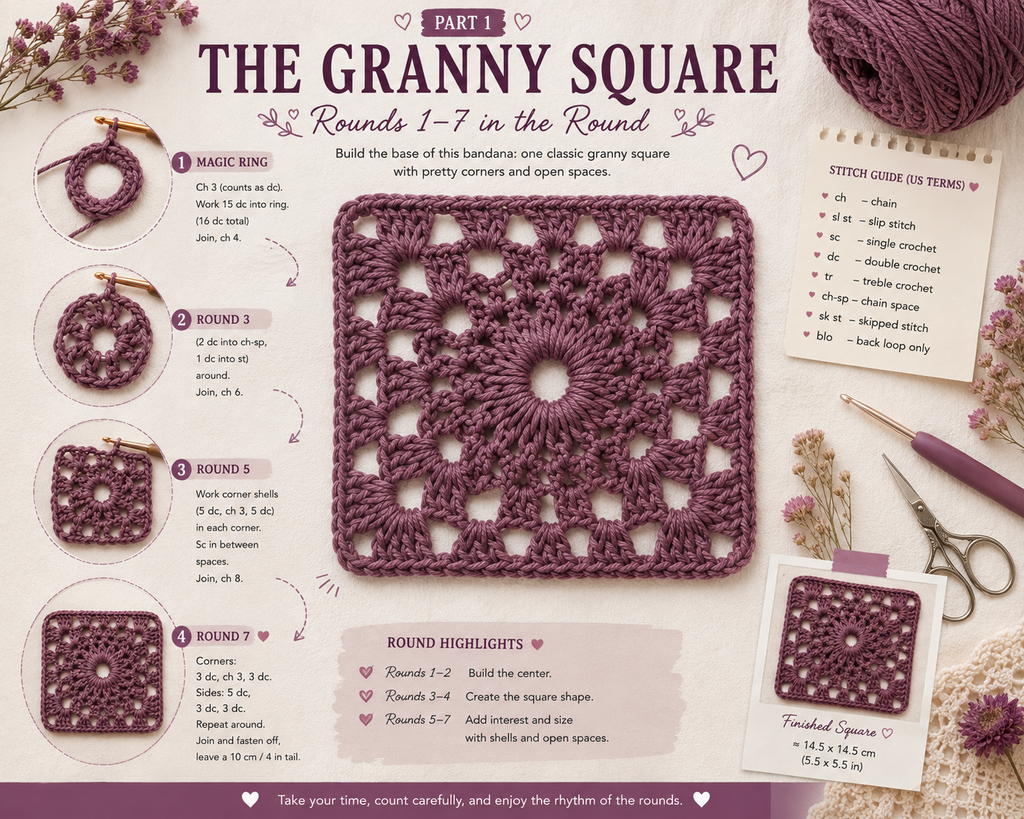
Round 1: Magic ring. Ch 3 (= 1 dc), 15 more dc into ring (16 dc). Join, ch 4. No magic ring? Slip knot, ch 4, join with sl st into first ch. Work Round 1 into that ring.
Round 2: Ch 4 (= dc, ch 1). (Dc, ch 1) into each stitch around = 16 dc-ch1 groups. Join into 3rd ch of ch 4. Ch 3.
Round 3: (2 dc into ch-sp, 1 dc into stitch) around. Join. Ch 6.
Round 4: Ch 6 = corner. Sk 2, sc into 3rd st, ch 3. Repeat (ch 3, sk 2, sc) x3 for the side. Corner: ch 6, sk 2, sc. Repeat around all 4 sides/corners. Join into first corner space. Ch 3.
Round 5: Ch 3 (= dc), 4 dc, ch 3, 5 dc — all into same corner space. Sc into next space (under previous round’s ch-3). 7 dc into next space, sc into next. Repeat corner + side pattern around. Join. Ch 8.
Round 6: Ch 8 (= dc, ch 5). Corner: sc, ch 3, sc, ch 5. Sk 5, dc into sc from Round 5, ch 3. Sc into 4th st of 7-dc group. Ch 3, sk 3 dc, dc into sc from Round 5, ch 5. Corner repeat. Continue around, end with sc into 4th st of last 7-dc group, ch 3. Join into 3rd ch of ch 8, sl st into next space. Ch 3.
Round 7: Ch 3 (= dc), 4 more dc same space (5 dc total). Corner: 3 dc, ch 3, 3 dc. 5 dc into next space, 3 dc into each of next 2 spaces, 5 dc into next space. Corner repeat. Continue around. Join. Cut yarn, leave 10 cm / 4 in tail.
(Photo: finished square)
Square done.
Part 2: Granny Triangles (Make 2)
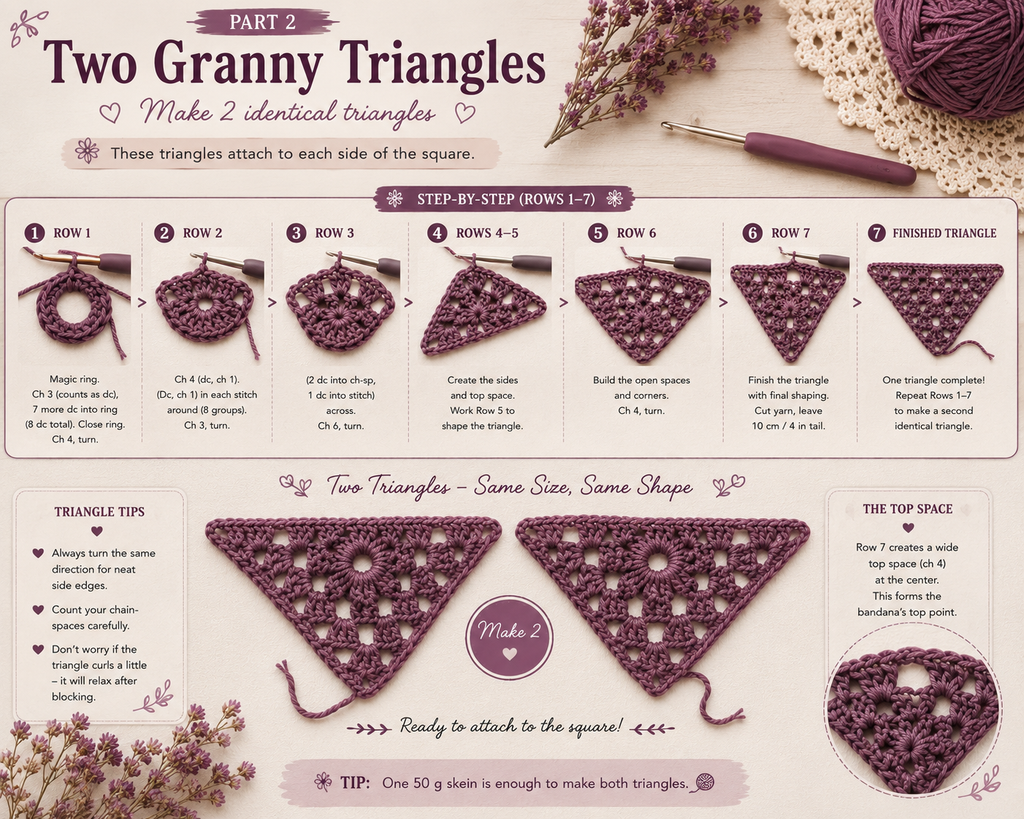
Row 1: Magic ring. Ch 3 (= dc), 7 more dc into ring (8 dc). Close ring. Ch 4, turn. Tip: always turn the same direction for a neat edge.
Row 2: Ch 4 (= dc, ch 1). (Dc, ch 1) into each stitch = 8 groups. Ch 3, turn.
Row 3: (2 dc into ch-sp, 1 dc into stitch) across. Ch 6, turn.
Row 4: Sk 2, sc. (Ch 3, sk 2, sc) x2. Ch 3, sk 1, (sc, ch 6, sc) into top stitch. Ch 3, sk 1, sc. (Ch 3, sk 2, sc) x2. Ch 6, sk 2, sl st into start of Row 3’s turning chain. Ch 4, turn.
Row 5: Ch 4 (= tr). (Tr, 4 dc) into same space. Sc into next space. 7 dc into next space, sc into next. (3 dc, ch 3, 3 dc) into top space. Sc into next. Mirror on second side. Last space: (4 dc, 2 tr). Ch 8, turn.
Row 6: Sk 2, sc into 3rd st. Ch 3, sk 3, dc into sc from Row 5. Ch 3, sk 3, sc into 4th st of 7-dc group. Ch 3, sk 3, dc into sc from Row 5, ch 5. Top space: sc, ch 3, sc, ch 5. Mirror on second side, end with sc into 3rd st. Ch 5, 1 dc into last space (before Row 5’s turning chains). Ch 4, turn.
Row 7: Ch 4 (= tr). (Tr, 4 dc) into same space. 4 dc into next space. 3 dc into each of next 2 spaces. 5 dc into next space. Top space: 3 dc, ch 4, 3 dc. Mirror on second side. Last space: (4 dc, 2 tr). Cut yarn, leave 10 cm / 4 in tail.
(Photo: finished triangle)
Repeat Rows 1–7 for a second triangle.
Part 3: Weave in Ends
Weave in every tail on the square and both triangles now, before assembly. Easier now than after joining.
Part 4: Assembly
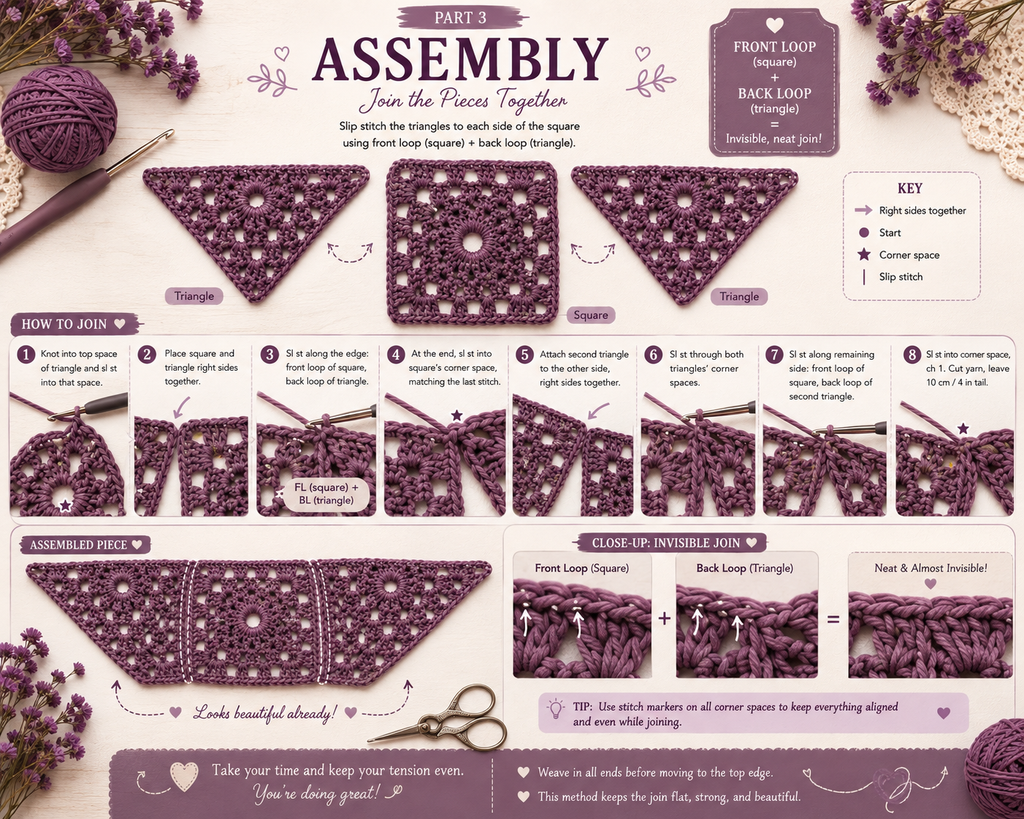
- Knot into top space of a triangle, sl st into that space.
- Square + triangle, right sides together.
- Sl st along the edge: front loop of square, back loop of triangle. To last stitch.
- Last sl st into square’s corner space, matching last stitch before triangle’s corner space.
- Second triangle against square’s other side, right sides together.
- Sl st through both triangles’ corner spaces.
- Sl st along square’s remaining side: front loop of square, back loop of second triangle.
- Sl st into corner space, ch 1, cut yarn, leave 10 cm / 4 in tail.
(Photo: assembled piece)
Part 5: Top Edge
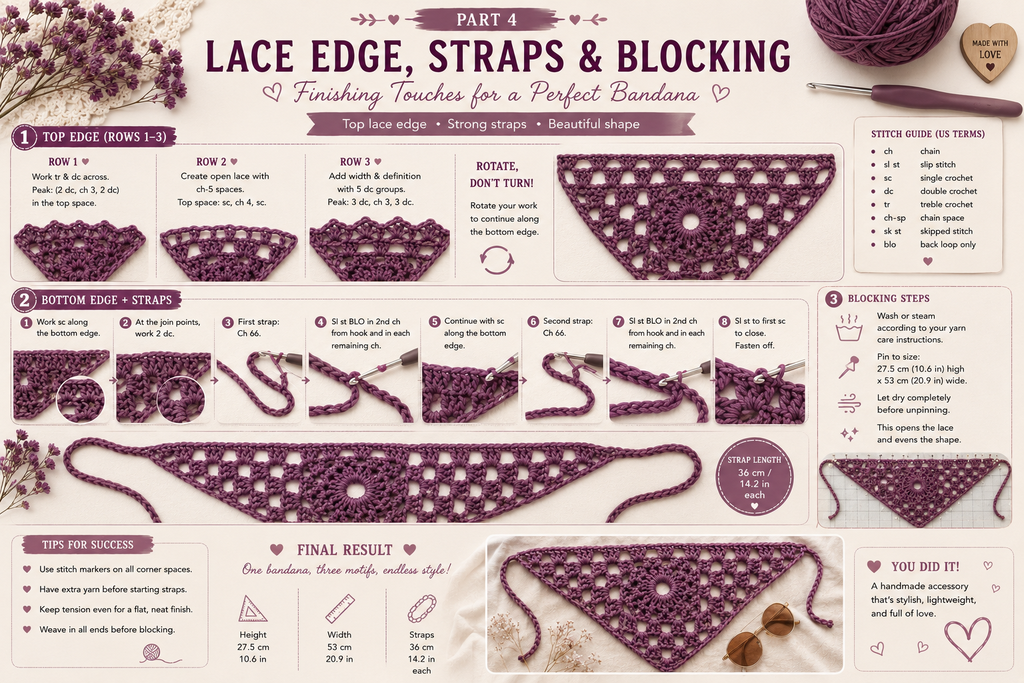
Row 1: RS facing. Knot into right corner space. Ch 4 (= tr), 1 tr into same space. Dc across to triangle/square seam: 2 dc into triangle’s top space, 2 dc into square’s corner space. Dc across to bandana’s top point: (2 dc, ch 3, 2 dc) into that space. Mirror down other side. Last stitch: 2 tr. Ch 8, turn.
Row 2: Sk 2, sc. (Ch 5, sk 2, sc) x16. Ch 5. Top space: sc, ch 4, sc, ch 5. Mirror: sk 2, sc, (ch 5, sk 2, sc) x16, ch 5. Dc into last stitch. Ch 4, turn.
Row 3: Ch 4 (= tr), 1 tr + 5 dc into same space. Sc into next space. Repeat (5 dc into next space, sc into next) to top space. Top space: 3 dc, ch 3, 3 dc. Mirror to last space. Last space: 5 dc, 2 tr.
Ch 1. Rotate (don’t turn) to move into the bottom edge.
Part 6: Bottom Edge + Straps
Without turning: 3 sc into first space (under last row). 3 sc into each of next 6 spaces. 2 sc into each of next 3 spaces. 1 sc into magic ring. 2 sc into each of next 3 spaces. 3 sc into each of next 4 spaces. At triangle/square join point: 2 dc. Repeat down second side.
First strap: Ch 66. Sl st blo into 2nd ch from hook, then sl st blo into each remaining chain.
Continue along bottom edge: sc through both loops, to end of row.
Second strap: Ch 66. Sl st blo into 2nd ch from hook, sl st blo to end of chain.
Sl st into first sc of this row to close. Cut yarn, leave 10 cm / 4 in tail.
Helpful Tips
- Use stitch markers on every corner space, Rounds 4–7.
- Finish the full side pattern before starting a corner (Round 4).
- Swatch first — measurements are exact.
- Have extra yarn ready before each 66-chain strap.
- Chain-ring start (from Round 1) also works for the triangles.
- One 50 g skein covers the whole project.
Common Mistakes to Avoid
- Miscounting chain spaces (Rounds 5–6, top-edge rows).
- Forgetting the starting chain counts as a stitch.
- Turning instead of rotating at the end of Top Edge Row 3.
- Working both loops instead of blo (straps, bottom edge).
- Swapping front loop/back loop during assembly.
- Cutting tails shorter than 10 cm / 4 in.
Finishing
Weave in all remaining ends. Run each tail through several stitches, changing direction, to secure it.
Blocking
Wash or steam per your yarn’s care label. Pin to 27.5 cm / 10.6 in x 53 cm / 20.9 in. Let dry fully before unpinning. Blocking opens the lace and evens out tension.
(Photo: finished, blocked bandana)
Final Thoughts
Three motifs, one bandana, no difficult stitches — just a lot of rounds and careful counting. Take it one part at a time and block it well, and it’ll look far more advanced than it was to make. A solid color keeps it graphic; a variegated yarn shows off the lace.
🧶 Download the FREE Crochet Bandana PDF
Loved this pattern? Get the free printable PDF so you can save it, print it, and follow the pattern anytime.
Enter your email below and I’ll send the PDF straight to your inbox.