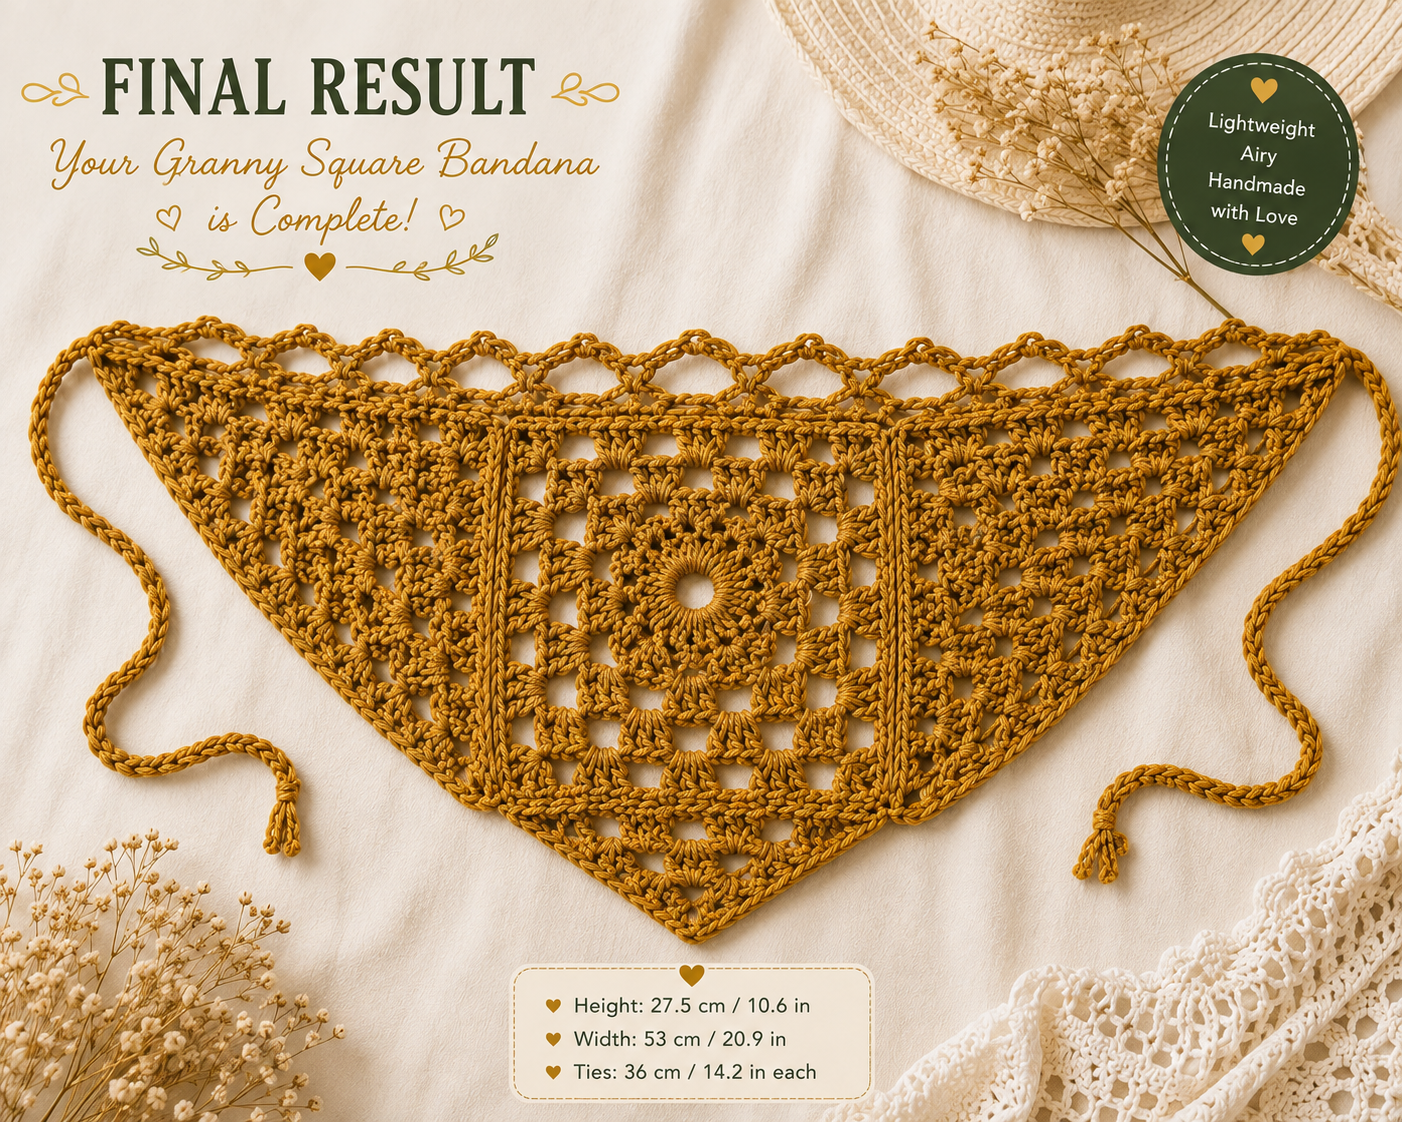
🧶 Free PDF Pattern
: Want to save this pattern for later? I’ve included a FREE printable PDF version at the bottom of this article. Keep reading, then download your copy below!
Warning: this crochet bandana pattern is extremely fun to make. Between the spinning granny square, the two perky little triangles, and a lace edge with enough chain spaces to make a spiderweb jealous, this project keeps things interesting from start to finish. It’s a crochet bandana, sure — but it’s also basically a love letter to everything a granny square can do when you let it show off a little.
Don’t let the round-and-row count intimidate you. Every single stitch is one you already know: chain, slip stitch, single crochet, double crochet, and just a sprinkle of treble crochet for height. This is what makes it such a great easy crochet bandana that doesn’t look easy — simple ingredients, dressed up in a fancy outfit. Grab your hook. Let’s have some fun with this.
Beginner Goal
This one’s for the crafter who’s outgrown their very first granny square and is ready to make it do tricks. If you’ve completed one traditional granny square before, you’re 100% ready — this is more “flex your skills” than “learn from zero.”
Here’s your fun-skills checklist for this project:
- Spinning up a granny square from the center, corners and all
- Making a granny triangle (it’s just a square that never finished growing on two sides)
- Joining pieces with slip stitches through very specific loops, for a seam so clean it practically disappears
- Reading chain-space instructions — crocheting into thin air, basically
- Back-loop-only stitching, for a subtle little rib texture
- A dash of treble crochet at the fancy points
Nothing here is genuinely hard. The only real challenge is staying focused through a lot of rounds — so put on a good podcast, get comfortable, and enjoy the ride.
What You’ll Need
Yarn
The sample bandana was made in a medium weight yarn (the worsted/aran crowd) — a cotton-viscose-linen blend from Sandnes Garn (Line, colorway 9004). One skein is 50 g / 1.76 oz and gives you 110 m / 120 yd, in a 53% cotton, 33% viscose, 14% linen mix.
The whole project ate up about 44 g / 1.55 oz of yarn. The pattern doesn’t hand you a yardage number outright, but doing a little math with the skein’s stats, that’s roughly 95–100 m / 105–110 yd — so yes, one skein gets the job done, with a little leftover to play with. Swapping yarns? Stay in the same weight family with some plant fiber in the blend for that nice drapey lace, and grab a hair more than the minimum just in case.
Hook
4 mm (US G-6)
Notions
- Yarn or tapestry needle
- Scissors
- Measuring tape
Stitches Used (US Terms)
- ch – chain
- sl st – slip stitch
- sc – single crochet
- dc – double crochet
- tr – treble crochet
- ch-sp – chain space (a little gap made of air, made by a chain — you crochet right into the gap)
- sk st – skipped stitch
- blo – back loop only (just the back strand of the stitch — leave the front one alone, and watch a subtle rib texture appear)
Bonus round of terms: the magic ring (adjustable starting loop for both the square and triangles — a chain-loop version is included if magic rings give you trouble), and the front loop (the loop closest to you, which shows up during assembly).
Finished Measurements
One size fits (delightfully) all. Flat, blocked measurements:
- Height: 27.5 cm / 10.6 in
- Width: 53 cm / 20.9 in
- Straps: 36 cm / 14.2 in each
Before You Begin
Quick gauge check before the fun begins: 16 dc and 9 rows should measure 10 x 10 cm / 4 x 4 in in plain double crochet. Bonus check: one finished granny square (through Round 7) should land around 14.5 x 14.5 cm / 5.5 x 5.5 in. If yours is way off, swap hooks — bigger hook, looser gauge; smaller hook, tighter gauge.
Here’s your roadmap:
- Granny square, worked in the round.
- Two matching granny triangles, worked in rows.
- Slip-stitch everything into one shape.
- Lace top edge, three rows.
- Bottom edge plus two long ties, all in one continuous stretch.
- Weave, block, done.
Everything’s written in US crochet terms — this double crochet is the regular US kind, not the taller “treble” from UK patterns.
Step-by-Step Instructions
Part 1: The Granny Square
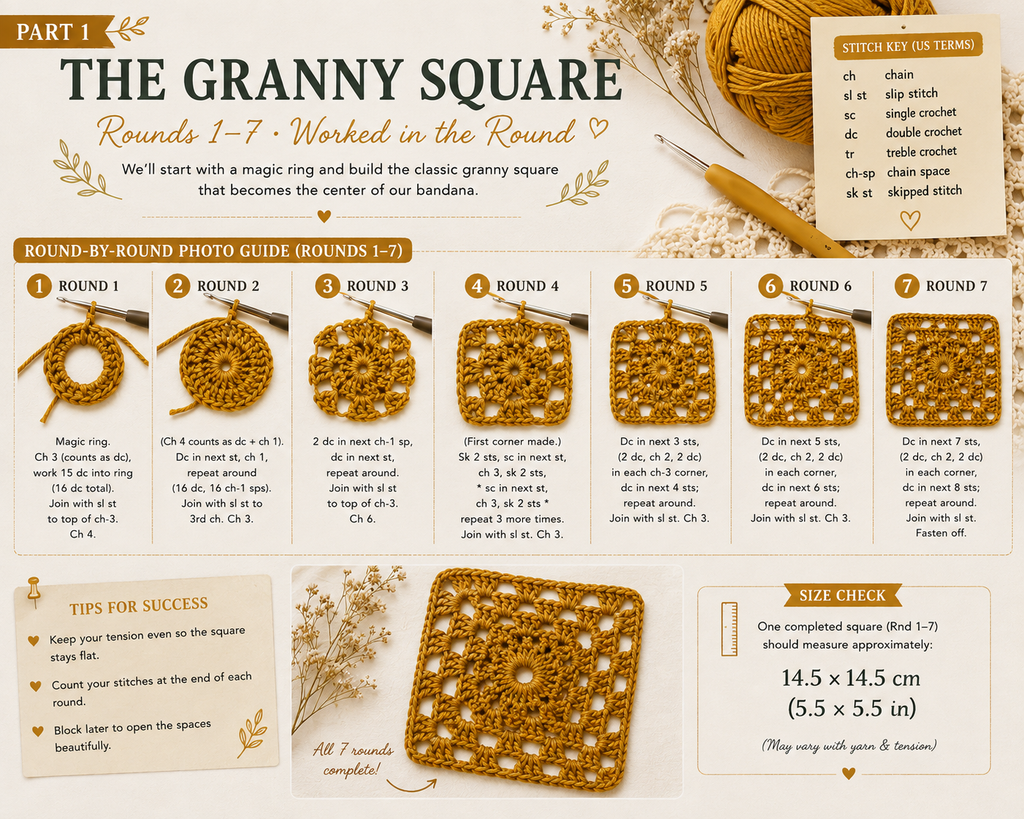
Round 1: Magic ring time! Chain 3 (that’s stitch #1, secretly), then pile in 15 more double crochets for 16 total. Slip stitch into the top of your chain-3 to close it up, then chain 4 to launch into Round 2.
Not feeling the magic ring? Totally fine — slip knot, chain 4, slip stitch into that first chain to make a loop, and work Round 1 into that instead.
Round 2: That chain-4 is secretly a double crochet plus a chain-1 space (sneaky, right?). Double crochet into the next stitch, chain 1, and repeat that combo all the way around — you’ll end up with 16 dc-and-chain-1 pairs. Slip stitch into the 3rd chain of your chain-4, then chain 3.
Round 3: Two double crochets into the next chain-1 space, one double crochet into the next stitch — rinse and repeat around the whole circle. Join with a slip stitch to your chain-3, then chain 6.
Round 4: That chain-6 becomes your very first corner. Skip 2 stitches, single crochet into the next, chain 3 — do that three more times to finish the side. Corner move: chain 6, skip 2, single crochet. Work your way around all four sides and corners this way, join into that first corner space, and chain 3.
Round 5: Chain 3 (dc #1), then 4 more double crochets, a chain-3, and 5 more double crochets — all piled into that same corner space. This little shell is what gives the square its pointy corners. Single crochet into the next space (working under last round’s chain-3). Seven double crochets into the following space, single crochet into the next. Repeat that shell-and-side combo all the way around. Join to your chain-3, then chain 8.
Round 6: Chain-8 is doing double duty as a dc plus a chain-5. Corner move: single crochet, chain 3, single crochet, chain 5. Skip 5 stitches, double crochet into the single crochet from Round 5, chain 3. Single crochet into the 4th stitch of that 7-dc group. Chain 3, skip 3 double crochets, double crochet into the sc from Round 5, chain 5. Repeat the corner move, keep the rhythm going all the way around, and finish with a single crochet into the 4th stitch of your last 7-dc group, then chain 3. Join into the 3rd chain of your chain-8, slip stitch into the next space, chain 3.
Round 7: Chain 3, then 4 more double crochets into that same space (5 dc, all together now). Corner: 3 dc, chain 3, 3 dc. Five double crochets into the next space, 3 double crochets into each of the next two spaces, 5 double crochets after that. Repeat the corner, keep going all the way around. Join, cut your yarn, leave about a 10 cm / 4 in tail.
(Photo moment: your finished granny square, all seven rounds of glory.)
Look at that — one granny square, officially crushed.
Part 2: The Granny Triangles (Two of These, Please)
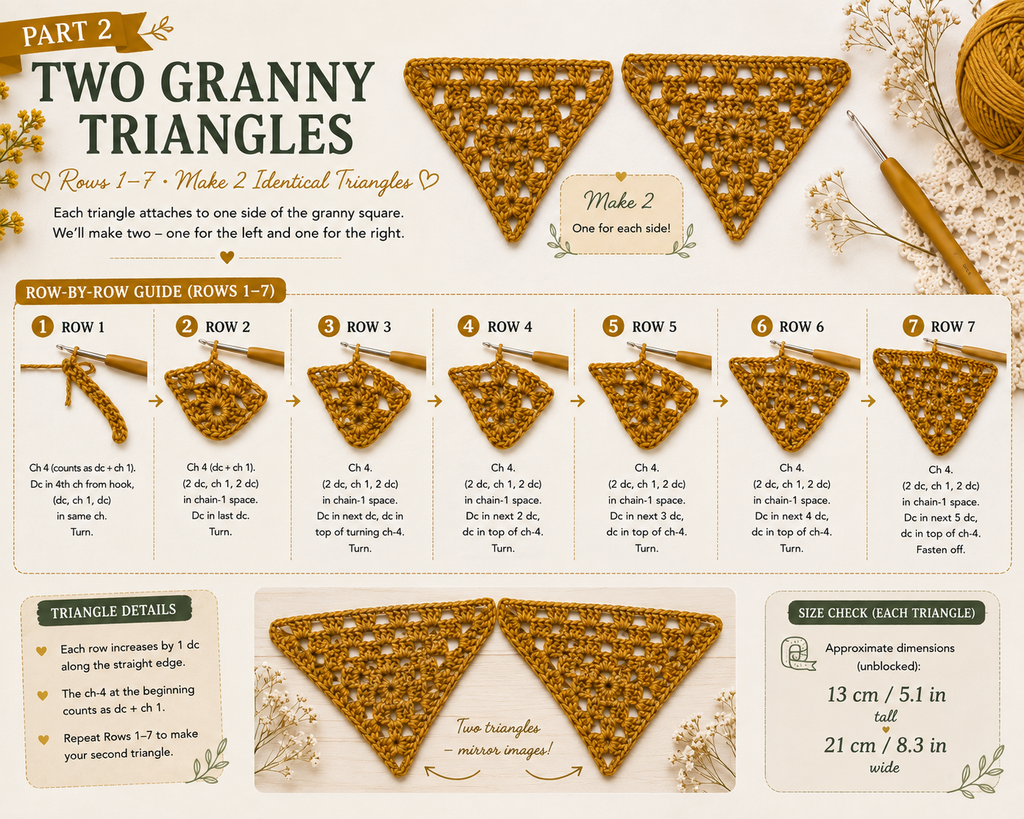
Same stitch vocabulary as the square, just worked in rows instead of rounds. You need two identical triangles, so knock them out back to back while it’s fresh in your head.
Row 1: Magic ring, chain 3 (dc #1), 7 more double crochets into the ring for 8 total. Close it up, chain 4, turn.
Fun fact: turning your work the same direction every row keeps the edge looking crisp. Small habit, big payoff.
Row 2: Chain-4 = dc plus chain-1. Double crochet into the next stitch, chain 1, repeat across until you’ve got 8 pairs. Chain 3, turn.
Row 3: Two double crochets into the next chain-1 space, one double crochet into the next stitch, alternating across the row. Chain 6, turn.
Row 4: Skip 2, single crochet, then “chain 3, skip 2, single crochet” two more times. Chain 3, skip 1, and pack single crochet, chain 6, single crochet into that top center stitch — hello, triangle peak! Chain 3, skip 1, single crochet, then mirror it: “chain 3, skip 2, single crochet” twice more. Finish with chain 6, skip 2, slip stitch into the start of Row 3’s turning chain. Chain 4, turn.
Row 5: Chain 4 (tr #1), 1 more treble crochet plus 4 double crochets into the same space. Single crochet into the next space. Seven double crochets into the following space, single crochet into the next. Top space gets 3 dc, chain 3, 3 dc — shaping that cute little peak. Single crochet, then mirror the whole thing on the flip side. Last space: 4 dc, 2 tr. Chain 8, turn.
Row 6: Skip 2, single crochet into the 3rd stitch. Chain 3, skip 3, double crochet into the sc from Row 5. Chain 3, skip 3, single crochet into the 4th stitch of the 7-dc group. Chain 3, skip 3, double crochet into the sc from Row 5, chain 5. Top space: single crochet, chain 3, single crochet, chain 5. Mirror it, ending with a single crochet into the 3rd stitch. Chain 5, one double crochet into the last space (right before Row 5’s turning chains). Chain 4, turn.
Row 7: Chain 4 (tr #1), 1 more treble crochet plus 4 double crochets into the same space. Four double crochets into the next space, 3 double crochets into each of the next two spaces, 5 double crochets after that. Top space: 3 dc, chain 4, 3 dc. Mirror it on the second side. Last space: 4 dc, 2 tr. Cut your yarn, leave a 10 cm / 4 in tail.
(Photo moment: your finished triangle, standing proud.)
Now make triangle #2, exactly the same way. Twinsies!
Part 3: A Quick End-Weaving Interlude
Before anything gets joined, weave in every loose tail hanging off the square and both triangles. Thread each one onto a needle, stitch it through a few nearby stitches in a couple of different directions, and call it secured. So much easier now than after everything’s stitched together — future you says thanks.
Part 4: Assembly Time — Let’s Make This One Piece
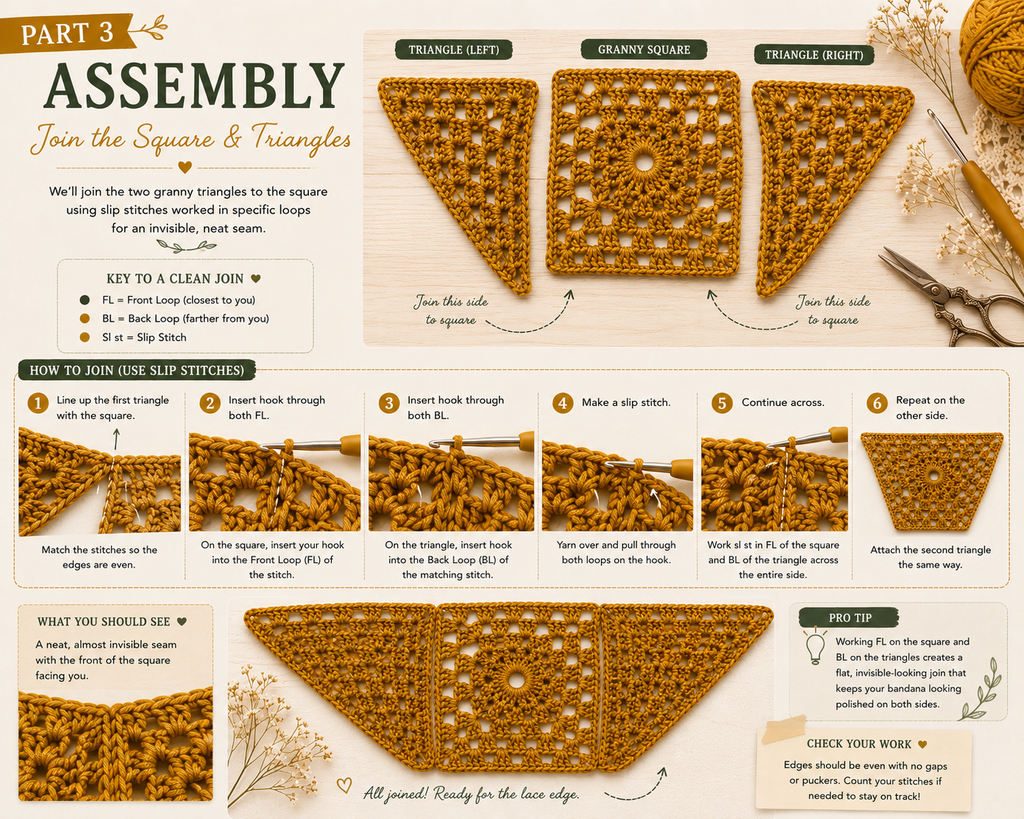
This is the fun part where three separate shapes officially become a bandana, all thanks to slip stitches worked through very specific loops.
- Knot your yarn into the top space of a triangle, slip stitch into that space to anchor it.
- Lay the square against the triangle, right sides facing each other.
- Slip stitch along the edge — front loop of the square, back loop of the triangle — all the way to the last stitch.
- Land your final slip stitch in the square’s corner space, lined up with the last stitch before the triangle’s corner space.
- Bring in triangle #2, positioned against the square’s other side the same way, right sides together.
- Slip stitch the two triangles’ corner spaces together.
- Slip stitch along the square’s remaining side — same combo, front loop of square, back loop of triangle.
- Slip stitch into the corner space, chain 1, cut your yarn, leave a 10 cm / 4 in tail.
That front-loop-back-loop trick is basically seam magic — it’s why the join looks so invisible from the front.
(Photo moment: your assembled piece, right side up, looking very official.)
Part 5: The Top Edge (Where the Lace Really Shows Off)
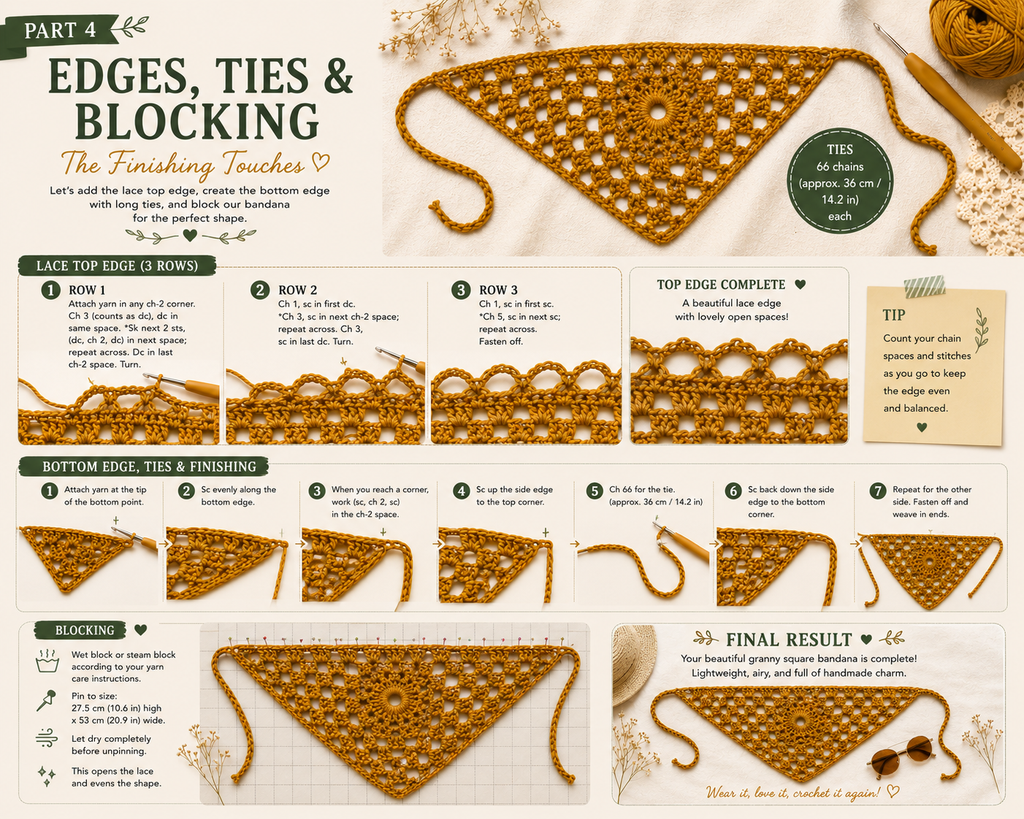
Three rows, worked directly onto your assembled piece, giving the top of the bandana that gorgeous scalloped edge.
Row 1: Right side facing you, knot into the right corner space. Chain 4 (tr #1), 1 more treble crochet into that space. Double crochet across until you hit the seam where a triangle meets the square — 2 dc into the triangle’s top space, 2 dc into the square’s corner space. Keep double crocheting until you reach the very top point of the bandana: 2 dc, chain 3, 2 dc into that space. Mirror it all down the other side. Last stitch: 2 treble crochets. Chain 8, turn.
Row 2: Skip 2, single crochet. Repeat “chain 5, skip 2, single crochet” 16 times, chain 5. Top space: single crochet, chain 4, single crochet, chain 5. Mirror it — skip 2, single crochet, “chain 5, skip 2, single crochet” 16 times, chain 5. Finish with one double crochet in the last stitch. Chain 4, turn.
Row 3: Chain 4 (tr #1), 1 more treble crochet plus 5 double crochets into that space. Single crochet into the next space. Repeat “5 dc into the next space, single crochet into the one after” across until you hit the top space, then 3 dc, chain 3, 3 dc there. Mirror it down the second half. Last space: 5 dc, 2 tr.
Chain 1, then rotate — don’t turn! Just spin your piece in place, keep the right side facing you, and flow straight into the bottom edge.
Part 6: The Bottom Edge and Those Fabulous Ties
Single crochet plus back-loop-only slip stitches, capped off with two seriously long chained ties.
Without turning: 3 single crochets into the first space (under the last row). Three single crochets into each of the next 6 spaces. Two single crochets into each of the next 3 spaces. One single crochet into the triangle’s magic-ring center. Two single crochets into each of the next 3 spaces, 3 single crochets into each of the next 4 spaces. Where a triangle meets the square, 2 double crochets. Repeat the whole sequence down the second side.
First strap: chain 66 at the end of the row. Slip stitch through the back loop only into the 2nd chain from your hook, then keep going in the back loop only down the rest of the chain.
Once that strap’s finished, keep moving along the bottom edge — single crochet through both loops this time, to the end of the row.
Second strap: chain another 66. Back loop only again, starting at the 2nd chain from the hook, all the way down.
Slip stitch into that very first single crochet on this row to close the loop. Cut your yarn, leave a 10 cm / 4 in tail.
(Photo moment: a close-up of one strap, showing off that ribbed texture.)
Back-loop-only is what gives those ties their subtle little cord look — small detail, big payoff.
Helpful Tips
- Stitch markers = your corner-tracking sidekicks, especially Rounds 4–7. Clip one into every corner space.
- Round 4 is sneaky — finish the whole side sequence before you commit to a corner, or you’ll be ripping back.
- Swatch first! This pattern has exact finished measurements, so gauge actually matters here.
- Wind off plenty of yarn before each strap — that chain-66-plus-slip-stitch combo eats yardage fast.
- Not vibing with magic rings? The chain-4 loop trick from Round 1 works for the triangles too.
- 44 g out of a 50 g skein means you’re golden with one skein, plus a little extra.
Common Mistakes to Avoid
- Losing count of chain spaces — Rounds 5–6 and the top-edge rows stack up a lot of similar-looking spaces in a row.
- Forgetting your starting chain counts as a stitch (it’s sneaky like that).
- Mixing up “turn” and “rotate” — only Top Edge Row 3 wants a rotate, everything else wants a turn.
- Working both loops when the pattern wants back loop only — this one really shows on the straps.
- Swapping the front-loop/back-loop combo during assembly — still joins, just not as invisibly.
- Cutting your tails too short to comfortably weave in.
Finishing
Chase down every last loose end and weave it in — a few stitches, a couple of direction changes, and you’re locked in tight.
Blocking
This is not a skippable step, friends. Wash or steam per your yarn’s care label, pin it out to 27.5 cm / 10.6 in tall by 53 cm / 20.9 in wide, and let it dry completely before unpinning.
(Photo moment: the finished, blocked bandana in all its lacy glory.)
Blocking is basically a magic trick for lace — it evens out your tension and opens up every single chain space so the whole thing reads clearly.
Final Thoughts
Three pieces, one bandana, and a whole lot of satisfying stitch-counting along the way. This crochet bandana pattern is proof that “simple stitches” and “impressive finished project” aren’t mutually exclusive — you just need seven rounds, fourteen rows, and a little patience. Take it section by section, keep your stitch markers close, and enjoy watching it all click into place.
Loved this one? Try it in a bold solid color for major graphic energy, or a variegated yarn to let the lace really sparkle.
🧶 Download the FREE Crochet Bandana PDF
Loved this pattern? Get the free printable PDF so you can save it, print it, and follow the pattern anytime.
Enter your email below and I’ll send the PDF straight to your inbox.