🧶 Free PDF Pattern:
Want to save this pattern for later? I’ve included a FREE printable PDF version at the bottom of this article. Keep reading, then download your copy below!
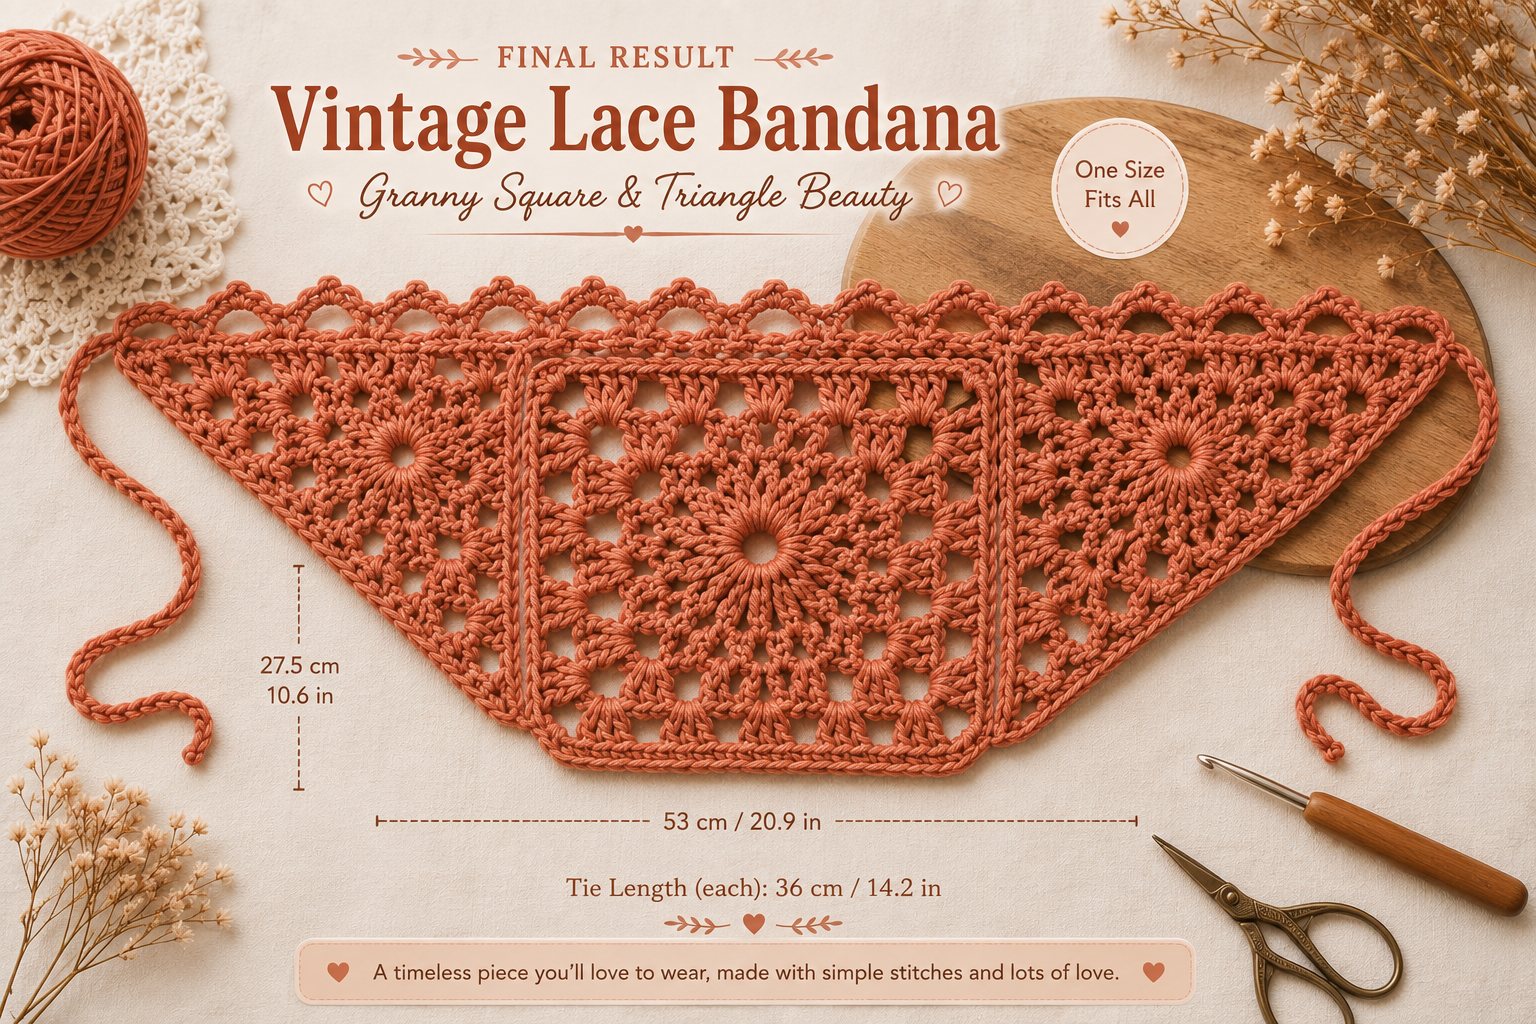
Some crochet bandana patterns aim for speed. This one aims for texture. Built from a single granny square flanked by two granny triangles, then finished in a cascade of open lace and long crocheted ties, this design draws on the vintage charm of traditional granny motifs while landing somewhere entirely modern — a crochet headscarf pattern with real architectural interest.
The construction itself is refreshingly approachable: chain, slip stitch, single crochet, double crochet, and a measure of treble crochet carry the entire piece. What elevates this beyond an easy crochet bandana is not stitch difficulty but structure — seven rounds to shape the square, seven mirrored rows to shape each triangle, a precise assembly sequence, and a lace border built in careful stages. The guide below walks through each stage in full, with particular attention to the handful of techniques — loop-specific joins, back-loop-only ribbing, a rotate-rather-than-turn transition — that separate this pattern from a beginner’s first granny square.
Beginner Goal
This pattern sits just beyond true beginner territory. Anyone who has completed a standard granny square has the foundation needed to succeed here; anyone attempting their very first crochet project may find the volume of rounds and rows more than they’d like to manage on a debut piece.
Working through this design builds fluency in:
- Constructing a granny square from a central ring outward, including corner shaping via shell stitches
- Crocheting a mirrored granny triangle in turned rows
- Joining separate motifs invisibly, using slip stitches worked through specific loops
- Interpreting chain-space instructions, where the working stitch lands in an open gap rather than atop a stitch
- Executing back-loop-only crochet for a raised, corded finish
- Introducing treble crochet at key structural points
Individually, none of these techniques demand advanced skill. Collectively, they demand attention — precise counting, careful tracking of corners, and a willingness to move at an unhurried pace.
What You’ll Need
Yarn
The original piece was worked in a medium weight yarn — the broad category encompassing most worsted and aran-weight yarns — specifically a cotton-viscose-linen blend from Sandnes Garn (Line, colorway 9004), sold in 50 g / 1.76 oz skeins yielding 110 m / 120 yd each, with a fiber composition of 53% cotton, 33% viscose, and 14% linen.
Total consumption came to approximately 44 g / 1.55 oz. The source pattern does not specify yardage directly, though calculated from the skein’s stated length, this equates to roughly 95–100 m / 105–110 yd — well within a single skein. Those substituting yarn should seek a comparable weight with some plant-fiber content, as this contributes meaningfully to the finished lace’s drape and structure. A modest surplus beyond the calculated minimum is advisable, to accommodate variation in individual tension.
Hook
4 mm (US G-6)
Notions
- Yarn or tapestry needle
- Scissors
- Measuring tape
Stitches Used (US Terms)
- ch – chain
- sl st – slip stitch
- sc – single crochet
- dc – double crochet
- tr – treble crochet
- ch-sp – chain space, the open gap formed by a length of chain, frequently used as a working point in place of a stitch
- sk st – skipped stitch
- blo – back loop only, in which only the rear strand of a stitch is worked, producing a raised, corded texture
Two additional techniques appear throughout, though neither is formally abbreviated: the magic ring, an adjustable loop that opens both the square and each triangle (a chain-loop alternative is provided for those who prefer it), and the front loop, referenced specifically during the assembly stage as the loop nearest the crocheter.
Finished Measurements
A one-size pattern. Measured flat, following blocking:
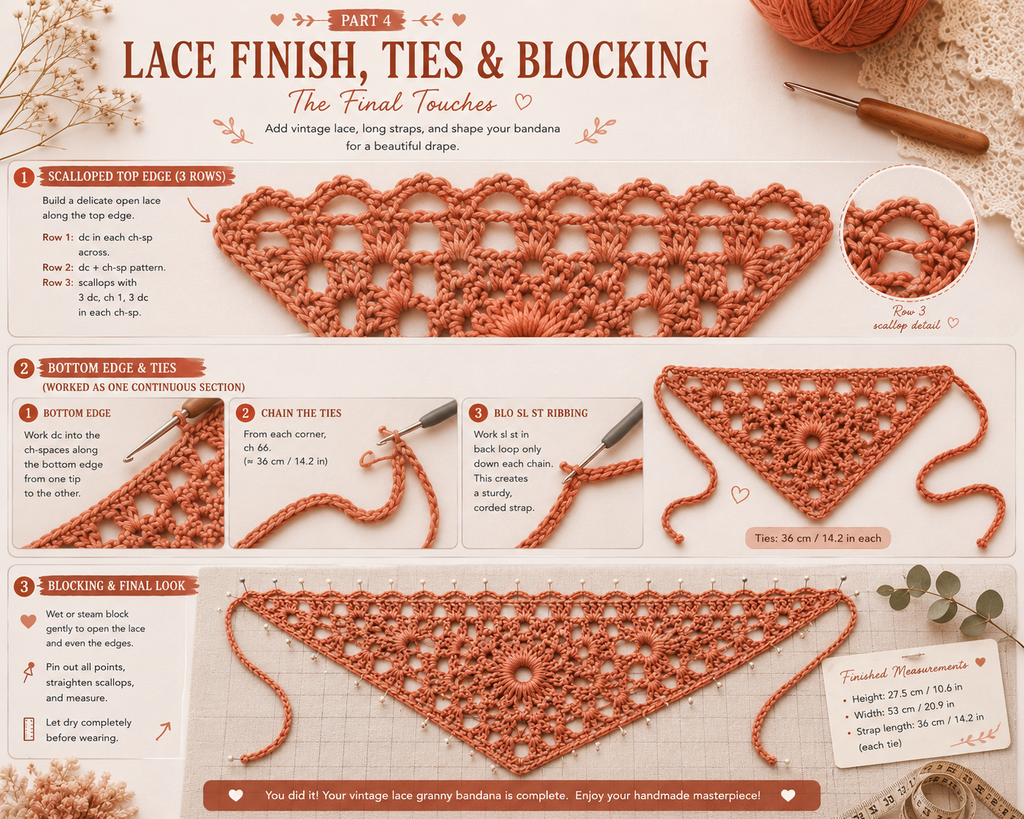
- Height: 27.5 cm / 10.6 in
- Width: 53 cm / 20.9 in
- Strap length: 36 cm / 14.2 in, each tie
Before You Begin
Establishing Gauge
Given the pattern’s fixed finished measurements, establishing gauge in advance is worthwhile. The target is 16 double crochets by 9 rows across 10 x 10 cm / 4 x 4 in of plain double crochet fabric. As a secondary reference point, one completed granny square (through Round 7) should measure approximately 14.5 x 14.5 cm / 5.5 x 5.5 in. Significant deviation in either direction warrants a hook adjustment before proceeding — a larger hook loosens the resulting gauge, a smaller one tightens it.
Construction Sequence
The piece assembles in six broad stages:
- One granny square, worked in the round.
- Two matching granny triangles, worked in turned rows.
- Assembly of the square and both triangles into a single form, via slip stitch.
- A three-row lace border along the top edge.
- A bottom edge and two long chained ties, completed as one continuous section.
- Weaving in ends and blocking.
Throughout, the pattern employs US crochet terminology — the double crochet referenced here corresponds to the standard US double crochet, not the taller stitch termed “treble” in UK conventions.
Step-by-Step Instructions
Part 1: The Granny Square
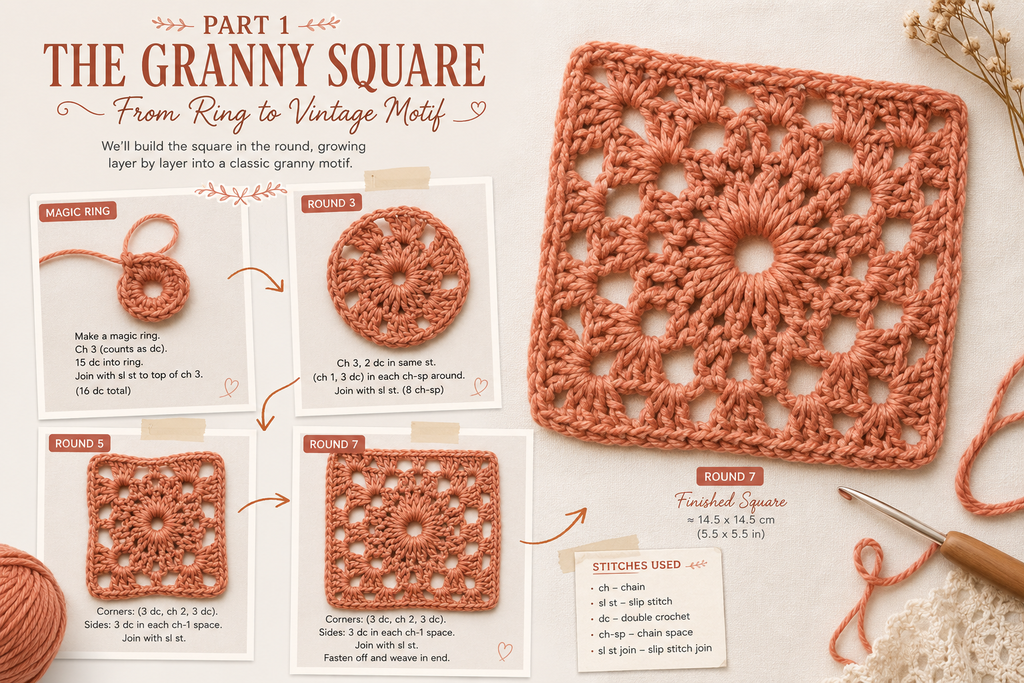
Round 1: Begin with a magic ring. Chain 3, standing in for the first double crochet, then work 15 additional double crochets into the ring, arriving at 16 stitches total. Close the round with a slip stitch into the top of the initial chain-3, then chain 4 in preparation for Round 2.
For those forgoing the magic ring: form a slip knot, chain 4, and join into a loop via a slip stitch worked into the first chain. Round 1 proceeds into this chain ring in place of the magic ring.
Round 2: The chain-4 stands in for a double crochet plus a chain-1 space. Work a double crochet into the next stitch, followed by a chain-1, repeating this pairing into every stitch around the circle. The round concludes with 16 double crochet-and-chain-1 groupings. Join via slip stitch into the 3rd chain of the starting chain-4, then chain 3.
Round 3: Work 2 double crochets into the next chain-1 space, followed by 1 double crochet into the subsequent stitch. Continue this alternating pattern — 2 double crochets in the space, 1 in the stitch — around the full circle. Join with a slip stitch to the top of the beginning chain-3, then chain 6.
Round 4: The chain-6 establishes the first corner space. Skip 2 stitches and work a single crochet into the third, followed by a chain-3. Repeat this sequence — chain-3, skip 2 stitches, single crochet — three additional times to complete the side. At the corner: chain 6, skip 2 stitches, single crochet. This pattern continues around all four sides and corners; join with a slip stitch into the first corner space established, then chain 3.
Round 5: Chain 3 to open as the first double crochet, followed by 4 additional double crochets, a chain-3, and 5 further double crochets, all worked into that same corner space — together forming the shell that defines each point of the square. Work a single crochet into the following space, working beneath the chain-3 established in Round 4. Seven double crochets follow in the next space, then a single crochet in the space beyond. This corner-shell-and-side sequence repeats at each remaining corner. Join with a slip stitch to the top of the starting chain-3, then chain 8.
Round 6: The chain-8 stands in for a double crochet plus a chain-5 space. At the corner: single crochet, chain 3, single crochet, chain 5. Skip the following 5 stitches, then work a double crochet into the single crochet established in Round 5, followed by a chain-3. Work a single crochet into the 4th stitch of the 7-double-crochet grouping. Chain 3, skip 3 double crochets, and work a double crochet into the single crochet from Round 5, followed by a chain-5. The corner sequence — single crochet, chain 3, single crochet, chain 5 — repeats, continuing this rhythm around the entire round and concluding with a single crochet into the 4th stitch of the final 7-double-crochet grouping, then a chain-3. Join with a slip stitch into the 3rd chain of the starting chain-8, followed by a further slip stitch into the next space, then chain 3.
Round 7: Chain 3 to open as the first double crochet, followed by 4 additional double crochets into that same space, for 5 total. At the corner space: 3 double crochets, chain 3, 3 double crochets. Five double crochets follow in the next space, then 3 double crochets in each of the following two spaces, then 5 double crochets in the space beyond. The corner shell repeats at the next corner, and this sequence continues around the entirety of the square. Join with a slip stitch to the top of the beginning chain-3. Cut the yarn, leaving a tail of approximately 10 cm / 4 in for later weaving.
(A photograph of the completed granny square, all seven rounds finished, belongs here.)
The granny square is now complete.
Part 2: The Granny Triangles (Two Required)
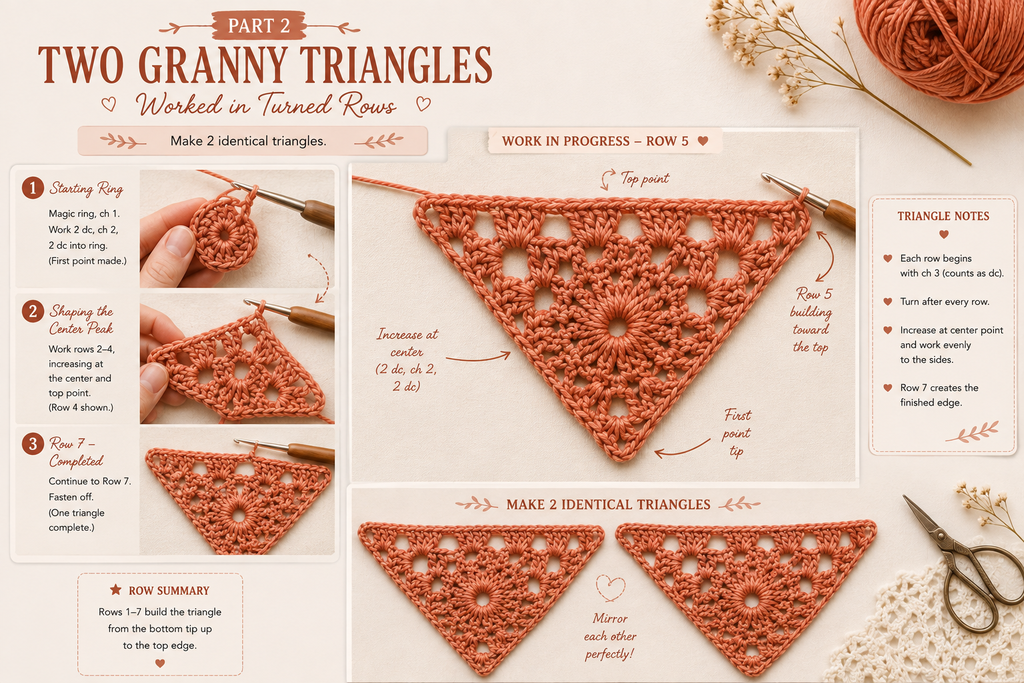
The triangles employ the same repertoire of stitches as the square, though worked in turned rows rather than in the round. Two identical pieces are required for assembly.
Row 1: Begin with a magic ring. Chain 3, standing in for the first double crochet, then work 7 additional double crochets into the ring, for 8 total. Close the ring, chain 4, and turn.
A note on technique: turning the work in a consistent direction, row after row, preserves a neat, even finished edge.
Row 2: The chain-4 stands in for a double crochet plus a chain-1 space. Work a double crochet into the next stitch, followed by a chain-1, repeating across the row until 8 such groupings are established. Chain 3 and turn.
Row 3: Work 2 double crochets into the next chain-1 space, followed by 1 double crochet into the subsequent stitch, alternating this pairing across the row. Chain 6 and turn.
Row 4: Skip 2 stitches and work a single crochet into the third. Repeat the sequence — chain-3, skip 2 stitches, single crochet — two additional times. Chain 3, skip 1 stitch, then work a single crochet, chain-6, single crochet into the top center stitch, establishing the triangle’s peak. Chain 3, skip 1 stitch, single crochet, then mirror the earlier sequence — chain-3, skip 2 stitches, single crochet — twice more. Conclude with chain 6, skip 2 stitches, and a slip stitch into the origin of Row 3’s turning chain. Chain 4 and turn.
Row 5: The chain-4 stands in for the first treble crochet. Work an additional treble crochet and 4 double crochets into that same space. Single crochet into the next space. Seven double crochets follow in the subsequent space, then a single crochet in the space beyond. Into the top center space: 3 double crochets, chain 3, 3 double crochets, shaping the triangle’s point. A single crochet follows, and the entire sequence mirrors down the row’s second half. The final space receives 4 double crochets and 2 treble crochets. Chain 8 and turn.
Row 6: Skip 2 stitches and single crochet into the third. Chain 3, skip 3 stitches, work a double crochet into the single crochet established in Row 5. Chain 3, skip 3 stitches, single crochet into the 4th stitch of the 7-double-crochet grouping. Chain 3, skip 3 stitches, double crochet into the single crochet from Row 5, followed by a chain-5. Into the top space: single crochet, chain 3, single crochet, chain 5. This sequence mirrors down the second half, concluding with a single crochet into the third stitch. Chain 5, then a single double crochet into the last space, immediately preceding Row 5’s turning chains. Chain 4 and turn.
Row 7: The chain-4 stands in for the first treble crochet. Work an additional treble crochet and 4 double crochets into that same space. Four double crochets follow in the next space, then 3 double crochets in each of the following two spaces, then 5 double crochets in the space beyond. Into the top center space: 3 double crochets, chain 4, 3 double crochets. The sequence mirrors down the second half. The final space receives 4 double crochets and 2 treble crochets. Cut the yarn, leaving a tail of approximately 10 cm / 4 in.
(A photograph of the completed triangle motif belongs here.)
Repeat Rows 1 through 7 to produce a second, identical triangle.
Part 3: Securing Loose Ends Prior to Assembly
Before joining the pieces, weave in every loose yarn tail on the square and both triangles. Draw each tail through a yarn needle and pass it through several nearby stitches, altering direction once or twice, to ensure it is fully secured. This step proves considerably more manageable while the three pieces remain separate.
Part 4: Assembling the Square and Triangles
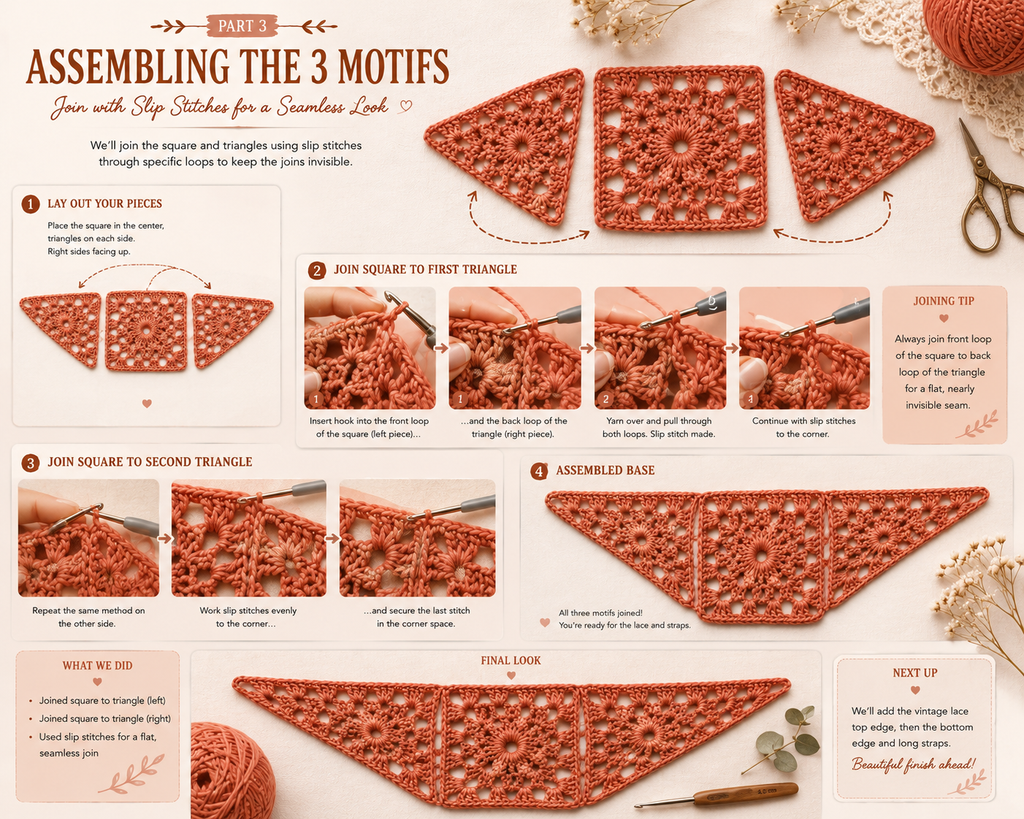
The square and both triangles unite into a single form via slip stitches worked through specific loops, yielding a seam that reads as nearly invisible on the right side. Proceed as follows:
- Secure the yarn with a knot in the top space of one triangle, then work a slip stitch into that space to anchor it.
- Position the square against the triangle, right sides together.
- Slip stitch along the edge, working through the front loop of the square and the back loop of the triangle, continuing to the final stitch of that side.
- Place the concluding slip stitch into the square’s corner space, aligned with the final stitch preceding the triangle’s corner space.
- Position the second triangle against the opposite side of the square, right sides together.
- Join the corner spaces of the two triangles with a slip stitch.
- Continue along the square’s remaining side in the same manner — front loop of the square, back loop of the second triangle.
- Conclude with a slip stitch into the corner space, chain 1, and cut the yarn, leaving a tail of approximately 10 cm / 4 in.
The front-loop, back-loop combination is precisely what renders this seam so unobtrusive on the finished piece’s right side.
(A photograph of the assembled piece, right side facing up, belongs here.)
Part 5: The Top Edge
Worked directly onto the assembled piece across three rows, this edge establishes the bandana’s scalloped, lace-trimmed silhouette.
Row 1: With the right side facing, secure the yarn with a knot into the right corner space. Chain 4, standing in for a treble crochet, then work an additional treble crochet into the same space. Double crochet across each stitch until reaching the point where a triangle meets the square: work 2 double crochets into the triangle’s top space, then 2 double crochets into the square’s corner space. Continue with a double crochet into each stitch until reaching the bandana’s top center point, working 2 double crochets, chain 3, 2 double crochets into that space. The entire sequence mirrors down the opposite side. The final stitch receives 2 treble crochets. Chain 8 and turn.
Row 2: Skip 2 stitches and single crochet into the next. Repeat “chain 5, skip 2 stitches, single crochet” sixteen times, then chain 5. Into the top center space: single crochet, chain 4, single crochet, chain 5. The sequence mirrors down the second side — skip 2 stitches, single crochet, then “chain 5, skip 2 stitches, single crochet” repeated sixteen times, chain 5 once more. Conclude with a double crochet into the final stitch. Chain 4 and turn.
Row 3: Chain 4, standing in for the first treble crochet, then work an additional treble crochet and 5 double crochets into that same space. Single crochet into the next space. Repeat “5 double crochets into the next space, single crochet into the space beyond” across the row until reaching the top space, then work 3 double crochets, chain 3, 3 double crochets into that space. This sequence mirrors down the second half, concluding at the final space with 5 double crochets and 2 treble crochets.
Chain 1, then rotate the work — rather than turning, as in previous rows — to proceed directly into the bottom edge without interrupting the working yarn. Rotation, distinct from turning, involves spinning the piece in place while the right side remains facing the crocheter throughout.
Part 6: The Bottom Edge and Ties
Worked in a single row combining single crochet and back-loop-only slip stitches, this section concludes with two extended chained ties.
Without turning, work 3 single crochets into the first space, beneath the preceding row. Continue with 3 single crochets into each of the following 6 spaces, again working beneath the row below. Two single crochets follow in each of the next 3 spaces, then a single crochet into the triangle’s magic-ring center. Two single crochets follow in each of the subsequent 3 spaces, then 3 single crochets in each of the following 4 spaces. Where a triangle joins the square, work 2 double crochets. This entire sequence repeats along the bandana’s second side.
First strap: At the row’s conclusion, chain 66. Working back along the chain, slip stitch through the back loop only into the 2nd chain from the hook, continuing in the back loop only through each remaining chain.
Upon completing the strap, continue along the bottom edge, working single crochet through both loops of each stitch to the row’s end.
Second strap: At the row’s conclusion, chain a further 66. Slip stitch through the back loop only into the 2nd chain from the hook, continuing through the back loop only along the chain’s full length.
Conclude with a slip stitch into the first single crochet of this row. Cut the yarn, leaving a tail of approximately 10 cm / 4 in.
The back-loop-only technique lends the finished ties a subtly ribbed, corded quality — a refined detail distinguishing them from an ordinary chain.
Helpful Tips
- Mark each corner space, particularly across Rounds 4 through 7 of the square, where multiple similarly sized spaces make miscounting easy.
- Verify the side sequence before advancing to a corner. Round 4, in particular, separates the side pattern from the corner instruction; confirming completion of the former before proceeding to the latter prevents a difficult correction later.
- Establish gauge before beginning. Given the pattern’s fixed finished dimensions, even minor gauge deviation compounds meaningfully across seven rounds.
- Measure sufficient yarn before beginning each strap, as the 66-chain and its accompanying back-loop-only row consume length quickly.
- The chain-ring alternative applies broadly. Though specified only for Round 1 of the square, the chain-and-join method may reasonably substitute for a magic ring wherever one is called for, including the triangles.
- A single skein generally suffices. At approximately 44 g of a 50 g skein, this project fits comfortably within one skein, though a modest reserve is advisable.
Common Mistakes to Avoid
- Miscounting chain spaces, particularly through Rounds 5 and 6 of the square and the top-edge rows, where several similarly proportioned spaces occur in close succession.
- Overlooking that the beginning chain constitutes a stitch. The starting chain-3, chain-4, or chain-8 throughout this pattern stands in for the first double or treble crochet; omitting it, or duplicating it with an additional stitch, disrupts the stitch count for the remainder of the round.
- Conflating “turn” with “rotate.” Every row concludes with a turn instruction save one — the close of Top Edge Row 3 — which calls specifically for rotation. Turning inverts the fabric; rotation spins it while the right side remains visible throughout. Confusing the two misaligns the bottom edge.
- Working through both loops where back loop only is specified, which obscures the ribbed texture intended for the straps and portions of the bottom edge.
- Reversing the front-loop and back-loop assignment during assembly. While the pieces will still join if reversed, the resulting seam will lack the intended flatness and clarity.
- Cutting yarn tails too short to comfortably weave in or rejoin later; a tail of approximately 10 cm / 4 in, as specified throughout, provides adequate working length.
Finishing
With all pieces joined and both straps complete, undertake a final pass through the bandana to weave in any remaining yarn ends. Draw each through a yarn needle and pass it through several nearby stitches, varying direction, to secure it fully against future wear.
Blocking
Given the extensive open lacework throughout this design, blocking meaningfully improves the finished result. Wash or steam the piece according to the yarn label’s care instructions, then pin to the finished measurements — 27.5 cm / 10.6 in in height, 53 cm / 20.9 in in width — allowing it to dry fully before removing the pins. Blocking equalizes tension across the stitches, opens the lace’s chain spaces for clarity, and lends the completed bandana a considerably more refined finish.
(A photograph of the finished, blocked bandana belongs here.)
Final Thoughts
There is a particular satisfaction in observing three independent motifs — one square, two triangles — resolve into a single, cohesive work of lace. This crochet bandana pattern rewards methodical attention over raw technical skill; while no individual stitch presents genuine difficulty, the pattern’s success depends on sustained organization across its many rounds and rows. Approached section by section, with stitch markers deployed as needed, the result is a finished piece that reads as considerably more advanced than its construction actually required.
For those drawn to this design, it offers a strong foundation for further experimentation — a saturated solid color yields a bold, graphic silhouette, while a variegated yarn allows the shifting color to underscore the lace’s considerable texture.
🧶 Download the FREE Crochet Bandana PDF
Loved this pattern? Get the free printable PDF so you can save it, print it, and follow the pattern anytime.
Enter your email below and I’ll send the PDF straight to your inbox.