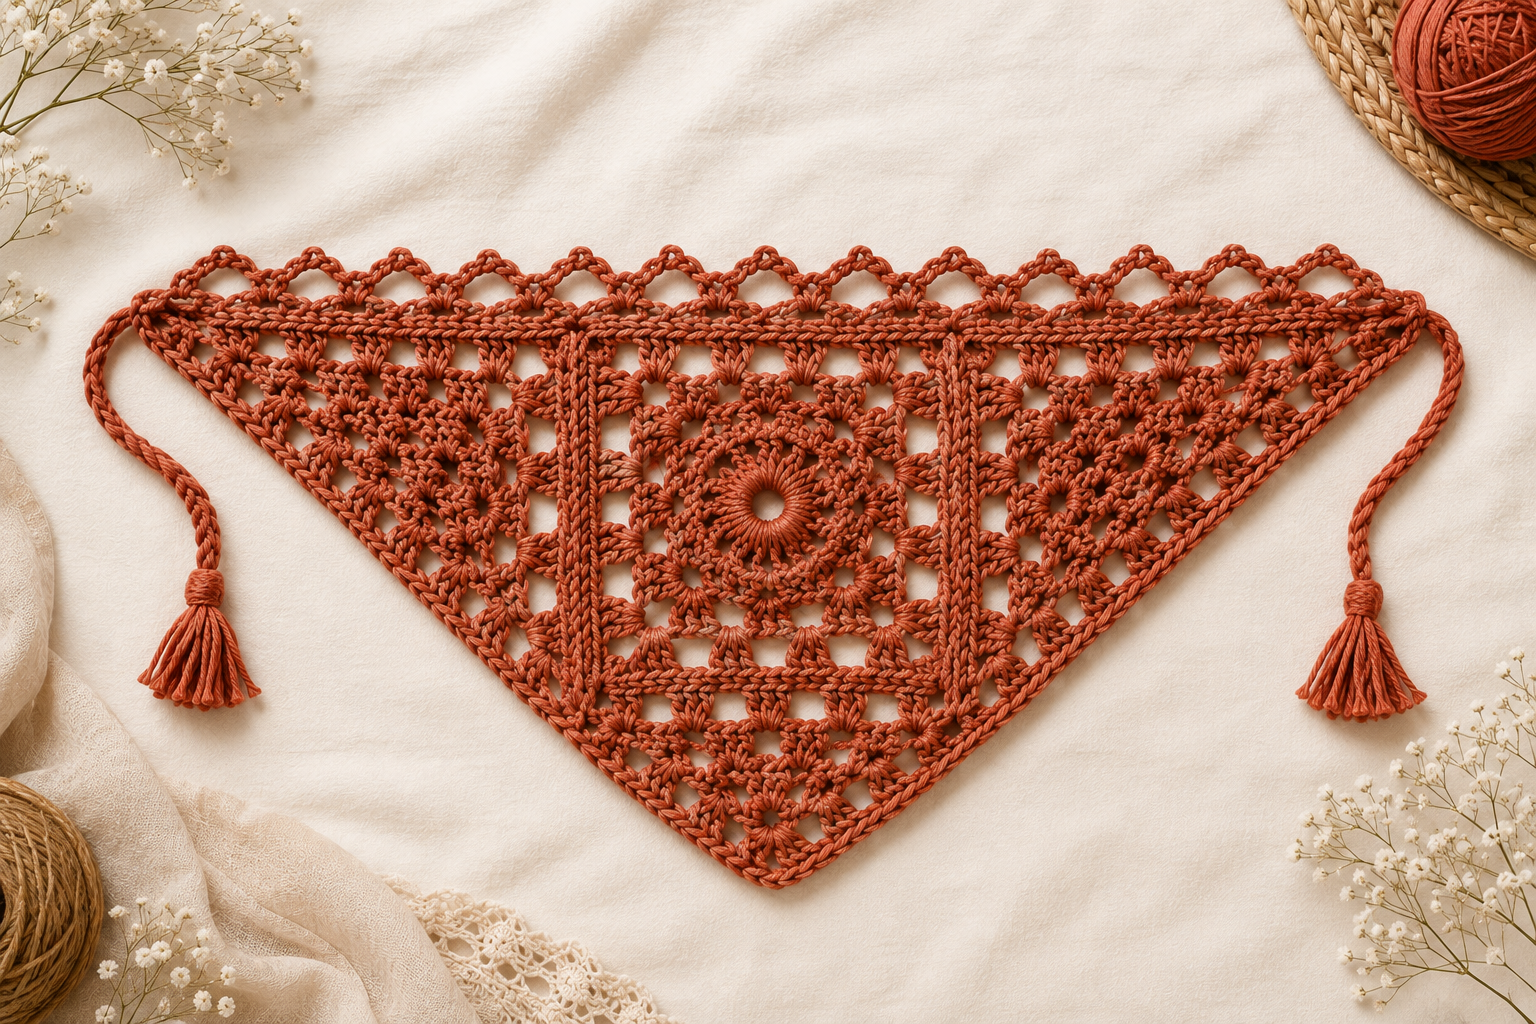
🧶 Free PDF Pattern:
Want to save this pattern for later? I’ve included a FREE printable PDF version at the bottom of this article. Keep reading, then download your copy below!
If this crochet bandana pattern looks intimidating at first glance, take a breath — you can do this. It’s built from one granny square, two granny triangles, a lace top edge, and two long crocheted ties, and yes, that’s a lot of pieces. But every single one of them is built from stitches you already know: chain, slip stitch, single crochet, double crochet, and a little treble crochet. Nothing new to learn from scratch here — just familiar stitches, arranged in a new order.
This guide walks you through every round and row, step by step, so you’re never stuck wondering what comes next. If you’ve made it through one granny square before, you already have proof that you can do this kind of project. This is just that same skill, given room to grow a little further.
Beginner Goal
Here’s the honest truth: this pattern asks more of you than a first-ever project would, simply because there’s a lot of it. But “a lot of steps” and “hard steps” are two very different things — and this pattern is mostly the first one. If you’ve completed a traditional granny square before, you are ready for this. Truly.
Here’s what you’ll build confidence in as you go:
- Working a granny square from the center out, corners and all — you’ve basically done this before
- Crocheting a granny triangle in turned rows — same skills, new shape
- Joining pieces together with slip stitches through specific loops — new, but very learnable
- Reading chain-space instructions, where you crochet into a gap instead of a stitch
- Working in the back loop only, for a nice textured detail
- A bit of treble crochet, which is really just one more step than a double crochet
You don’t need to feel confident about all of this before you start. You just need to be willing to go one round at a time. Confidence comes from doing it, not from feeling ready first.
What You’ll Need
Yarn
The sample was made in a medium weight yarn (worsted or aran weight both work) — a cotton-viscose-linen blend from Sandnes Garn (Line, colorway 9004), which comes in 50 g / 1.76 oz skeins with 110 m / 120 yd each, in a 53% cotton, 33% viscose, 14% linen blend.
The whole project used about 44 g / 1.55 oz — the pattern doesn’t give an exact yardage, but based on the skein’s numbers, that’s roughly 95–100 m / 105–110 yd. Good news: that means one skein will cover the whole thing, with a bit left over, so you don’t need to worry about running out partway through. If you’re using a different yarn, just match the weight and pick something with a bit of plant fiber in it, and grab slightly more than you think you’ll need — there’s no shame in a little insurance yarn.
Hook
4 mm (US G-6)
Notions
- Yarn or tapestry needle
- Scissors
- Measuring tape
Stitches Used (US Terms)
You’ve got this — here’s everything you’ll need:
- ch – chain
- sl st – slip stitch
- sc – single crochet
- dc – double crochet
- tr – treble crochet
- ch-sp – chain space (crocheting into the open gap a chain leaves — it feels strange the first time, totally normal after that)
- sk st – skipped stitch
- blo – back loop only (just the back strand of the stitch — it’s a small change that makes a noticeable difference in texture)
Two more terms you’ll want to know: the magic ring (the adjustable loop you’ll use to start both the square and the triangles — a chain-loop alternative is included if you’d rather not use one), and the front loop (which comes up during assembly).
Finished Measurements
One size — no sizing decisions to stress over. Measured flat, after blocking:
- Height: 27.5 cm / 10.6 in
- Width: 53 cm / 20.9 in
- Strap length: 36 cm / 14.2 in, each
Before You Begin
Before you dive in, take a few minutes to check your gauge — 16 double crochets and 9 rows should measure 10 x 10 cm / 4 x 4 in in plain double crochet. As a second check, one finished granny square (through Round 7) should measure about 14.5 x 14.5 cm / 5.5 x 5.5 in. If yours is off, that’s not a failure — it just means trying a different hook size before you commit to the whole project.
Here’s your roadmap, so you always know where you are:
- Crochet the granny square, in the round.
- Crochet two matching granny triangles, in turned rows.
- Join the square and both triangles into one piece.
- Add a three-row lace edge along the top.
- Add the bottom edge and two long ties.
- Weave in your ends and block.
Everything here uses US crochet terms — the same double crochet you’d find in any US pattern.
Step-by-Step Instructions
Part 1: The Granny Square
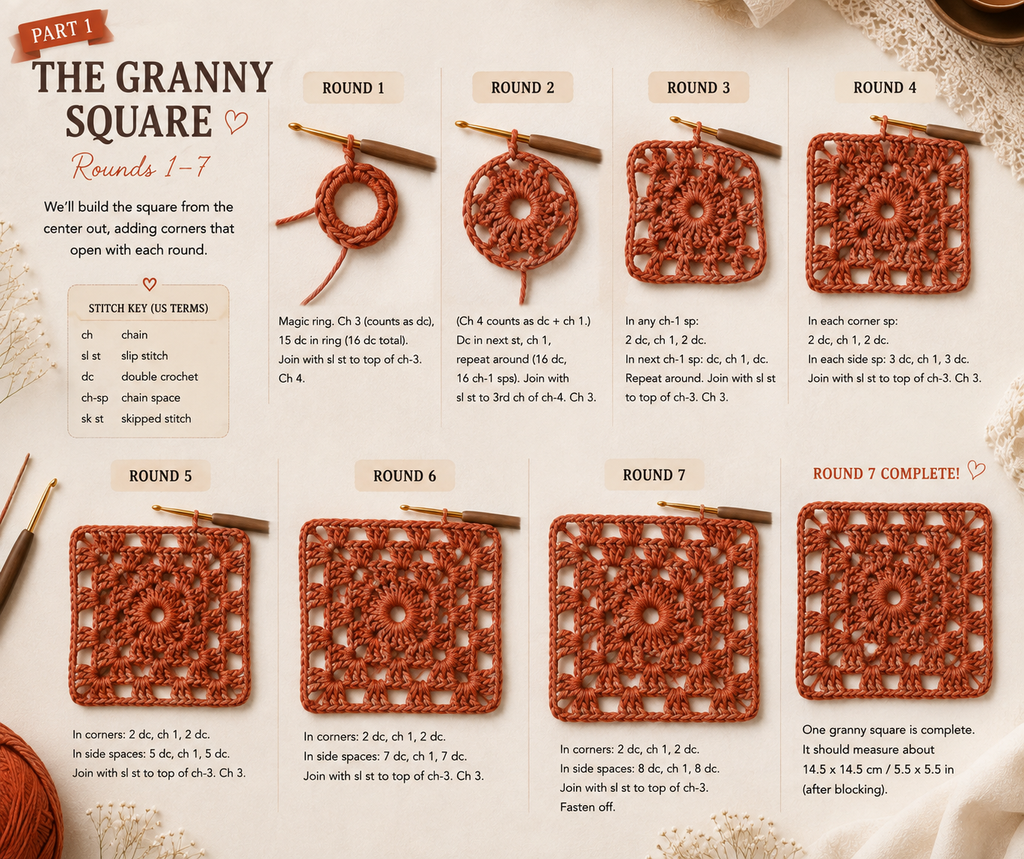
Round 1: Start with a magic ring. Chain 3 (this counts as your first double crochet — a common pattern convention, not a trick), then work 15 more double crochets into the ring, for 16 total. Close the round with a slip stitch into the top of that starting chain-3, then chain 4 to move into Round 2. One round down already!
If magic rings aren’t your thing, that’s completely fine — make a slip knot, chain 4, and join it into a loop with a slip stitch into the first chain. Work Round 1 into that ring instead. Either way works beautifully.
Round 2: That chain-4 counts as a double crochet plus a chain-1 space. Work a double crochet into the next stitch, then chain 1, and repeat that combination all the way around — you’ll end up with 16 double crochet-and-chain-1 groups. Join with a slip stitch into the 3rd chain of your starting chain-4, then chain 3. You’re doing great.
Round 3: Work 2 double crochets into the next chain-1 space, then 1 double crochet into the next stitch, repeating that pattern all the way around. Join with a slip stitch to the top of your beginning chain-3, then chain 6.
Round 4: That chain-6 becomes your first corner space. Skip 2 stitches and single crochet into the next one, then chain 3. Repeat that sequence three more times to complete the side. For the corner: chain 6, skip 2, single crochet. Work all four sides and corners this way — if you lose count, it’s okay to pause and recount rather than guess. Join with a slip stitch into that first corner space, then chain 3.
Round 5: Chain 3 for your first double crochet, then work 4 more double crochets, a chain-3, and 5 more double crochets, all into that same corner space. This is the shell that shapes the square’s point, and it might feel like a lot happening in one space — that’s normal, just take it stitch by stitch. Single crochet into the next space, working under the chain-3 from Round 4. Seven double crochets into the following space, then single crochet into the next. Repeat the corner shell and side pattern around. Join to your chain-3, then chain 8. Halfway through the square — you’re doing wonderfully.
Round 6: Your chain-8 counts as a double crochet plus a chain-5 space. At the corner: single crochet, chain 3, single crochet, chain 5. Skip 5 stitches, double crochet into the single crochet from Round 5, chain 3. Single crochet into the 4th stitch of that 7-dc group. Chain 3, skip 3 double crochets, double crochet into the sc from Round 5, chain 5. Repeat the corner, and continue this rhythm around, finishing with a single crochet into the 4th stitch of your last 7-dc group, then chain 3. Join into the 3rd chain of your chain-8, slip stitch into the next space, chain 3. This round has the most moving parts in the whole square — if it takes you a little longer, that’s completely expected.
Round 7: Chain 3, then 4 more double crochets into that same space (5 dc total). At the corner: 3 dc, chain 3, 3 dc. Five double crochets into the next space, 3 double crochets into each of the next two spaces, 5 double crochets after that. Repeat the corner around. Join, and cut your yarn, leaving about a 10 cm / 4 in tail.
(Take a photo here if you’re documenting your progress — this is a real milestone!)
Your granny square is complete. Seriously, take a moment — that was seven full rounds, and you did every one of them.
Part 2: The Granny Triangles (You’ve Got Two to Go)
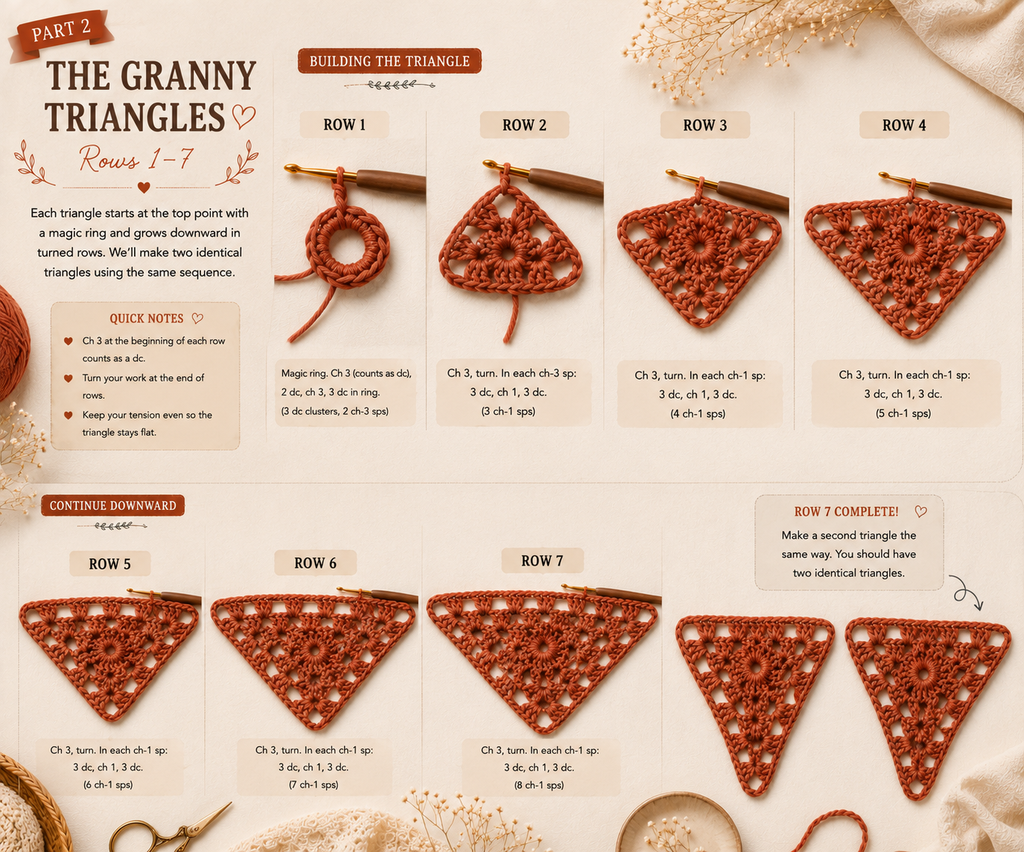
Good news: the triangles use every stitch you just practiced on the square, just worked in rows instead of rounds. You’ll make two identical ones — consider doing them back to back so the pattern stays fresh.
Row 1: Magic ring, chain 3 (your first dc), 7 more double crochets into the ring for 8 total. Close it, chain 4, turn.
Encouragement break: turning your work the same direction every row keeps your edge looking neat. Small habit, real payoff — you’re building good instincts here.
Row 2: That chain-4 is a dc plus a chain-1. Double crochet into the next stitch, chain 1, and repeat across until you have 8 groups. Chain 3, turn.
Row 3: Two double crochets into the next chain-1 space, one double crochet into the next stitch, alternating across the row. Chain 6, turn.
Row 4: Skip 2 stitches, single crochet, then repeat “chain 3, skip 2, single crochet” two more times. Chain 3, skip 1 stitch, and work single crochet, chain 6, single crochet into that top center stitch — you’re shaping the triangle’s peak, and it will look a little unusual until the next row builds on top of it. Trust the process. Chain 3, skip 1, single crochet, then mirror the first half: “chain 3, skip 2, single crochet” two more times. Finish with chain 6, skip 2, slip stitch into the start of Row 3’s turning chain. Chain 4, turn.
Row 5: Chain 4 (your first tr), 1 more treble crochet plus 4 double crochets into that same space. Single crochet into the next space. Seven double crochets into the following space, single crochet into the next. Top space: 3 dc, chain 3, 3 dc — shaping that peak beautifully. Single crochet, then mirror the whole thing down the second half. Last space: 4 dc, 2 tr. Chain 8, turn. Look at that shape coming together!
Row 6: Skip 2, single crochet into the 3rd stitch. Chain 3, skip 3, double crochet into the sc from Row 5. Chain 3, skip 3, single crochet into the 4th stitch of the 7-dc group. Chain 3, skip 3, double crochet into the sc from Row 5, chain 5. Top space: single crochet, chain 3, single crochet, chain 5. Mirror it, ending with a single crochet into the 3rd stitch. Chain 5, one double crochet into the last space, just before Row 5’s turning chains. Chain 4, turn.
Row 7: Chain 4 (your first tr), 1 more treble crochet plus 4 double crochets into that same space. Four double crochets into the next space, 3 double crochets into each of the next two spaces, 5 double crochets after that. Top space: 3 dc, chain 4, 3 dc. Mirror it on the second half. Last space: 4 dc, 2 tr. Cut your yarn, leaving about a 10 cm / 4 in tail.
(A photo moment — your finished triangle deserves one.)
Now do the whole thing again for triangle number two. You already know exactly what to do — this repeat will go faster than the first.
Part 3: A Quick, Well-Earned Weave-In Break
Before you join anything, weave in every loose tail on the square and both triangles. Thread each one onto a needle and stitch it through a few nearby stitches, changing direction as you go. It’s a small task, but it matters — and it’s much easier now than after everything is joined.
Part 4: Putting It All Together
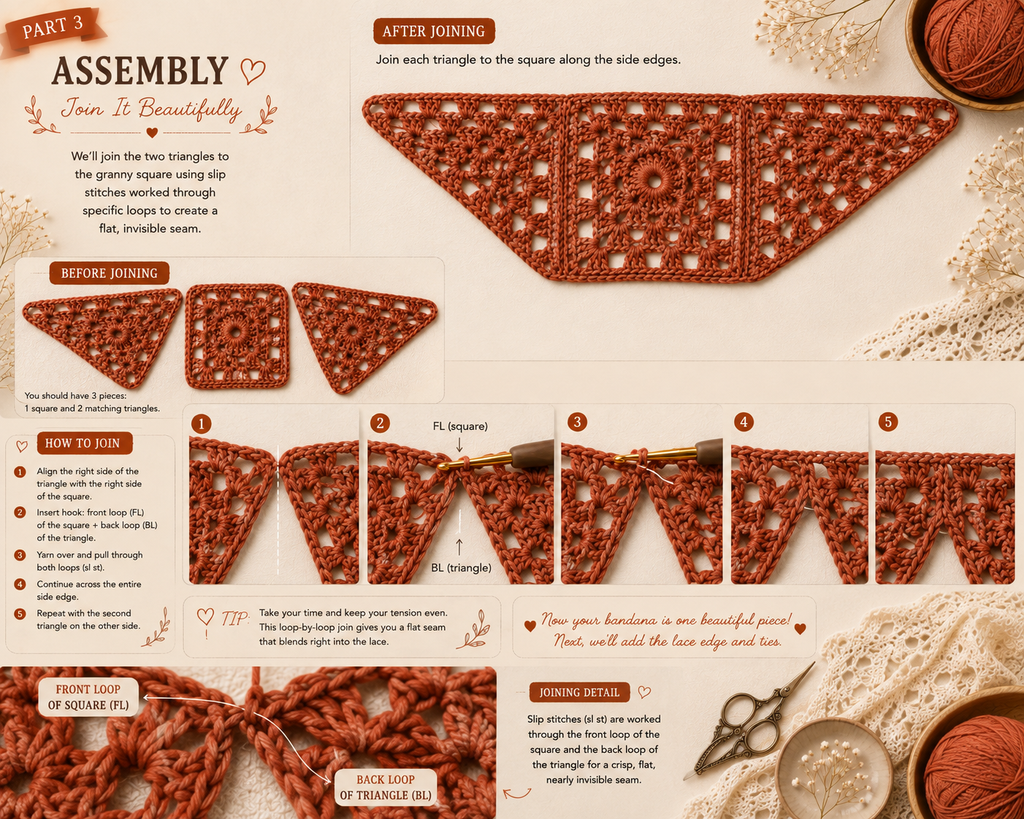
This is the step where three separate pieces become one bandana — and it’s genuinely one of the most satisfying parts of this whole project. You’re joining everything with slip stitches through specific loops, which creates a seam that’s almost invisible.
- Knot your yarn into the top space of a triangle, then slip stitch into that space to anchor it.
- Lay the square against the triangle, right sides facing each other.
- Slip stitch along the edge — front loop of the square, back loop of the triangle — all the way to the last stitch. Take your time here; there’s no rush.
- Land your last slip stitch in the square’s corner space, matching the last stitch before the triangle’s corner space.
- Bring in your second triangle, positioned against the square’s other side the same way, right sides together.
- Slip stitch the two triangles’ corner spaces together.
- Continue along the square’s remaining side, same as before — front loop of square, back loop of triangle.
- Slip stitch into the corner space, chain 1, cut your yarn, leave a 10 cm / 4 in tail.
(This is a great photo moment — your assembled piece is starting to look like an actual bandana!)
However this seam turns out on your first try, it’s going to work. You can always practice this join on scrap pieces first if you want extra confidence.
Part 5: The Top Edge
Three rows, worked right onto your assembled piece — and this is where the lace really starts to shine.
Row 1: Right side facing you, knot into the right corner space. Chain 4 (first tr), one more treble crochet into that space. Double crochet across until you reach the seam where a triangle meets the square — 2 dc into the triangle’s top space, 2 dc into the square’s corner space. Keep double crocheting until you reach the very top point of the bandana: 2 dc, chain 3, 2 dc into that space. Mirror it all down the other side. Last stitch: 2 treble crochets. Chain 8, turn.
Row 2: Skip 2, single crochet. Repeat “chain 5, skip 2, single crochet” 16 times, chain 5. Top space: single crochet, chain 4, single crochet, chain 5. Mirror it — skip 2, single crochet, “chain 5, skip 2, single crochet” 16 times, chain 5. Finish with one double crochet in the last stitch. Chain 4, turn. Counting to 16 twice in one row is genuinely the hardest part of this whole pattern — a stitch marker every few repeats can help.
Row 3: Chain 4 (first tr), 1 more treble crochet plus 5 double crochets into that space. Single crochet into the next space. Repeat “5 dc into the next space, single crochet into the one after” across until the top space, then 3 dc, chain 3, 3 dc there. Mirror it down the second half. Last space: 5 dc, 2 tr.
Chain 1, then rotate — not turn — your work. This one’s easy to get backward, and if you do, it’s not a disaster, just unravel back to this point and try again. Rotating means spinning your piece in place so the right side stays facing you.
Part 6: The Bottom Edge and Ties — Almost There
Single crochet and back-loop-only slip stitches, finishing with two long ties. You’re in the home stretch.
Without turning: 3 single crochets into the first space (under the last row). Three single crochets into each of the next 6 spaces. Two single crochets into each of the next 3 spaces. One single crochet into the triangle’s magic-ring center. Two single crochets into each of the next 3 spaces, 3 single crochets into each of the next 4 spaces. At the triangle-square join point, 2 double crochets. Repeat down the second side.
First strap: at the end of the row, chain 66 — yes, it’s a long chain, but it goes quickly. Slip stitch through the back loop only into the 2nd chain from your hook, then continue in the back loop only down the rest of the chain.
Once that strap is done, continue along the bottom edge — single crochet through both loops this time, to the end.
Second strap: chain another 66. Back loop only again, from the 2nd chain from the hook, all the way down. You’ve done this once already — this one will feel familiar.
Slip stitch into that very first single crochet on this row to close it up. Cut your yarn, leave a 10 cm / 4 in tail.
(One more photo here — those finished straps are worth celebrating.)
Helpful Tips
- Use stitch markers generously, especially on the corner spaces from Round 4 through Round 7. There’s no such thing as too many markers on a pattern like this.
- Before turning any corner, especially in Round 4, pause and count. It’s always easier to fix a mistake before you’ve moved past it.
- Take the time to swatch your gauge — it’s a small investment that protects the whole project’s fit.
- Have extra yarn measured out before you start each strap, so you’re not caught off guard partway through.
- If magic rings feel fiddly, the chain-loop method from Round 1 of the square works just as well for the triangles.
- One 50 g skein comfortably covers this whole project — no need to buy extra unless you’d like a cushion for peace of mind.
Common Mistakes to Avoid
- Losing count of chain spaces, especially in Rounds 5–6 and the top-edge rows. This happens to everyone — slow down and recount if you feel unsure, rather than guessing and moving on.
- Forgetting the starting chain counts as a stitch. An easy slip, and an easy fix once you know to watch for it.
- Mixing up “turn” and “rotate” at the end of Top Edge Row 3. If you catch this after the fact, it’s a simple undo, not a project-ending mistake.
- Working through both loops instead of back loop only — mostly noticeable on the straps, and worth a quick check before you get too far.
- Swapping the front loop and back loop during assembly. The pieces will still join even if you do — it just won’t lie quite as flat.
- Cutting your tails too short. Give yourself the full 10 cm / 4 in, every time.
Finishing
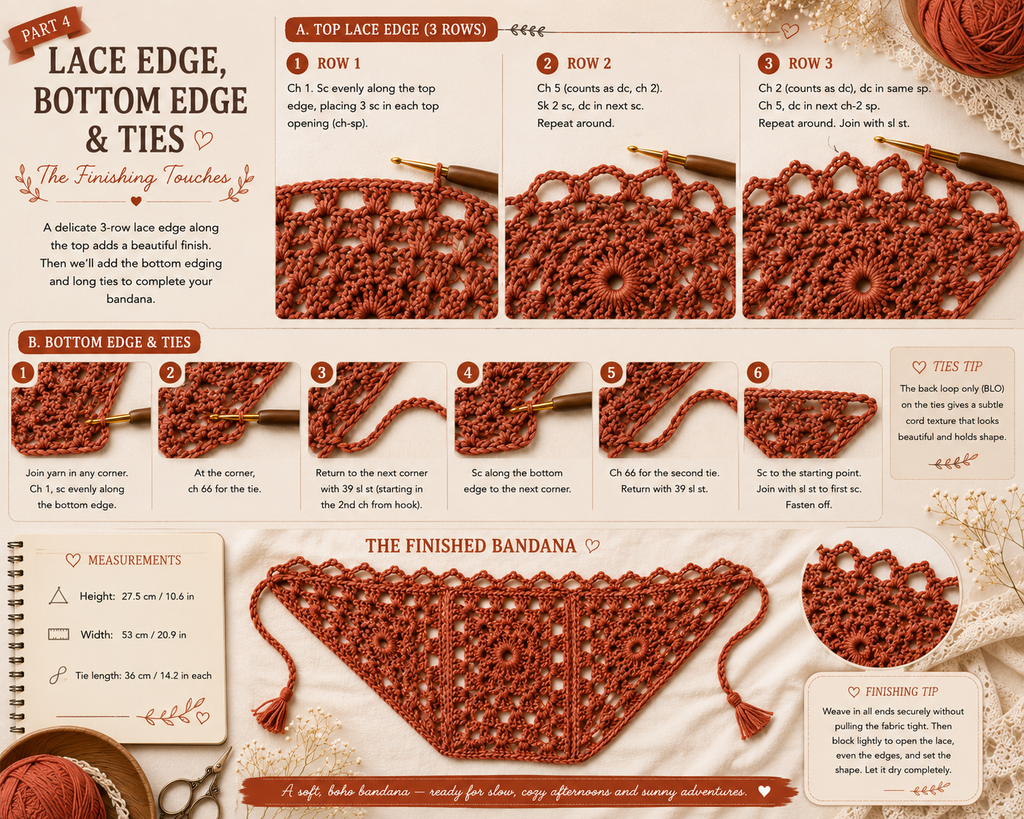
You’re nearly there. Take a final pass through the bandana and weave in any yarn ends still hanging loose, running each one through a few nearby stitches and changing direction as you go.
Blocking
This last step matters more than it might seem — don’t skip it. Wash or steam according to your yarn’s care label, then pin the piece out to 27.5 cm / 10.6 in tall by 53 cm / 20.9 in wide, and let it dry completely before unpinning.
(This is the photo — your finished, blocked bandana. You made this.)
Blocking relaxes any uneven tension and opens up all those lovely chain spaces, giving your finished bandana a polished, professional look.
Final Thoughts
However long this took you, however many times you recounted a round or pulled back a few stitches — you finished it. This crochet bandana pattern isn’t a small undertaking, and if you made it through all seven rounds of the square, all fourteen rows of the triangles, the assembly, the lace edge, and both straps, that’s real, earned skill, not luck.
If you enjoyed the process, that’s the best sign that this pattern is worth making again — maybe in a bold solid color next time, or a variegated yarn to see the lace in a whole new light. Either way, you already know you can do it.
🧶 Download the FREE Crochet Bandana PDF
Loved this pattern? Get the free printable PDF so you can save it, print it, and follow the pattern anytime.
Enter your email below and I’ll send the PDF straight to your inbox.