🧶 Free PDF Pattern:
Want to save this pattern for later? I’ve included a FREE printable PDF version at the bottom of this article. Keep reading, then download your copy below!
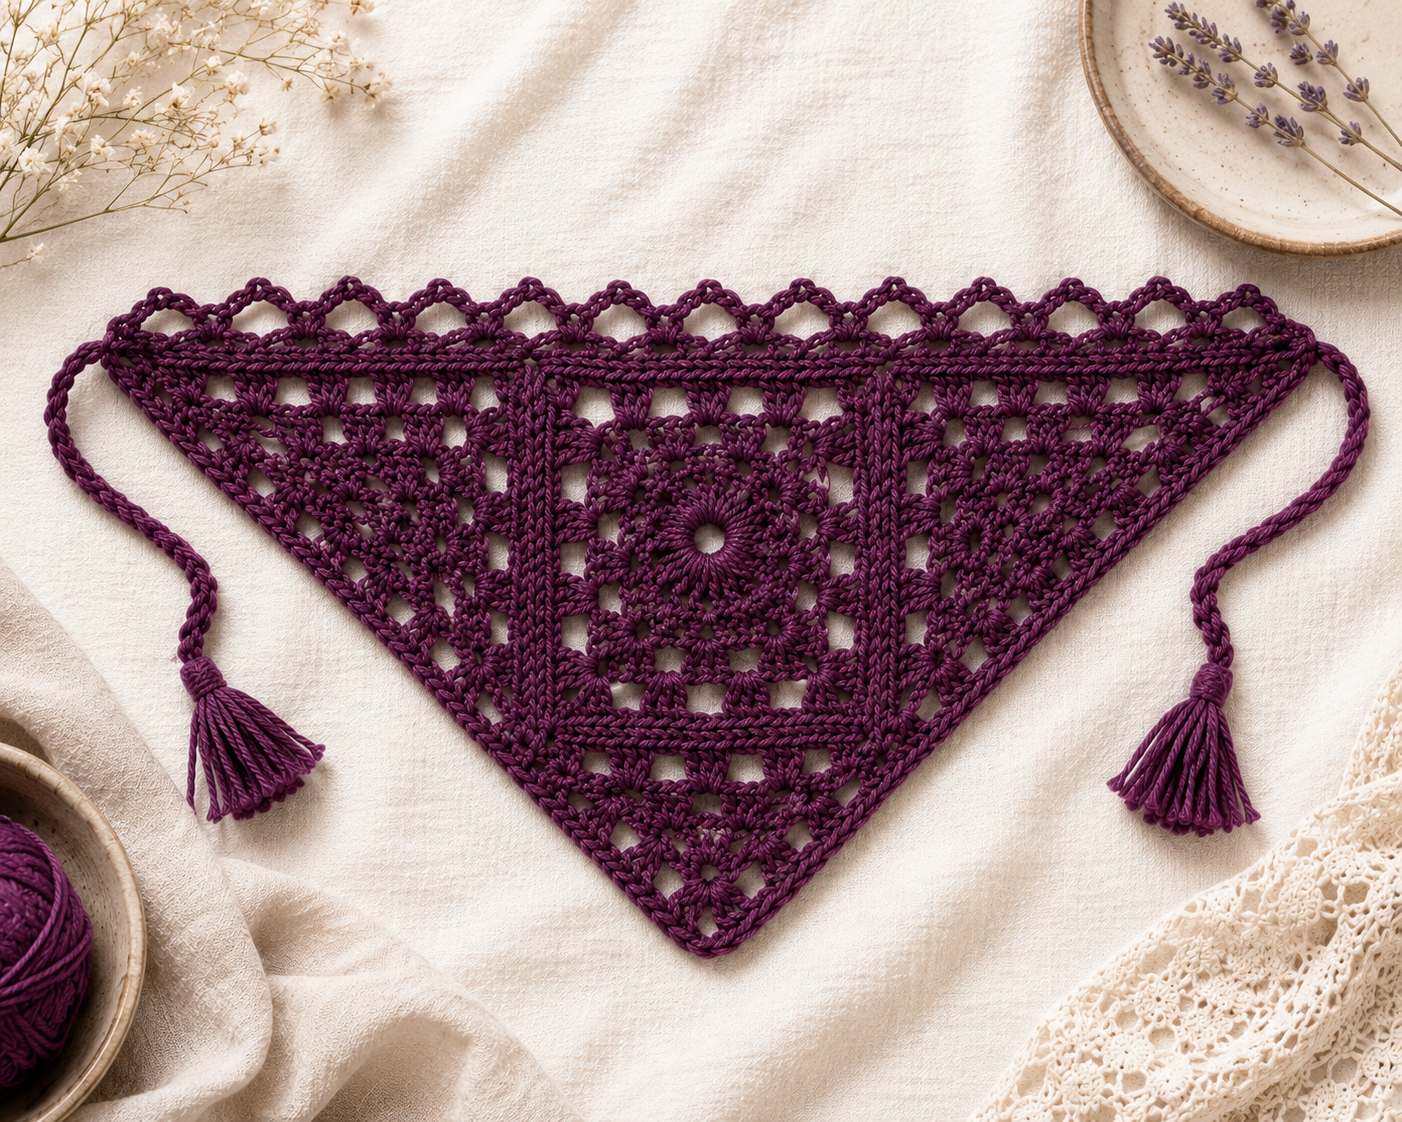
A granny square, in its most familiar form, is a small and solid thing — rounds of double crochet folding into corners, repeating until it stops. This crochet bandana pattern takes that same familiar shape and asks it to do something else: to open outward into lace, to meet two mirrored triangles at its sides, and to trail off into two long ties that drift and knot. What begins as a single, dense motif ends as something closer to a spiderweb caught mid-breeze — a crochet headscarf pattern built from structure, but finished in air.
The stitches themselves ask nothing unusual of you. Chain, slip stitch, single crochet, double crochet, and here and there a treble crochet reaching a little taller than the rest. What separates this from a simple, easy crochet bandana is not any one stitch but the accumulation — round after round, row after row, each one building quietly on the last until the lace reveals itself. This guide follows that accumulation closely, stage by stage, so nothing is left to guesswork.
Beginner Goal
This pattern belongs just past the beginning — close enough that a single completed granny square is all the preparation you truly need, far enough that a first-ever project might find it overwhelming rather than inviting.
In making it, you will come to know:
- The granny square’s familiar outward growth, corner by corner
- Its mirror image, the granny triangle, worked in rows that turn back on themselves
- A join so quiet — front loop to back loop — that the seam nearly disappears
- The chain space, that small deliberate emptiness you crochet into rather than around
- The back loop only, which raises a thin ridge like a seam beneath the skin
- The treble crochet, reaching just a little further than its neighbors
None of these, alone, asks for expertise. Together, across so many rounds, they ask for attention — and reward it.
What You’ll Need
Yarn
The original was worked in a medium weight yarn — the familiar worsted and aran family — a cotton-viscose-linen blend from Sandnes Garn (Line, colorway 9004). Each skein holds 50 g / 1.76 oz and 110 m / 120 yd, spun from 53% cotton, 33% viscose, and 14% linen, a blend chosen for the way it lets lace fall rather than stand stiff.
In total, the piece consumed roughly 44 g / 1.55 oz of yarn. The pattern itself is silent on yardage, but calculated from the skein’s own numbers, that comes to something like 95–100 m / 105–110 yd — comfortably inside a single skein, with a small remainder left over. Anyone substituting yarn should stay within the same weight and reach for something with plant fiber in its blend, since that’s much of what gives the finished lace its particular drape. A little extra beyond the calculated minimum is wise, since no two hands hold tension quite the same way.
Hook
4 mm (US G-6)
Notions
- Yarn or tapestry needle
- Scissors
- Measuring tape
Stitches Used (US Terms)
- ch – chain
- sl st – slip stitch
- sc – single crochet
- dc – double crochet
- tr – treble crochet
- ch-sp – chain space, the small deliberate gap a chain leaves, into which you’ll often work rather than into a stitch
- sk st – skipped stitch
- blo – back loop only, working just the rear strand of a stitch and leaving the front one untouched, which raises a faint ridge
Two more terms surface throughout, unofficial but essential: the magic ring, the adjustable loop that opens both the square and each triangle (a chain-loop alternative stands ready for anyone who’d rather skip it), and the front loop, the strand nearest you, called on specifically during assembly.
Finished Measurements
One size. Measured flat, once blocked and settled:
- Height: 27.5 cm / 10.6 in
- Width: 53 cm / 20.9 in
- Strap length: 36 cm / 14.2 in, each
Before You Begin
Before the first stitch, a small act of measurement: 16 double crochets and 9 rows should span 10 x 10 cm / 4 x 4 in of plain double crochet fabric. A second, gentler check — one completed granny square, all seven rounds, should settle at roughly 14.5 x 14.5 cm / 5.5 x 5.5 in. Should your own numbers drift far from these, a different hook will bring them back — larger for looser, smaller for tighter.
The piece unfolds in a fixed order:
- One granny square, grown in the round.
- Two matching granny triangles, grown in turned rows.
- Square and triangles joined into a single form.
- A three-row lace border along the top.
- A bottom edge and two long ties, worked as one unbroken length.
- Ends woven quiet, and the whole piece blocked into its final shape.
Throughout, the language is American — this double crochet is the ordinary US stitch, not the taller one the UK calls “treble.”
Step-by-Step Instructions
Part 1: The Granny Square
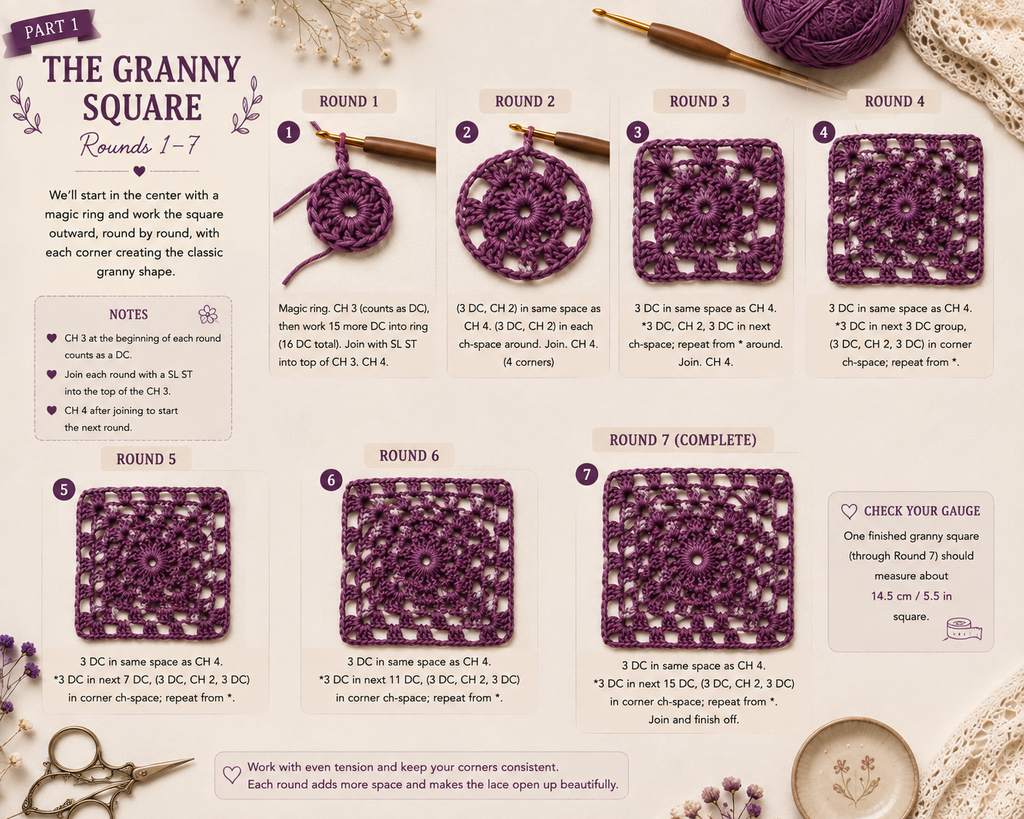
Round 1: Begin at the center, with a magic ring. Chain 3 — a stand-in for the first double crochet — then work 15 more into the ring, 16 in total, gathered close around that first small circle. Close with a slip stitch into the top of the chain-3, then chain 4, a small bridge into Round 2.
If the magic ring doesn’t suit you, a slip knot will do just as well: chain 4, close it into a loop with a slip stitch into the first chain, and let Round 1 grow from that ring instead.
Round 2: That chain-4 carries two meanings at once — a double crochet, and a chain-1 space beside it. Work a double crochet into the next stitch, then a chain-1, and let that pairing repeat all the way around, until 16 such pairs ring the center. Close with a slip stitch into the 3rd chain of your chain-4, then chain 3.
Round 3: Two double crochets into the next chain-1 space, one into the stitch beside it — and again, and again, all the way around, the circle widening as it goes. Join with a slip stitch to the top of your chain-3, then chain 6.
Round 4: That chain-6 marks the first corner — the moment the circle begins to remember it will become a square. Skip 2 stitches, single crochet into the third, chain 3, and repeat this three times more to carry the side. At the corner: chain 6, skip 2, single crochet. Let this rhythm — side, corner, side, corner — carry you the whole way around. Join into that first corner space, then chain 3.
Round 5: Chain 3 to open, then 4 more double crochets, a chain-3, and 5 more double crochets, all gathered into that same corner space — a small shell, and the true beginning of the square’s points. Single crochet into the next space, worked beneath the chain-3 left by Round 4. Seven double crochets follow in the space after, then a single crochet beyond that. Let the shell and its neighboring rhythm repeat at every corner. Join to your chain-3, then chain 8.
Round 6: The chain-8 stands for a double crochet and a chain-5 space together. At the corner: single crochet, chain 3, single crochet, chain 5. Skip 5 stitches, then a double crochet into the single crochet left by Round 5, followed by a chain-3. Single crochet into the 4th stitch of that 7-double-crochet group. Chain 3, skip 3 double crochets, a double crochet into Round 5’s single crochet once more, then chain 5. Let the corner repeat, and the rhythm carry all the way around, closing with a single crochet into the 4th stitch of the final 7-double-crochet group, then chain 3. Join into the 3rd chain of your chain-8, slip stitch once more into the next space, then chain 3.
Round 7: Chain 3, then 4 more double crochets into that same space — 5 in total, a small solid gathering. At the corner: 3 double crochets, chain 3, 3 double crochets. Five double crochets follow, then 3 into each of the next two spaces, then 5 more beyond that. Let the corner repeat once more, and the whole sequence close the circuit of the square. Join, and cut the yarn, leaving a tail of about 10 cm / 4 in to be woven away later.
(A photograph belongs here — the finished square, all seven rounds, its center still visible at the heart of everything around it.)
What began as a small ring has become, seven rounds later, a square built entirely of lace.
Part 2: The Granny Triangles (A Pair, Mirrored)
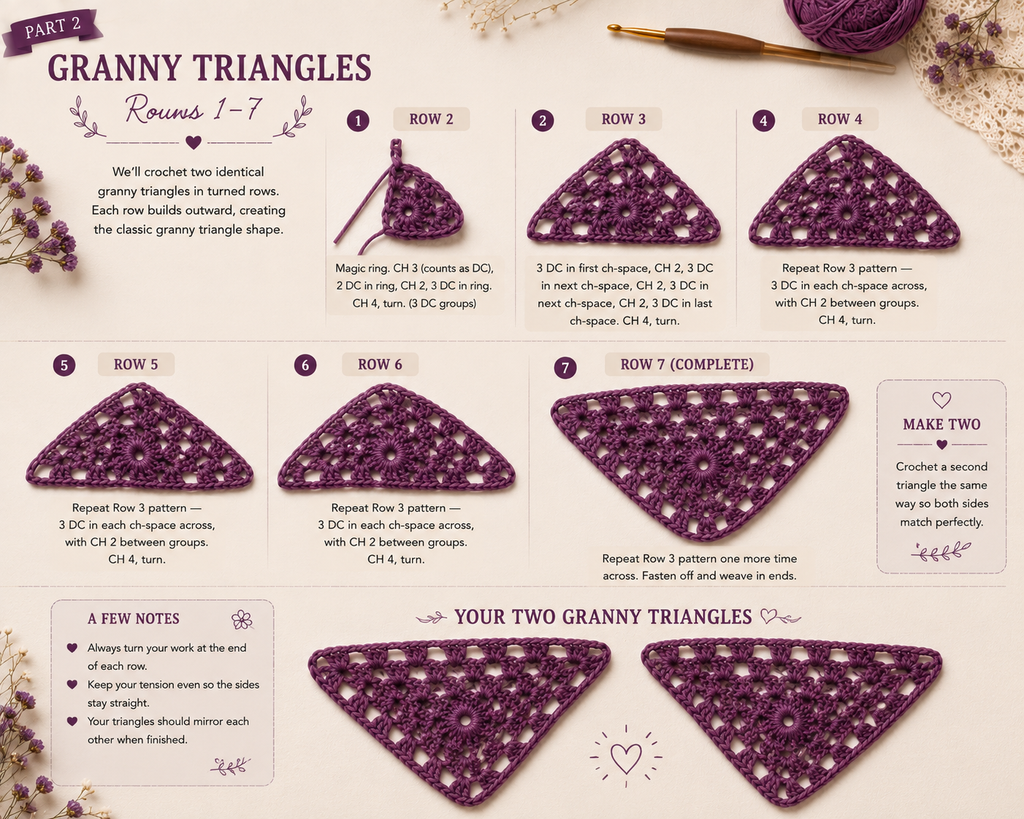
The triangles ask nothing new of your stitches — only a new direction, worked back and forth in turned rows rather than around and around. Two are needed, identical, to sit on either side of the square.
Row 1: Begin again with a magic ring. Chain 3, then 7 more double crochets into the ring — 8 in total, a small fan beginning to open. Close the ring, chain 4, and turn.
A quiet piece of advice: turn your work the same direction each time. The habit is small, but it keeps the edge honest and even.
Row 2: That chain-4 stands for a double crochet and a chain-1 space. Work a double crochet into the next stitch, then chain 1, letting the pair repeat across the row until 8 such pairs have gathered. Chain 3, and turn.
Row 3: Two double crochets into the next chain-1 space, one into the stitch beyond — alternating this way across the row, the fan widening. Chain 6, and turn.
Row 4: Skip 2 stitches, single crochet, then repeat “chain 3, skip 2, single crochet” twice more. Chain 3, skip 1 stitch, and gather single crochet, chain 6, single crochet into the top center stitch — the very first suggestion of a peak. Chain 3, skip 1, single crochet, then mirror what came before: “chain 3, skip 2, single crochet” twice again. Close with chain 6, skip 2, and a slip stitch into the start of Row 3’s turning chain. Chain 4, and turn.
Row 5: That chain-4 now stands for a treble crochet — the pattern reaching a little taller here. One more treble crochet, then 4 double crochets, into the same space. Single crochet into the next. Seven double crochets follow, then a single crochet beyond. Into the top space: 3 double crochets, chain 3, 3 double crochets — the peak taking real shape now. Single crochet, and let the whole sequence mirror down the second half. The last space gathers 4 double crochets and 2 treble crochets. Chain 8, and turn.
Row 6: Skip 2 stitches, single crochet into the third. Chain 3, skip 3, a double crochet into the single crochet left by Row 5. Chain 3, skip 3, single crochet into the 4th stitch of the 7-double-crochet group. Chain 3, skip 3, another double crochet into Row 5’s single crochet, then chain 5. Into the top space: single crochet, chain 3, single crochet, chain 5. Let this mirror down the second half, closing with a single crochet into the third stitch. Chain 5, then one double crochet into the last space, just before Row 5’s turning chains began. Chain 4, and turn.
Row 7: That chain-4 stands for a treble crochet once more. One more treble crochet, 4 double crochets, into the same space. Four double crochets follow in the next space, then 3 into each of the next two, then 5 beyond that. Into the top space: 3 double crochets, chain 4, 3 double crochets. Let it mirror down the second half. The last space closes with 4 double crochets and 2 treble crochets. Cut the yarn, leaving about 10 cm / 4 in.
(A photograph here — the finished triangle, its peak now unmistakable.)
Repeat all seven rows once more, and a second triangle, identical to the first, joins it.
Part 3: A Silence Before Joining
Before the pieces meet, weave in every loose end left on the square and on both triangles — thread each through a needle, guide it through a few nearby stitches, changing direction once or twice, until it disappears. This quiet task is far kinder to do now, while the three pieces are still separate and easy to hold.
Part 4: Where Three Become One
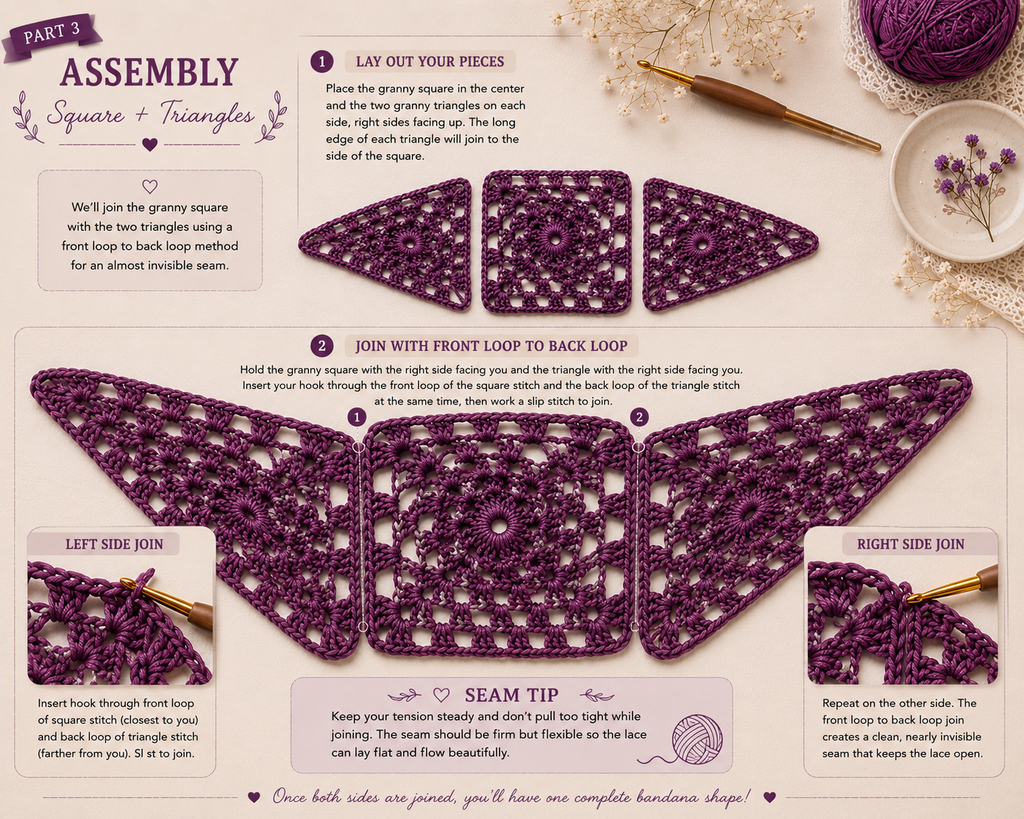
Here the square and both triangles are drawn together, joined by slip stitches worked through very particular loops — a join so precise it barely announces itself.
- Knot the yarn into the top space of a triangle, then slip stitch into that same space.
- Lay the square against the triangle, right sides meeting.
- Slip stitch along the edge — the front loop of the square, the back loop of the triangle — to the very last stitch.
- Let the final slip stitch land in the square’s corner space, meeting the last stitch before the triangle’s own corner.
- Bring the second triangle to the square’s other side, right sides together, the same way.
- Join the two triangles’ corner spaces with a single slip stitch.
- Continue along the square’s remaining side — front loop of the square, back loop of the second triangle, as before.
- Close with a slip stitch into the corner space, chain 1, and cut the yarn, leaving about 10 cm / 4 in.
(A photograph here — the assembled piece, right side facing up, three shapes now one.)
It’s the difference between the two loops — front on one piece, back on the other — that lets this seam vanish so completely once the piece lies flat.
Part 5: The Top Edge
Three rows, worked directly onto what you’ve already made, and it’s here the lace truly announces itself.
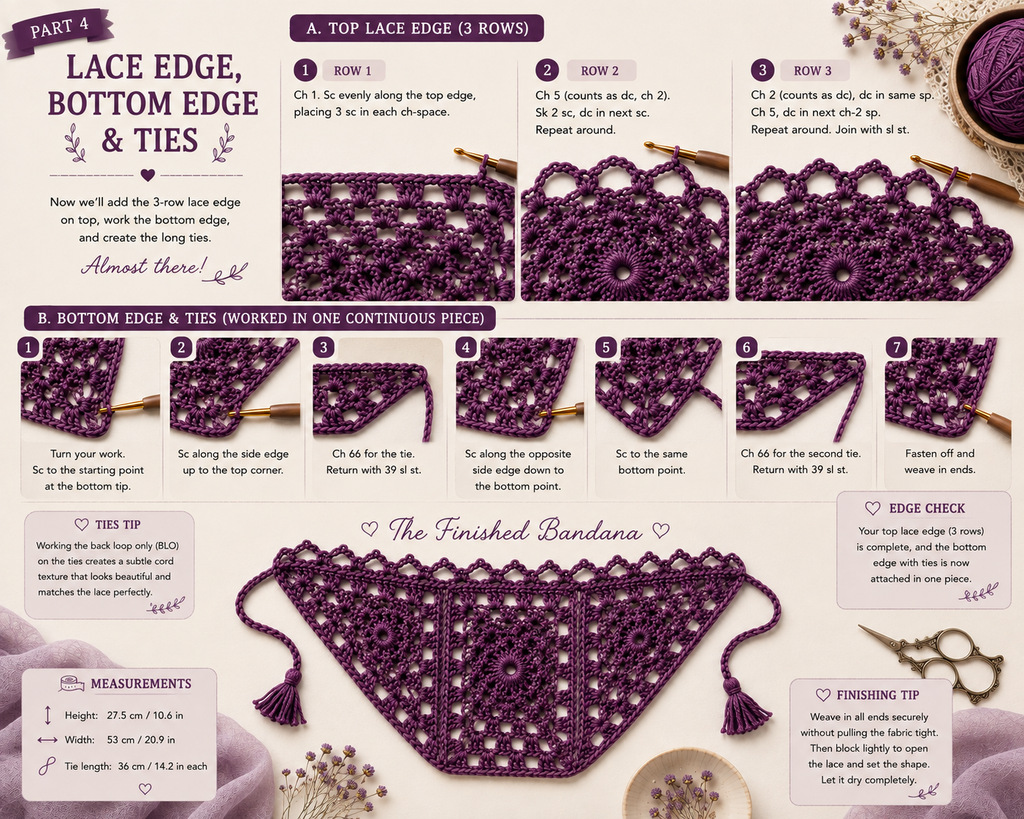
Row 1: With the right side facing you, knot into the right corner space. Chain 4 for a treble crochet, then one more treble crochet into the same space. Double crochet across until you meet the seam where a triangle joins the square — 2 double crochets into the triangle’s top space, 2 more into the square’s corner space. Continue with a double crochet in each stitch until you reach the very top point of the bandana, then 2 double crochets, chain 3, 2 double crochets into that space. Let it all mirror down the far side. The last stitch closes with 2 treble crochets. Chain 8, and turn.
Row 2: Skip 2 stitches, single crochet. Repeat “chain 5, skip 2 stitches, single crochet” sixteen times, then chain 5. Into the top space: single crochet, chain 4, single crochet, chain 5. Let the first half mirror down the second — skip 2, single crochet, sixteen more repeats of “chain 5, skip 2, single crochet,” chain 5 once more. Close with a double crochet into the final stitch. Chain 4, and turn.
Row 3: Chain 4 for a treble crochet, then one more treble crochet and 5 double crochets into the same space. Single crochet into the next. Repeat “5 double crochets into the next space, single crochet beyond it” until you reach the top space, then 3 double crochets, chain 3, 3 double crochets there. Mirror it down the second half, to the final space — 5 double crochets, 2 treble crochets.
Chain 1, then rotate rather than turn — not a flip, but a quiet spin in place, the right side never leaving your view, carrying you straight into the bottom edge without breaking the thread.
Part 6: The Bottom Edge, and Two Long Threads Trailing
A single row of single crochet and back-loop-only slip stitches, ending in two long chained ties.
Without turning: 3 single crochets into the first space, beneath the row just finished. Continue with 3 single crochets into each of the next 6 spaces, still beneath the row below. Two single crochets into each of the following 3 spaces, then one single crochet into the triangle’s own magic-ring center. Two single crochets into each of the next 3 spaces, then 3 into each of the following 4. Where a triangle meets the square, 2 double crochets. Let all of this repeat down the second side.
First strap: at the row’s end, chain 66 — a long thread reaching outward. Working back down its length, slip stitch through the back loop only into the 2nd chain from the hook, and continue, back loop only, to the very end.
Once the strap is finished, continue along the bottom edge — single crochet through both loops now, to the end of the row.
Second strap: chain 66 once more. Back loop only again, from the 2nd chain from the hook, the whole way down.
Close with a slip stitch into the very first single crochet of this row. Cut the yarn, leaving about 10 cm / 4 in.
(A photograph here — one strap, close, its ridged back-loop texture visible like a seam.)
That back-loop-only ridge is a small thing to look at, but it’s what keeps these ties from ever reading as a plain, unconsidered chain.
Helpful Tips
- Mark each corner space as you reach it, especially through Rounds 4 to 7 — a small thread of contrasting color will save you from having to count backward later.
- Before any corner, pause and confirm the side is truly finished. It is always easier to mend a mistake before turning than after.
- Swatch before you begin. This pattern has exact, promised measurements, and a gauge even slightly astray will carry that difference through every round.
- Measure generous lengths of yarn before each strap; the long chain and its answering row of slip stitches ask for more than they seem to.
- The chain-loop beginning, given for Round 1 of the square, will serve just as well for the triangles, if the magic ring never quite feels natural in your hands.
- Forty-four grams of a fifty-gram skein leaves room to spare — one skein, in the end, is enough.
Common Mistakes to Avoid
- Losing the count of chain spaces, particularly through Rounds 5 and 6, and again along the top edge, where several similar spaces gather close together.
- Forgetting that the first chain of a round is itself a stitch, easily overlooked, easily doubled by accident.
- Mistaking “rotate” for “turn,” or the reverse — every row asks for a turn except the close of Top Edge Row 3, which asks, just once, for a quiet spin instead.
- Working through both loops where only the back loop was asked for — the straps, most visibly, lose their intended ridge this way.
- Reversing which piece gives its front loop and which its back during assembly — the seam will still hold, only less invisibly.
- Leaving too short a tail when the yarn is cut — ten centimeters, four inches, is not a suggestion but a small kindness to your future self.
Finishing
Once every piece is joined and both ties are finished, make one last pass through the bandana and gather in whatever ends remain. Thread each through a needle, guide it through a handful of stitches, shifting direction once or twice, until it settles and disappears.
Blocking
A piece built so thoroughly of lace asks, in the end, to be blocked. Wash or steam it according to the yarn’s own care instructions, then pin it to its true measurements — 27.5 cm / 10.6 in tall, 53 cm / 20.9 in wide — and let it rest until fully dry before the pins come away.
(A photograph here — the finished, blocked bandana, its lace finally settled and open.)
Blocking is the quiet last step that evens what tension left uneven, opens every chain space to its full breath, and gives the whole piece the finished, considered look it was always working toward.
Final Thoughts
A square. Two triangles. And between them, in the end, something closer to lace than to any single motif alone. This crochet bandana pattern is less about difficulty than about accumulation — no single round asks for much, but together they ask for patience, and reward it with something that looks, when finished, like it took far more than it did.
Should you return to this pattern again, it holds up well to change — a single saturated color, letting the structure speak plainly, or a variegated yarn, letting color drift across the lace the way light moves across water.
🧶 Download the FREE Crochet Bandana PDF
Loved this pattern? Get the free printable PDF so you can save it, print it, and follow the pattern anytime.
Enter your email below and I’ll send the PDF straight to your inbox.