🧶 Free PDF Pattern:
Want to save this pattern for later? I’ve included a FREE printable PDF version at the bottom of this article. Keep reading, then download your copy below!
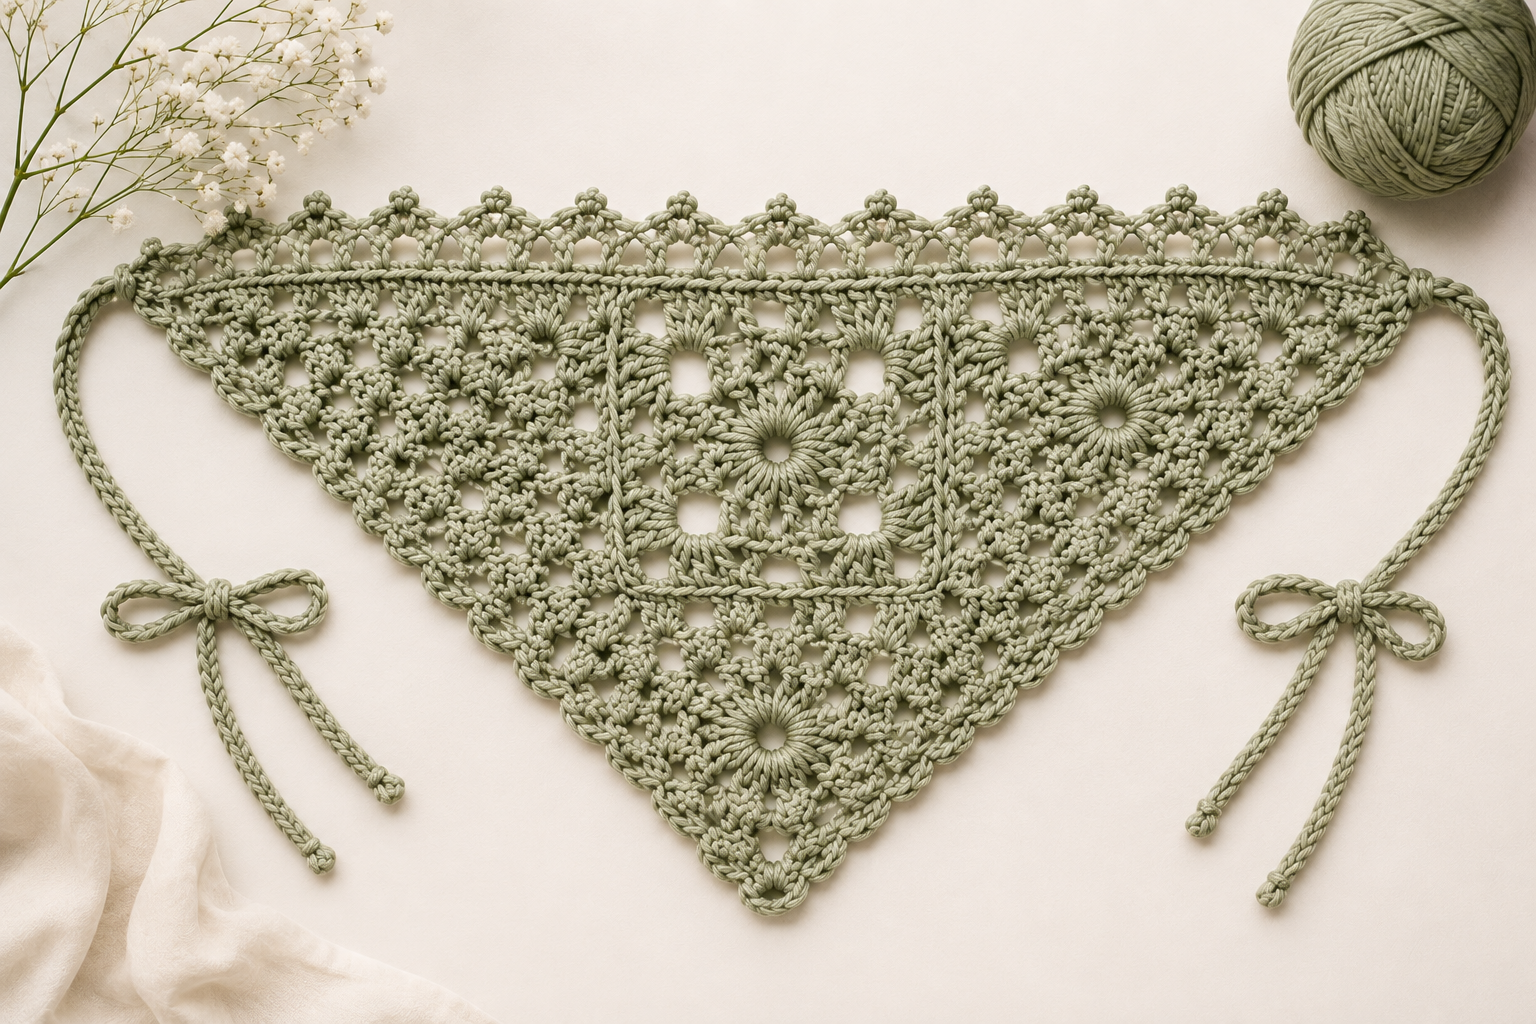
If you’ve been hunting for a free crochet bandana pattern that feels a little more special than a basic triangle scarf, this granny square and triangle design is worth bookmarking. It combines one classic granny square with two granny triangles, joins them into a single triangular headscarf shape, and finishes everything off with a delicate lace edge and two long crocheted ties. Whether you think of it as a crochet bandana or a crochet headscarf pattern, the result is the same: a textured, romantic accessory that looks far more advanced than the stitches actually are.
Every stitch used here — chain, slip stitch, single crochet, double crochet, and a little treble crochet — is one most confident beginners already know. What makes this feel like more than an easy crochet bandana is really just the number of rounds and rows involved, and the careful counting that goes with them. This tutorial breaks the whole pattern down step by step in plain language, with extra explanation anywhere the construction gets a little more technical — there’s some front-loop-only and back-loop-only work, and one spot where you’ll rotate your piece instead of turning it.
Beginner Goal
This isn’t the simplest beginner crochet bandana pattern out there, but it’s very achievable once you’re comfortable with your basic stitches. It’s not the best choice for your very first-ever crochet project — but if you’ve made even one traditional granny square before, you already have what you need to succeed here.
Along the way, you’ll practice:
- Building a granny square from the center out, including corner shells and shaping
- Crocheting a mirrored granny triangle in turned rows
- Joining finished motifs together with slip stitches worked through specific loops
- Reading chain-space (ch-sp) instructions, where you crochet into a gap rather than into a stitch
- Working in the back loop only (blo) to create a raised, corded texture
- A bit of treble crochet (tr), used at the points of the triangles and along the top edge
None of these skills are difficult in isolation. What bumps this pattern up from beginner-easy to beginner-plus is simply the number of rounds and rows, and how much counting is involved in keeping your corners and chain spaces lined up. Take it one round at a time and you’ll be fine.
What You’ll Need
Yarn
The sample was made with a medium weight yarn — the general category that includes most worsted and aran-weight yarns — in a cotton-viscose-linen blend (Sandnes Garn, Line, colorway 9004). This yarn comes in 50 g / 1.76 oz skeins with 110 m / 120 yd each, and is 53% cotton, 33% viscose, and 14% linen.
The finished bandana used approximately 44 g / 1.55 oz of yarn in total. The pattern doesn’t state a yardage figure directly, but based on the skein’s stated length, that works out to roughly 95–100 m / 105–110 yd — comfortably within a single skein, with a little left over. If you’re substituting yarn, look for a similar medium/worsted weight with some plant-fiber content, since that’s part of what gives the finished lace its drape. As with any pattern, buy a bit more than the calculated minimum in case your tension runs looser than the sample.
Hook
4 mm (US G-6)
Notions
- Yarn or tapestry needle
- Scissors
- Measuring tape
Stitches Used (US Terms)
- ch – chain
- sl st – slip stitch
- sc – single crochet
- dc – double crochet
- tr – treble crochet
- ch-sp – chain space (the gap created by a chain, which you’ll often crochet into instead of into a stitch)
- sk st – skipped stitch
- blo – back loop only (crocheting into just the back strand of a stitch, leaving the front strand unworked, which creates a subtle ribbed texture)
Two more terms come up that aren’t part of the formal abbreviation list but are worth knowing before you start:
- Magic ring – an adjustable starting loop used to begin both the granny square and the granny triangles. A chain-loop alternative is given if you’d rather not use one.
- Front loop – the loop of a stitch closest to you as you look at your work, referenced specifically during assembly.
Finished Measurements
This is a one-size pattern. Measured flat, after blocking:
- Height: 27.5 cm / 10.6 in
- Width: 53 cm / 20.9 in
- Strap length: 36 cm / 14.2 in (each tie)
Before You Begin
Check Your Gauge
Because the finished bandana has set measurements, it’s worth checking your gauge before you dive in. The target is 16 double crochets and 9 rows to measure 10 x 10 cm / 4 x 4 in in plain double crochet fabric. As a second checkpoint, one fully completed granny square motif (through Round 7) should measure about 14.5 x 14.5 cm / 5.5 x 5.5 in. If your square comes out noticeably smaller or larger than that, try a different hook size — sizing up will loosen your gauge, and sizing down will tighten it.
How the Bandana Comes Together
It helps to see the full build order before you start:
- Crochet one granny square, worked in the round.
- Crochet two matching granny triangles, worked in turned rows.
- Join the square and both triangles into one piece using slip stitches.
- Add a three-row lace edge along the top.
- Add a bottom edge and two long chained ties, worked as one continuous piece.
- Weave in ends and block.
This pattern uses US crochet terms throughout, so the double crochet here is the same double crochet used in most US pattern books — not the taller stitch called “treble” in UK terminology.
Step-by-Step Instructions
Part 1: Crocheting the Granny Square
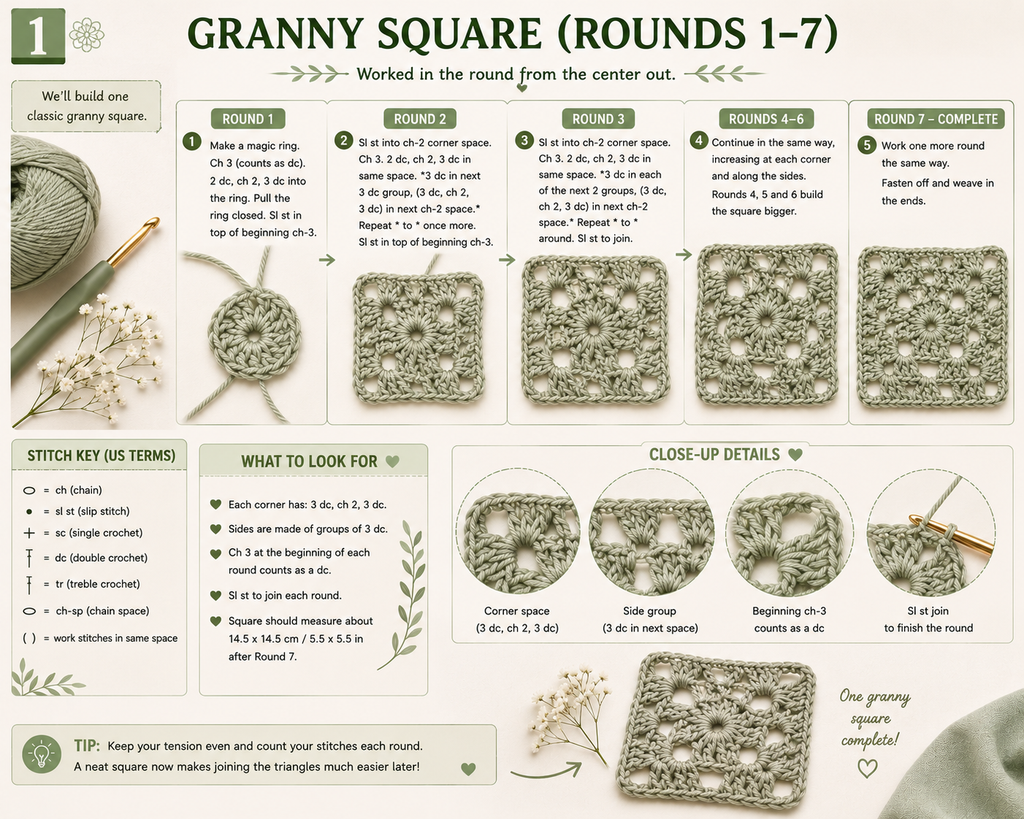
Round 1: Begin with a magic ring. Chain 3 (this counts as your first double crochet), then work 15 more double crochets into the ring for 16 stitches total. Close the round with a slip stitch into the top of that starting chain-3, then chain 4 to set up for Round 2.
Prefer not to use a magic ring? Make a slip knot, chain 4, and join it into a loop with a slip stitch into the very first chain. Work all of Round 1 into that chain loop instead.
(Suggested photo: close-up of the magic ring with all 16 double crochets worked in.)
Round 2: That chain-4 counts as a double crochet plus a chain-1 space. Work a double crochet into the next stitch, then chain 1; repeat this dc-plus-chain-1 combination into every stitch around. You should finish the round with 16 double crochet-and-chain-1 groups. Join with a slip stitch into the 3rd chain of your starting chain-4, then chain 3.
Round 3: Work 2 double crochets into the next chain-1 space, then 1 double crochet into the top of the next stitch. Repeat “2 dc in the space, 1 dc in the stitch” all the way around. Join with a slip stitch to the top of the beginning chain-3, then chain 6.
(Suggested photo: the circular motif after Round 3, before the corners appear.)
Round 4: That chain-6 becomes your first corner space. Skip 2 stitches and single crochet into the 3rd one, then chain 3. Repeat “chain 3, skip 2 stitches, single crochet” three more times to complete the side. For the corner, chain 6, skip 2 stitches, and single crochet into the next stitch. Work all four sides and corners this way, then join with a slip stitch into that very first corner space. Chain 3.
Round 5: Chain 3 to count as your first double crochet, then work 4 more double crochets, a chain-3, and 5 more double crochets — all into that same corner space. This builds the shell that becomes the square’s point. Single crochet into the next space (you’re working under the chain-3 left from Round 4). Work 7 double crochets into the following space, then single crochet into the space after that. Repeat the corner shell (5 dc, ch 3, 5 dc) at each remaining corner, with the same 7-dc-then-single-crochet pattern running along each side. Join with a slip stitch to the top of your starting chain-3, then chain 8.
(Suggested photo: the square shape starting to emerge after Round 5, with corners visible.)
Round 6: The chain-8 counts as a double crochet plus a chain-5 space. At the corner, work single crochet, chain 3, single crochet, chain 5. Skip the next 5 stitches, then work a double crochet into the single crochet from Round 5, followed by a chain-3. Single crochet into the 4th stitch of the 7-dc group. Chain 3, skip the next 3 double crochets, and work a double crochet into the single crochet from Round 5, followed by a chain-5. Repeat the corner (sc, ch 3, sc, ch 5) at the next corner, and continue this rhythm all the way around, finishing with a single crochet into the 4th stitch of the final 7-dc group, then chain 3. Join with a slip stitch into the 3rd chain of your starting chain-8, slip stitch once more into the next space, then chain 3.
Round 7: Chain 3 to count as your first double crochet, then work 4 more double crochets into that same space (5 dc total). At the corner space, work 3 dc, chain 3, 3 dc. Work 5 double crochets into the next space, 3 double crochets into each of the following two spaces, then 5 double crochets into the space after that. Repeat the corner shell at the next corner, and continue this sequence all the way around the square. Join with a slip stitch to the top of your beginning chain-3. Cut the yarn, leaving a tail of roughly 10 cm / 4 in to weave in later.
(Suggested photo: the completed granny square, all seven rounds finished.)
Your granny square is now complete.
Part 2: Crocheting the Granny Triangles (Make Two)
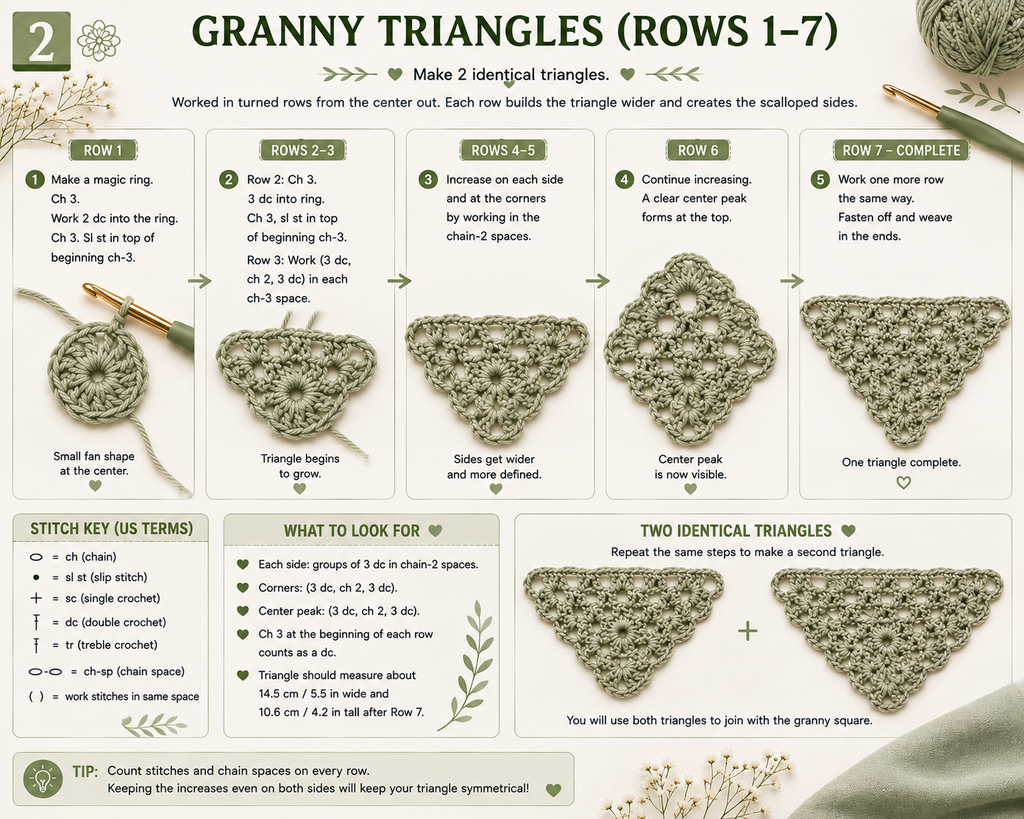
Both triangles use the same stitches as the square, but they’re worked back and forth in turned rows instead of in the round. You’ll need two identical triangles for assembly, so it can help to make them one right after the other while the pattern is fresh in your mind.
Row 1: Start with a magic ring. Chain 3 (counts as your first double crochet), then work 7 more double crochets into the ring for 8 total. Close the ring, chain 4, and turn.
Tip: Turn your piece in the same direction at the end of every row. Staying consistent keeps the finished edge lying flat and neat.
Row 2: The chain-4 counts as a double crochet plus a chain-1 space. Work a double crochet into the next stitch, chain 1, and repeat across until you have 8 dc-and-chain-1 groups total. Chain 3 and turn.
Row 3: Work 2 double crochets into the next chain-1 space, then 1 double crochet into the next stitch. Alternate “2 dc in the space, 1 dc in the stitch” across the row. Chain 6 and turn.
(Suggested photo: the fan-shaped half circle after Row 3.)
Row 4: Skip 2 stitches and single crochet into the next one. Work “chain 3, skip 2 stitches, single crochet” two more times. Chain 3, skip 1 stitch, then work single crochet, chain 6, single crochet all into the top center stitch — this marks the peak of the triangle. Chain 3, skip 1 stitch, single crochet, then work “chain 3, skip 2 stitches, single crochet” two more times to mirror the first half of the row. Finish with chain 6, skip 2 stitches, and slip stitch into the beginning of the turning chain from Row 3. Chain 4 and turn.
Row 5: The chain-4 counts as your first treble crochet. Work 1 more treble crochet and 4 double crochets into that same space. Single crochet into the next space. Work 7 double crochets into the following space, then single crochet into the space after that. Into the top center space, work 3 dc, chain 3, 3 dc — this shapes the little peak at the point of the triangle. Single crochet into the next space, then mirror this entire sequence down the second half of the row. Into the very last space, work 4 double crochets and 2 treble crochets. Chain 8 and turn.
(Suggested photo: the scalloped crown shape after Row 5.)
Row 6: Skip 2 stitches and single crochet into the 3rd one. Chain 3, skip 3 stitches, and work a double crochet into the single crochet from Row 5. Chain 3, skip 3 stitches, and single crochet into the 4th stitch of the 7-dc group. Chain 3, skip 3 stitches, work a double crochet into the single crochet from Row 5, then chain 5. Into the top space, work single crochet, chain 3, single crochet, chain 5. Mirror this same sequence down the second half of the row, ending with a single crochet into the 3rd stitch. Chain 5, then work 1 double crochet into the last space, just before the turning chains of Row 5. Chain 4 and turn.
Row 7: The chain-4 counts as your first treble crochet. Work 1 more treble crochet and 4 double crochets into that same space. Work 4 double crochets into the next space, 3 double crochets into each of the following two spaces, then 5 double crochets into the space after that. Into the top center space, work 3 dc, chain 4, 3 dc. Mirror the same sequence down the second half of the row. Into the very last space, work 4 double crochets and 2 treble crochets. Cut the yarn, leaving a tail of about 10 cm / 4 in.
(Suggested photo: the completed triangle motif, all seven rows finished.)
Repeat Rows 1–7 to make a second, identical triangle. You should now have one granny square and two matching granny triangles.
Part 3: Weaving in Ends Before Assembly
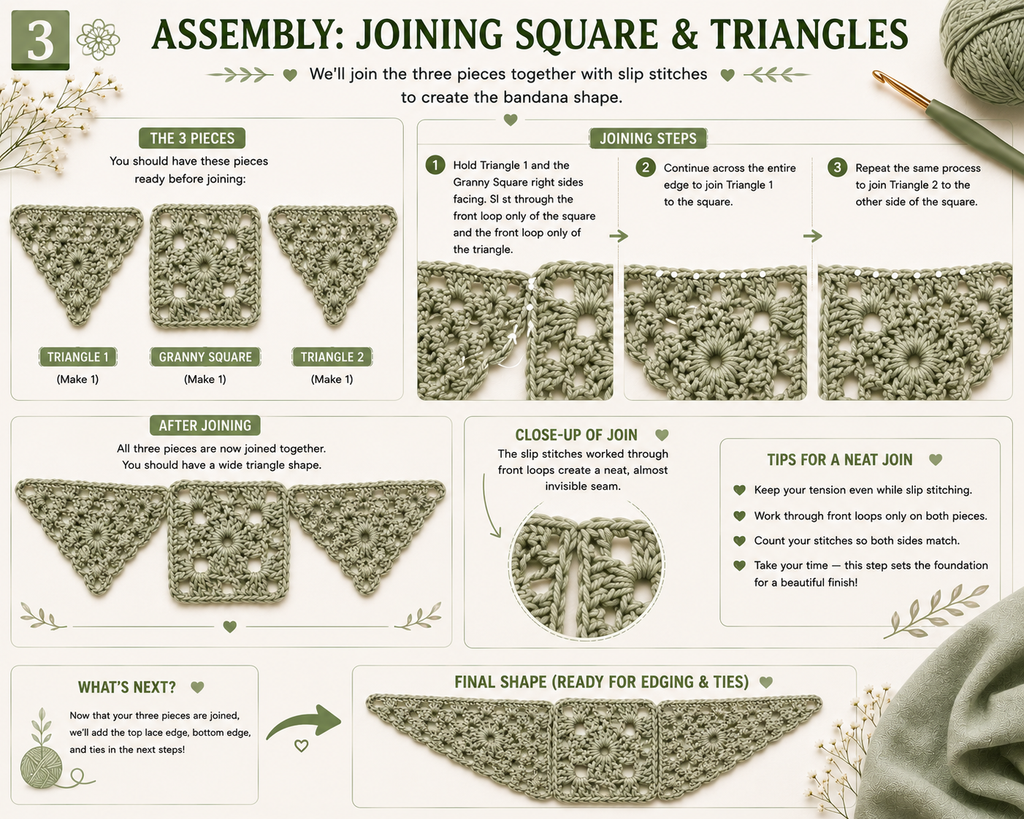
Before you join anything together, weave in every loose yarn tail on the square and on both triangles. Thread each tail onto a yarn needle and stitch it through several nearby stitches, changing direction once or twice as you go, so each end is secure and won’t work loose later. It’s far easier to do this now, while the three pieces are still separate and easy to handle, than after everything is joined together.
(Suggested photo: the three finished pieces — square, triangle, triangle — laid out before assembly.)
Part 4: Assembling the Square and Triangles
The square and both triangles are joined into one piece using slip stitches worked through specific loops, which creates a clean, nearly invisible seam on the right side. Work through the following steps in order:
- Attach your yarn with a knot into the top space of one triangle, then slip stitch into that same space to anchor it.
- Lay the square against that triangle with right sides together (facing each other).
- Slip stitch the two pieces together along the edge, working through the front loop of the square and the back loop of the triangle as you go, continuing all the way to the last stitch on that side.
- Place your final slip stitch into the corner space of the square, matching it with the last stitch before the triangle’s corner space.
- Position your second triangle against the opposite side of the square the same way, right sides together.
- Join the corner space of the first triangle to the corner space of the second triangle with a slip stitch.
- Slip stitch along the remaining side of the square the same way as before — front loop of the square, back loop of the second triangle.
- Finish with a slip stitch into the corner space, chain 1, and cut the yarn, leaving a tail of about 10 cm / 4 in.
Working through the front loop of one piece and the back loop of the other is what gives this seam its clean, nearly invisible look on the right side, so it’s worth taking your time here instead of rushing through.
(Suggested photo: the assembled triangular piece — square plus two triangles — right side facing up.)
Part 5: Crocheting the Top Edge
This edge is worked in three rows directly onto the piece you just assembled, and it’s what gives the top of the bandana its scalloped, lacy finish.
Row 1: With the right side facing you, attach your yarn with a knot into the right corner space. Chain 4 (counts as a treble crochet), then work 1 more treble crochet into that same space. Double crochet into each stitch across until you reach the seam where a triangle meets the square — at that point, work 2 double crochets into the triangle’s top space, then 2 double crochets into the square’s corner space. Continue with 1 double crochet into each stitch until you reach the very top center point of the bandana, then work 2 dc, chain 3, 2 dc into that space. Mirror the entire sequence down the other side. Work 2 treble crochets into the very last stitch. Chain 8 and turn.
(Suggested photo: Row 1 of the top edge in progress, showing the seam transition where a triangle meets the square.)
Row 2: Skip 2 stitches and single crochet into the next one. Work “chain 5, skip 2 stitches, single crochet” 16 times, then chain 5. Into the top center space, work single crochet, chain 4, single crochet, chain 5. Mirror the first half of the row down the second side — skip 2 stitches, single crochet, then “chain 5, skip 2 stitches, single crochet” 16 times, chain 5 once more. Finish the row with a double crochet into the very last stitch. Chain 4 and turn.
Row 3: Chain 4 to count as your first treble crochet, then work 1 more treble crochet and 5 double crochets into that same space. Single crochet into the next space. Repeat “5 double crochets into the next space, single crochet into the space after that” across the row until you reach the top space, then work 3 dc, chain 3, 3 dc into that space. Mirror this sequence down the second half of the row, all the way to the last space. Into the last space, work 5 double crochets and 2 treble crochets.
Chain 1, then rotate your work — rather than flipping it over the way you normally would when turning — so you’re ready to crochet straight into the bottom edge without breaking your yarn. Rotating simply means spinning the piece in place to work along a new edge, while the right side stays facing you the whole time.
(Suggested photo: the completed top edge, showing the full scalloped lace border.)
Part 6: Crocheting the Bottom Edge and Ties
This section is worked in a single row of single crochet and back-loop-only slip stitches, and it ends with two long chained ties that let you tie the finished bandana comfortably around your head.
Without turning, work 3 single crochets into the first space, working underneath the last row you completed. Continue with 3 single crochets into each of the next 6 spaces, still working under the row below. Work 2 single crochets into each of the following 3 spaces, then a single crochet into the triangle’s magic-ring center. Work 2 single crochets into each of the next 3 spaces, then 3 single crochets into each of the following 4 spaces. When you reach the point where a triangle joins the square, work 2 double crochets there. Repeat this entire sequence along the second side of the bandana.
(Suggested photo: the bottom-edge single crochet row in progress along one triangle.)
First strap: Once you reach the end of the row, chain 66. Working back down the chain, slip stitch through the back loop only into the 2nd chain from your hook, then continue slip stitching through the back loop only into each remaining chain to the end.
Once that strap chain is finished, continue along the bottom edge of the bandana, working single crochet through both loops of each stitch to the end of the row.
Second strap: At the end of the row, chain another 66. Slip stitch through the back loop only into the 2nd chain from the hook, and continue in the back loop only down the entire length of the chain.
Finish by slip stitching into the very first single crochet you worked on this row. Cut the yarn and leave a tail of about 10 cm / 4 in.
(Suggested photo: close-up of one finished strap, showing the ribbed, back-loop-only texture.)
Working the straps in the back loop only, rather than through both loops, is what gives them their subtle ribbed, corded look — it’s a small detail, but it makes the finished ties feel much more polished than a plain chain would.
Helpful Tips
- Mark your corners. Especially from Round 4 through Round 7 of the square, it’s easy to lose track of which chain space is a corner and which is a side space. Clip a stitch marker or a scrap of contrasting yarn into each corner space to save yourself from having to rip back and recount.
- Count each side before you commit to a corner. A few rounds in this pattern describe the side pattern first and the corner separately (Round 4, in particular). Before working any corner, double-check you’ve completed the full side sequence — it’s much easier to fix a missed repeat before turning the corner than after.
- Don’t skip the gauge swatch. Because the finished bandana has set measurements, a swatch that’s off by even a stitch or two per 10 cm can add up to a noticeably different final size.
- Wind off plenty of yarn before starting a strap. Each tie uses a chain of 66 plus a full row of back-loop-only slip stitches worked back along it, so make sure you’re not left joining new yarn partway through.
- The chain-ring alternative works for either starting ring. If you find magic rings fiddly, the chain-and-join method given for Round 1 of the square (chain 4, join into a loop with a slip stitch) is a technique that generally works any time a pattern calls for a magic ring — including the triangles’ Row 1.
- One skein is likely enough. At around 44 g out of a 50 g skein, this project comfortably fits on a single skein of a similar-weight yarn, though it’s always sensible to keep a little extra on hand in case your tension runs looser than the sample.
Common Mistakes to Avoid
- Losing count of chain spaces. Rounds 5 and 6 of the square, along with the top-edge rows, all involve several similarly sized chain spaces in a row. Slow down and count out loud if you need to, especially near the corners.
- Forgetting that the beginning chain counts as a stitch. Throughout this pattern, the starting chain-3, chain-4, or chain-8 stands in for your first double or treble crochet. Skipping it, or accidentally working an extra stitch into that same space, will shift your stitch count for the rest of the round.
- Mixing up “turn” and “rotate.” Every row in this pattern ends with an instruction to turn your work, except the end of Top Edge Row 3, which specifically asks you to rotate instead. Turning flips the work over; rotating spins it in place so the right side keeps facing you. Using the wrong one there will leave your bottom edge started on the wrong side of the fabric.
- Crocheting through both loops when the pattern calls for back loop only. This matters most for the two straps and part of the bottom edge — working through both loops there will hide the ribbed texture the technique is meant to create.
- Reversing the front-loop/back-loop join during assembly. Part 4 specifically calls for the front loop of the square and the back loop of the triangle. Swapping these will still join the pieces, but the seam won’t sit as flat or look as clean on the right side.
- Cutting yarn tails too short. Several sections end with an instruction to leave a tail of about 10 cm / 4 in — that length is what makes weaving in (or rejoining, if needed) manageable. A tail cut too short is hard to work with later.
Finishing
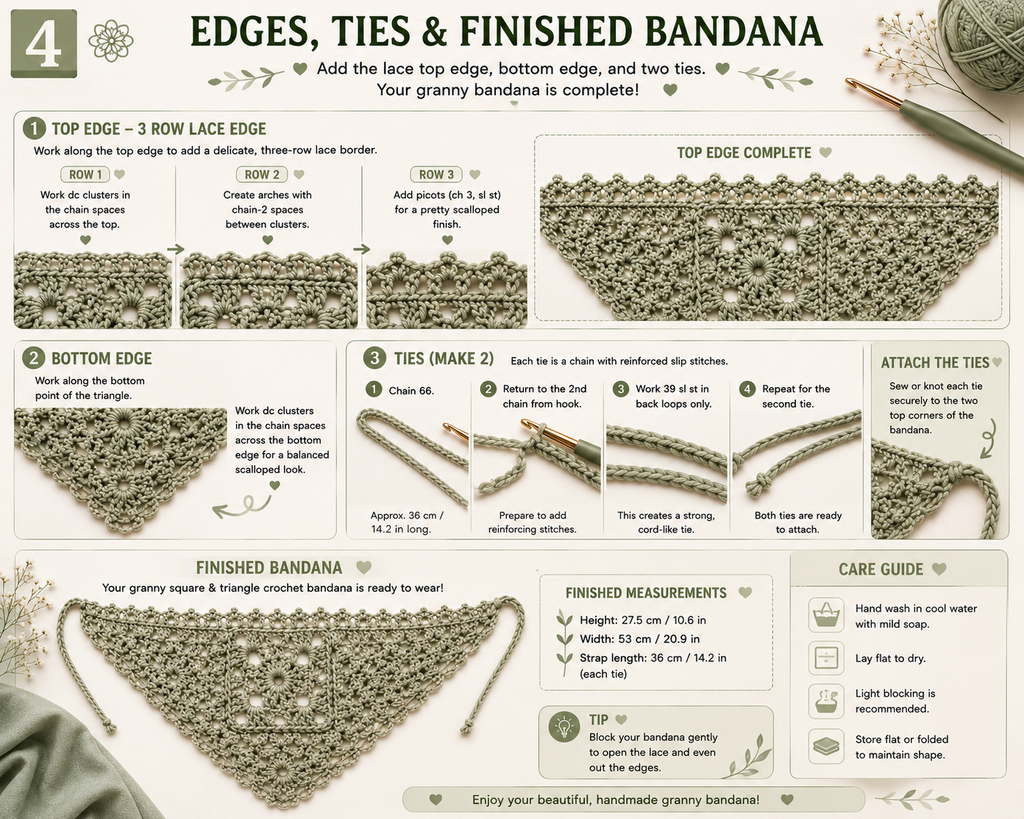
Once every piece is joined and both straps are complete, take a final pass through your bandana and weave in any yarn ends still hanging loose. Thread each one onto a yarn needle and run it through several nearby stitches, shifting direction as you go, so nothing works its way out with wear over time.
Blocking
This bandana is full of open lace and chain spaces, so blocking makes a real difference in how the finished piece looks. Wash or steam it according to the care instructions on your yarn label, then pin it out to the finished measurements — 27.5 cm / 10.6 in tall and 53 cm / 20.9 in wide — and let it dry completely before unpinning. Blocking evens out any uneven tension, opens up the lacy chain spaces so they read clearly, and gives the whole piece a noticeably crisper, more polished finish.
(Suggested photo: the finished, blocked bandana laid flat or styled on a head form, showing the full lace pattern.)
Final Thoughts
There’s something genuinely satisfying about watching three separate motifs — one square, two triangles — turn into a single, cohesive piece of lace. This crochet bandana pattern rewards patience more than raw skill: none of the individual stitches are difficult, but the pattern does ask you to stay organized across a lot of rounds and rows. Work through it a section at a time, lean on stitch markers whenever you’re unsure, and you’ll end up with a piece that looks like it took far more expertise than it actually did.
If you enjoy this project, it’s a great pattern to experiment with going forward — try it in a solid, saturated color for a bold, graphic look, or in a variegated yarn to let the shifting colors highlight all that lace texture.
🧶 Download the FREE Crochet Bandana PDF
Loved this pattern? Get the free printable PDF so you can save it, print it, and follow the pattern anytime.
Enter your email below and I’ll send the PDF straight to your inbox.