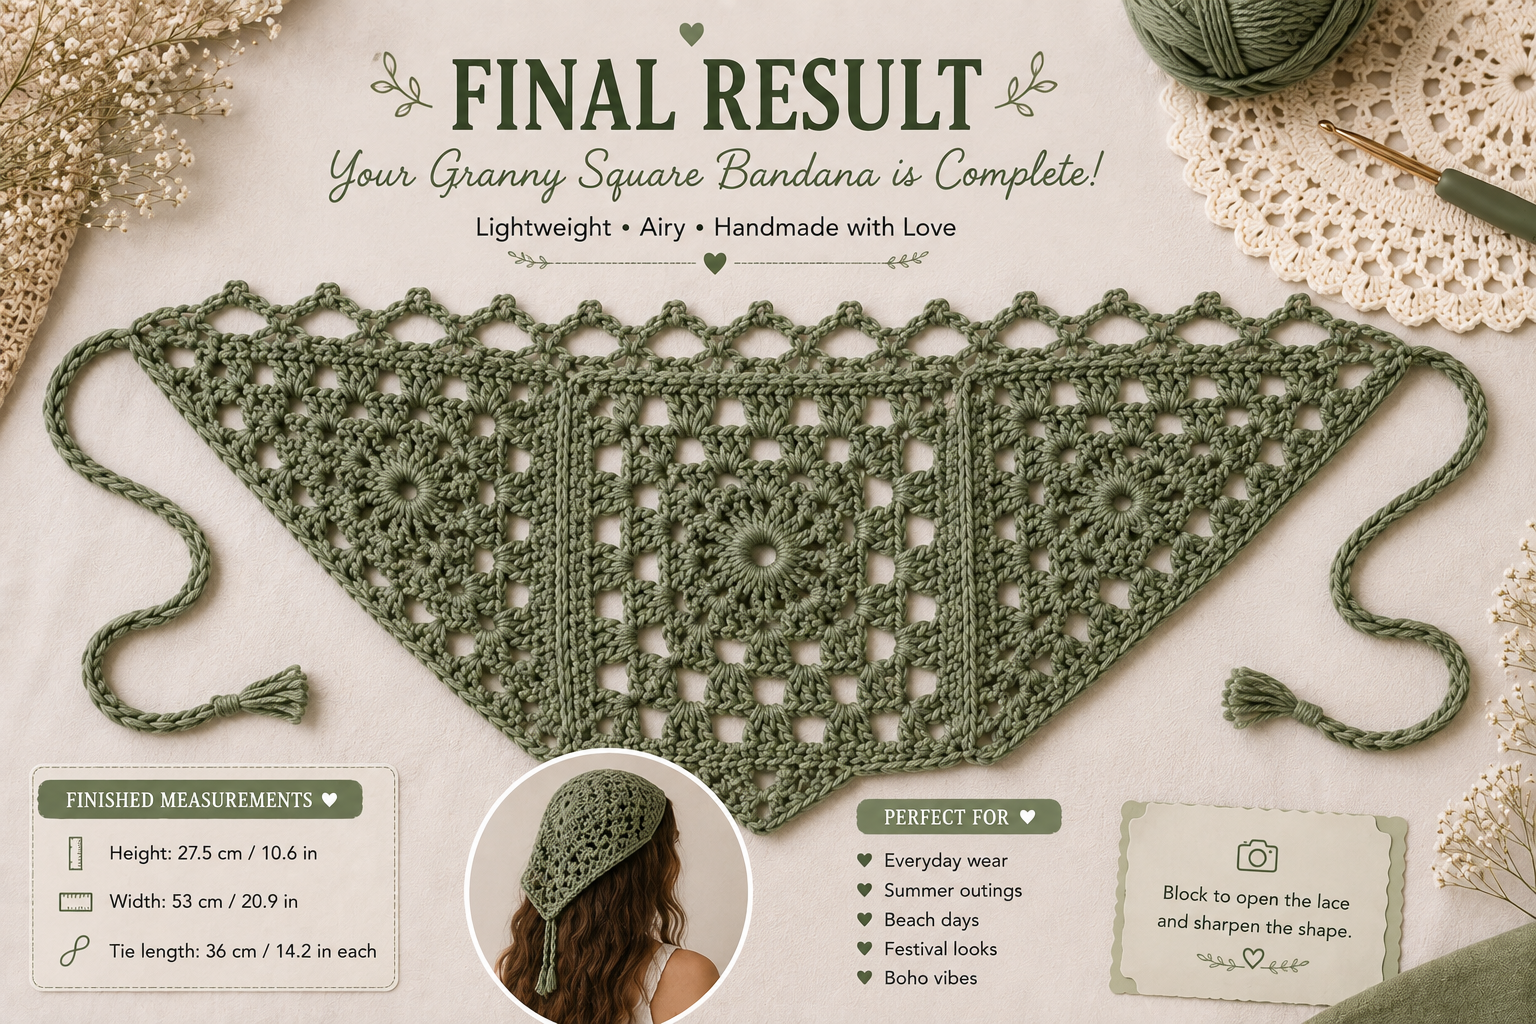
🧶 Free PDF Pattern:
Want to save this pattern for later? I’ve included a FREE printable PDF version at the bottom of this article. Keep reading, then download your copy below!
This lesson walks you through a crochet bandana built from three components: one granny square, two granny triangles, and a lace border that ties them together — literally, with two long crocheted straps. Rather than just listing stitches, this guide explains what each technique is doing and why, so you understand the construction, not just the instructions.
The stitch vocabulary is short: chain, slip stitch, single crochet, double crochet, and treble crochet. What makes this a step above a typical easy crochet bandana isn’t any single stitch — it’s how those stitches are sequenced across seven rounds, fourteen rows, a specific assembly method, and a multi-stage lace edge. Understanding the logic behind each stage will make the whole pattern click faster than memorizing it step by step.
Beginner Goal
This lesson assumes you already know your foundational stitches — chain, slip stitch, single crochet, double crochet — and have completed at least one traditional granny square. If that’s you, you’re ready. If you’ve never made a granny square, consider practicing one on its own first; the skills it teaches (working in rounds, building corners, reading chain-space instructions) are the exact skills this pattern builds on.
By the end of this project, you will have practiced:
- Constructing a motif from the center outward, with corner shaping via shell stitches (groups of stitches worked into a single space)
- Mirroring a stitch sequence across a row — a technique used repeatedly in the triangles and the top edge
- Joining two pieces using loop-specific slip stitches (working through only the front loop of one piece and the back loop of another)
- Working into a chain space rather than a stitch — a foundational lace technique
- Crocheting in the back loop only, which isolates the front loop and creates a ridge
- Introducing treble crochet at structural high points
Each of these is a discrete, learnable skill. The pattern’s difficulty comes from combining them across many rounds, not from any one technique being advanced.
What You’ll Need
Yarn
This lesson uses a medium weight yarn (the category covering most worsted and aran-weight yarns) — a cotton-viscose-linen blend from Sandnes Garn (Line, colorway 9004), 50 g / 1.76 oz per skein, 110 m / 120 yd per skein, 53% cotton / 33% viscose / 14% linen.
Total yarn used: approximately 44 g / 1.55 oz. Yardage isn’t given directly in the source pattern, but using the skein’s stated ratio, that converts to roughly 95–100 m / 105–110 yd — meaning one skein is sufficient, with some left over. When substituting yarn, match the weight category and favor a blend with some plant fiber, since fiber content affects how open lace drapes once blocked. Buy slightly more than the calculated minimum, since individual tension varies.
Hook
4 mm (US G-6)
Notions
- Yarn or tapestry needle
- Scissors
- Measuring tape
Stitches Used (US Terms)
- ch – chain: the foundational loop stitch, used both as a stitch and to create gaps (chain spaces)
- sl st – slip stitch: used to join rounds/rows and to seam pieces together
- sc – single crochet: a short, dense stitch
- dc – double crochet: the primary stitch throughout this pattern
- tr – treble crochet: the tallest stitch used, reserved for structural points
- ch-sp – chain space: the open gap created by a chain, used as a working point
- sk st – skipped stitch: a stitch that is deliberately passed over
- blo – back loop only: working into just the rear loop of a stitch, leaving the front loop unworked
Two related concepts aren’t formally abbreviated but come up repeatedly: the magic ring (an adjustable loop that starts both the square and each triangle, with a chain-loop alternative provided), and the front loop (the loop nearest you, referenced during assembly to distinguish it from the back loop).
Finished Measurements
One size. Measured flat, after blocking:
- Height: 27.5 cm / 10.6 in
- Width: 53 cm / 20.9 in
- Strap length: 36 cm / 14.2 in, each
Before You Begin
Gauge
Target gauge is 16 double crochets by 9 rows across 10 x 10 cm / 4 x 4 in of plain double crochet fabric. A second checkpoint: one completed granny square (through Round 7) should measure roughly 14.5 x 14.5 cm / 5.5 x 5.5 in. If your test swatch or square runs noticeably large or small, adjust hook size accordingly — a larger hook produces a looser gauge, a smaller hook a tighter one. Since this pattern has fixed finished measurements, this step is worth doing rather than skipping.
Construction Overview
Understanding the order of operations makes the pattern easier to follow:
- Crochet one granny square, worked in the round.
- Crochet two matching granny triangles, worked in turned rows.
- Join the square and both triangles using slip stitches.
- Add a three-row lace border to the top edge.
- Add a bottom edge and two long chained ties, in one continuous pass.
- Weave in ends and block.
This pattern is written entirely in US crochet terms. If you’ve learned from UK-based sources, note that the double crochet here is the US stitch — the UK equivalent term for this stitch is “treble.”
Step-by-Step Instructions
Part 1: The Granny Square
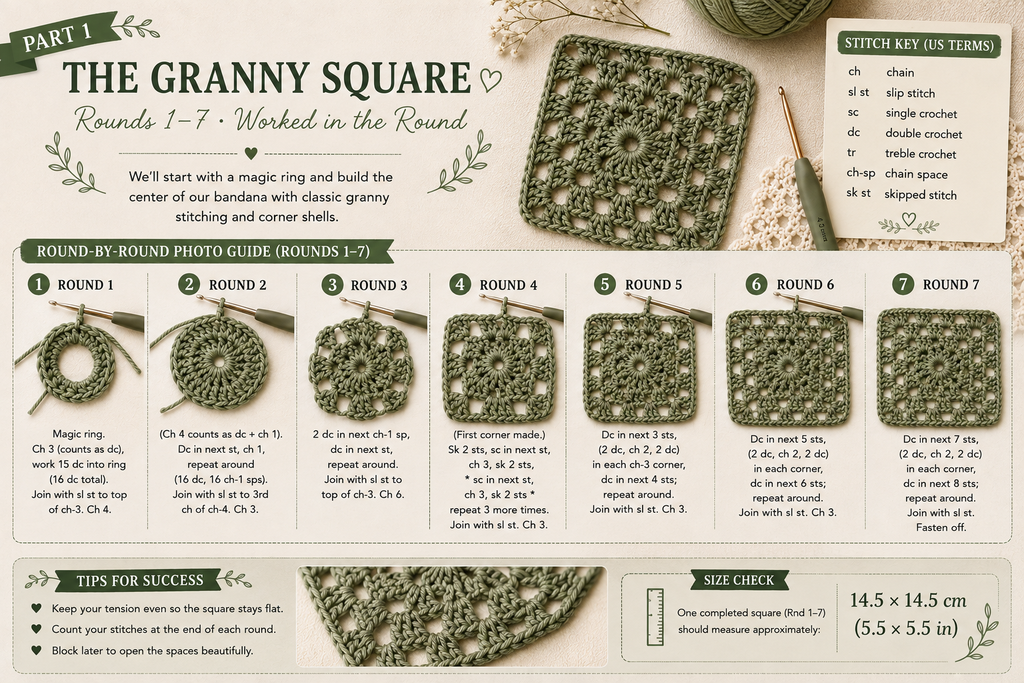
Round 1: Begin with a magic ring. Chain 3 — this stands in for your first double crochet, a standard convention in crochet patterns. Work 15 more double crochets into the ring, for 16 stitches total. Close the round with a slip stitch into the top of that starting chain-3, then chain 4 to set up Round 2.
If you prefer not to use a magic ring: make a slip knot, chain 4, and join it into a loop with a slip stitch into the first chain. Work Round 1 into this chain ring instead. Both methods produce a comparable center; the magic ring simply allows you to tighten the center hole afterward.
Round 2: The chain-4 you just made counts as a double crochet plus a chain-1 space — this is why it’s slightly longer than the chain-3 used elsewhere. Work a double crochet into the next stitch, then chain 1; repeat this pairing into every stitch around. You’ll finish with 16 double crochet-and-chain-1 groups. This alternating structure is what creates the chain-1 spaces you’ll use in Round 3. Join with a slip stitch into the 3rd chain of your starting chain-4, then chain 3.
Round 3: Work 2 double crochets into the next chain-1 space, then 1 double crochet into the top of the next stitch. This “2 in the space, 1 in the stitch” pattern increases your stitch count while keeping the motif flat — a standard technique for expanding a circular motif. Repeat all the way around. Join with a slip stitch to the top of the beginning chain-3, then chain 6.
Round 4: The chain-6 becomes your first corner space; notice it’s longer than the side chains you’ll make next, which is what visually distinguishes a corner from a side in the finished piece. Skip 2 stitches and single crochet into the 3rd one, then chain 3. Repeat “chain 3, skip 2 stitches, single crochet” three more times to complete the side. At the corner, chain 6, skip 2 stitches, single crochet. Work all four sides and corners this way — you’re essentially building a mesh of chain spaces that will support the shell stitches in the next round. Join with a slip stitch into that first corner space, then chain 3.
Round 5: Chain 3 to count as your first double crochet, then work 4 more double crochets, a chain-3, and 5 more double crochets, all into that same corner space. This is a shell stitch — a cluster of stitches worked into one space — and it’s what physically creates the square’s point. Single crochet into the next space, working under the chain-3 left from Round 4 (this “working under” language means you’re crocheting around the chain itself, not into an individual chain stitch). Work 7 double crochets into the following space, then single crochet into the space after. Repeat the corner shell and side pattern all the way around. Join with a slip stitch to the top of your starting chain-3, then chain 8.
Round 6: The chain-8 counts as a double crochet plus a chain-5 space. At the corner: single crochet, chain 3, single crochet, chain 5. Skip the next 5 stitches, then work a double crochet into the single crochet from Round 5, followed by a chain-3 — this double crochet anchors into the previous round’s single crochet, a technique that keeps the lace aligned vertically between rounds. Single crochet into the 4th stitch of the 7-dc group. Chain 3, skip the next 3 double crochets, and work a double crochet into the single crochet from Round 5, followed by a chain-5. Repeat the corner sequence, continuing this rhythm all the way around, ending with a single crochet into the 4th stitch of the final 7-dc group, then chain 3. Join with a slip stitch into the 3rd chain of your starting chain-8, slip stitch once more into the next space, then chain 3.
Round 7: Chain 3 to count as your first double crochet, then work 4 more double crochets into that same space (5 dc total) — this final round adds a solid border that will visually frame the lace beneath it. At the corner space, work 3 dc, chain 3, 3 dc. Work 5 double crochets into the next space, 3 double crochets into each of the following two spaces, then 5 double crochets into the space after. Repeat the corner shell at the next corner, and continue this sequence all the way around the square. Join with a slip stitch to the top of your beginning chain-3. Cut the yarn, leaving a tail of roughly 10 cm / 4 in to weave in later.
(Photo suggestion: the completed granny square, all seven rounds, ideally photographed flat to show the corner shaping clearly.)
At this point, you’ve completed a full lace granny square — the same skill set used in countless other crochet motifs.
Part 2: The Granny Triangles (Make Two)
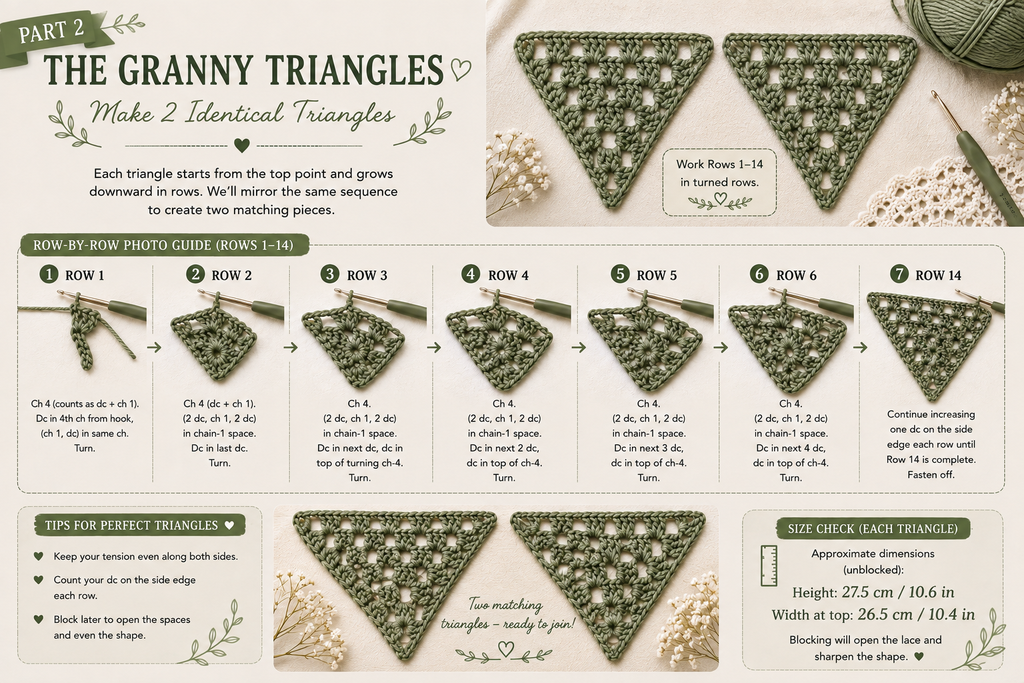
The triangles reuse every stitch from the square, but instead of working in continuous rounds, you’ll work in turned rows — meaning you complete a row, turn your work over, and start the next row from the opposite direction. This is the same principle used in most straight or shaped crochet panels.
Row 1: Start with a magic ring. Chain 3 (counts as your first double crochet), then work 7 more double crochets into the ring for 8 total. Close the ring, chain 4, and turn.
Teaching note: Consistently turning your work in the same direction every row (rather than alternating) keeps your tension and edge shape predictable. This matters more in turned-row pieces like these triangles than it did in the square, since inconsistent turning shows up as a wavy edge.
Row 2: The chain-4 counts as a double crochet plus a chain-1 space. Work a double crochet into the next stitch, chain 1, and repeat across until you have 8 dc-and-chain-1 groups total. Chain 3 and turn.
Row 3: Work 2 double crochets into the next chain-1 space, then 1 double crochet into the next stitch. Alternate this across the row — the same increase technique used in Round 3 of the square, just worked in a straight row instead of a circle. Chain 6 and turn.
Row 4: Skip 2 stitches and single crochet into the next one. Work “chain 3, skip 2 stitches, single crochet” two more times. Chain 3, skip 1 stitch, then work single crochet, chain 6, single crochet all into the top center stitch — this taller chain-6 space marks the triangle’s peak, structurally similar to a corner on the square. Chain 3, skip 1 stitch, single crochet, then mirror the first half of the row: “chain 3, skip 2 stitches, single crochet” two more times. Finish with chain 6, skip 2 stitches, and slip stitch into the beginning of Row 3’s turning chain. Chain 4 and turn.
Row 5: The chain-4 counts as your first treble crochet — notice the pattern is introducing a taller stitch here specifically to build height at the shaped edges. Work 1 more treble crochet and 4 double crochets into that same space. Single crochet into the next space. Work 7 double crochets into the following space, then single crochet into the space after. Into the top center space, work 3 dc, chain 3, 3 dc, shaping the peak. Single crochet into the next space, then mirror this entire sequence down the second half of the row. Into the very last space, work 4 double crochets and 2 treble crochets. Chain 8 and turn.
Row 6: Skip 2 stitches and single crochet into the 3rd one. Chain 3, skip 3 stitches, and work a double crochet into the single crochet from Row 5. Chain 3, skip 3 stitches, and single crochet into the 4th stitch of the 7-dc group. Chain 3, skip 3 stitches, work a double crochet into the single crochet from Row 5, then chain 5. Into the top space, work single crochet, chain 3, single crochet, chain 5. Mirror this same sequence down the second half of the row, ending with a single crochet into the 3rd stitch. Chain 5, then work 1 double crochet into the last space, just before Row 5’s turning chains. Chain 4 and turn.
Row 7: The chain-4 counts as your first treble crochet. Work 1 more treble crochet and 4 double crochets into that same space. Work 4 double crochets into the next space, 3 double crochets into each of the following two spaces, then 5 double crochets into the space after. Into the top center space, work 3 dc, chain 4, 3 dc. Mirror the same sequence down the second half. Into the very last space, work 4 double crochets and 2 treble crochets. Cut the yarn, leaving a tail of about 10 cm / 4 in.
(Photo suggestion: the completed triangle, all seven rows.)
Repeat Rows 1–7 to produce a second, identical triangle. Working from written instructions a second time is a good opportunity to notice which steps you understand intuitively now versus which you’re still checking against the text.
Part 3: Weaving in Ends Before Assembly
Before joining any pieces, weave in every loose yarn tail on the square and both triangles. Thread each tail onto a yarn needle and pass it through several nearby stitches, changing direction once or twice, so it’s secured against pulling loose. Doing this now, while the pieces are separate, is significantly easier than doing it after assembly — there’s more fabric to hold onto and less risk of catching the wrong stitch.
Part 4: Assembling the Square and Triangles
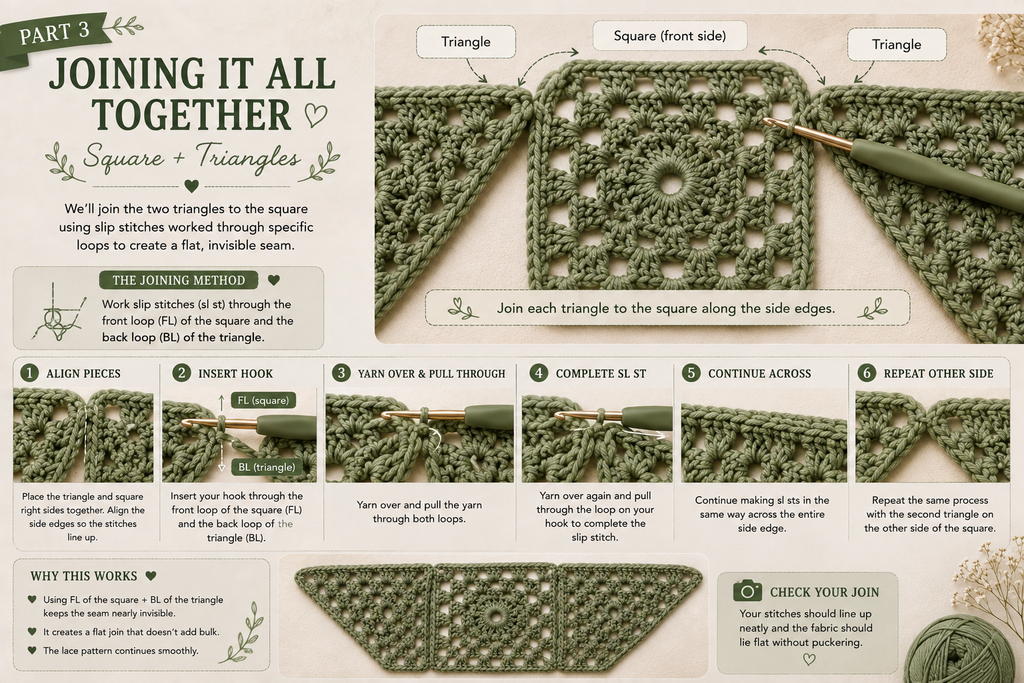
This stage joins your three motifs into a single piece using slip stitches worked through specific loops — a technique that produces a nearly invisible seam because it mimics the structure of a woven join rather than sitting on top of the fabric.
- Attach your yarn with a knot into the top space of one triangle, then slip stitch into that same space to anchor it.
- Lay the square against that triangle with right sides together (facing each other) — this positioning is what allows the seam to sit correctly once the piece is turned right-side out.
- Slip stitch the two pieces together along the edge, working through the front loop of the square and the back loop of the triangle as you go, continuing to the last stitch on that side.
- Place your final slip stitch into the corner space of the square, matching it with the last stitch before the triangle’s corner space.
- Position your second triangle against the opposite side of the square the same way, right sides together.
- Join the corner spaces of the two triangles to each other with a slip stitch.
- Slip stitch along the remaining side of the square the same way as before: front loop of the square, back loop of the second triangle.
- Finish with a slip stitch into the corner space, chain 1, and cut the yarn, leaving a tail of about 10 cm / 4 in.
(Photo suggestion: the assembled piece, right side facing up, to show the completed seam.)
Understanding why this join uses different loops on each piece — rather than both loops on both pieces — is useful: it’s specifically what allows the seam to lie flat rather than creating a visible ridge.
Part 5: The Top Edge
This edge is worked directly onto the assembled piece across three rows, and it’s responsible for the bandana’s scalloped, lace-trimmed top.
Row 1: With the right side facing you, attach your yarn with a knot into the right corner space. Chain 4 (counts as a treble crochet), then work 1 more treble crochet into that same space. Double crochet into each stitch across until you reach the seam where a triangle joins the square — work 2 double crochets into the triangle’s top space, then 2 double crochets into the square’s corner space. Continue with 1 double crochet into each stitch until you reach the top center point of the bandana, then work 2 dc, chain 3, 2 dc into that space. Mirror the entire sequence down the other side. Into the last stitch, work 2 treble crochets. Chain 8 and turn.
Row 2: Skip 2 stitches and single crochet into the next. Work “chain 5, skip 2 stitches, single crochet” 16 times, then chain 5. Into the top center space, work single crochet, chain 4, single crochet, chain 5. Mirror the first half of the row down the second side, then finish with a double crochet into the very last stitch. Chain 4 and turn.
Row 3: Chain 4 to count as your first treble crochet, then work 1 more treble crochet and 5 double crochets into that same space. Single crochet into the next space. Repeat “5 double crochets into the next space, single crochet into the space after” across the row until you reach the top space, then work 3 dc, chain 3, 3 dc into that space. Mirror this sequence down the second half of the row, all the way to the last space. Into the last space, work 5 double crochets and 2 treble crochets.
Chain 1, then rotate your work — this is distinct from turning, which you’ve done at the end of every row so far. Rotating means spinning the piece in place, so the right side keeps facing you, allowing you to continue directly into the bottom edge without breaking your working yarn.
Part 6: The Bottom Edge and Ties
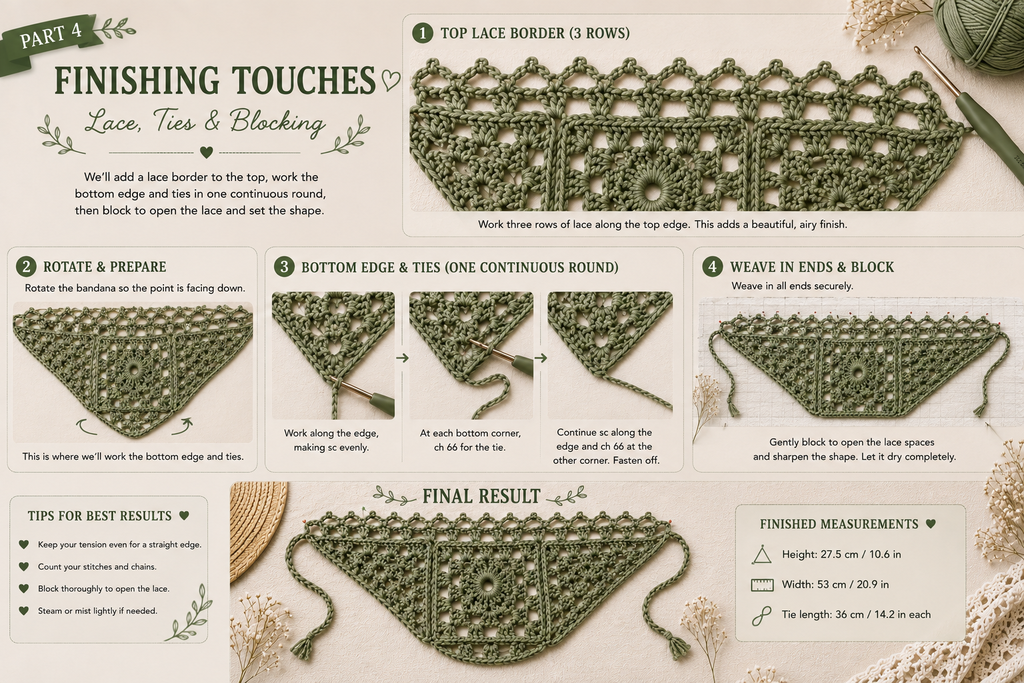
This section is worked in a single row combining single crochet and back-loop-only slip stitches, concluding with two long chained ties.
Without turning, work 3 single crochets into the first space, working underneath the last row you completed. Continue with 3 single crochets into each of the next 6 spaces, still working under the row below. Work 2 single crochets into each of the following 3 spaces, then a single crochet into the triangle’s magic-ring center. Work 2 single crochets into each of the next 3 spaces, then 3 single crochets into each of the following 4 spaces. When you reach the point where a triangle joins the square, work 2 double crochets there. Repeat this entire sequence along the second side of the bandana.
First strap: Once you reach the end of the row, chain 66. Working back down the chain, slip stitch through the back loop only into the 2nd chain from your hook, then continue slip stitching through the back loop only into each remaining chain to the end. Working only through the back loop, rather than both loops, is what produces the raised, corded texture along the strap’s length.
Once that strap chain is finished, continue along the bottom edge of the bandana, working single crochet through both loops of each stitch to the end of the row.
Second strap: At the end of the row, chain another 66. Slip stitch through the back loop only into the 2nd chain from the hook, and continue in the back loop only down the entire length of the chain.
Finish by slip stitching into the very first single crochet you worked on this row. Cut the yarn and leave a tail of about 10 cm / 4 in.
(Photo suggestion: a close-up of one finished strap, to clearly show the back-loop-only ridge.)
Helpful Tips
- Track your corners deliberately. From Round 4 through Round 7, use a stitch marker in every corner space. This isn’t just a convenience — it’s how experienced crocheters avoid the most common error in motifs like this one.
- Count before you commit to a corner. Round 4 in particular separates the side pattern from the corner instruction. Verify you’ve completed the full side sequence before starting the corner; correcting a miscount is much easier before you’ve moved on.
- Treat the gauge swatch as mandatory, not optional, since this pattern has fixed finished measurements. A small gauge discrepancy compounds across seven rounds.
- Estimate your yarn needs before each strap. The chain-66-plus-slip-stitch-row sequence consumes yarn quickly; running out mid-strap means joining new yarn in a highly visible spot.
- The chain-ring starting method generalizes. Although the pattern specifies it only for Round 1 of the square, this technique works anywhere a magic ring is called for, including the triangles.
- One skein is generally sufficient. At roughly 44 g of a 50 g skein, this project fits comfortably on one skein of a comparable yarn, with a small margin for tension variation.
Common Mistakes to Avoid
- Miscounting chain spaces. Rounds 5 and 6 of the square, along with the top-edge rows, involve multiple similarly sized chain spaces in sequence — a common point of error even for experienced crocheters.
- Treating the beginning chain as optional. The starting chain-3, chain-4, or chain-8 throughout this pattern always counts as your first stitch. Skipping it, or adding an extra stitch into the same space, shifts your count for the remainder of the round.
- Confusing “turn” with “rotate.” Every row in this pattern ends with a turn instruction except the end of Top Edge Row 3, which specifically calls for a rotation instead. This is the single most consequential wording distinction in the whole pattern — using the wrong one changes which side faces you for the bottom edge.
- Working through both loops where back loop only is specified. This affects the straps and part of the bottom edge most visibly, since it’s the technique responsible for their ribbed texture.
- Reversing which piece gets the front loop versus the back loop during assembly. The join will still function structurally, but the seam won’t lie as flat.
- Cutting yarn tails shorter than instructed. The 10 cm / 4 in length specified throughout is the minimum needed to weave in securely.
Finishing
Once all pieces are joined and both straps are complete, make a final pass through the bandana and weave in any remaining yarn ends. Thread each through a yarn needle and pass it through several nearby stitches, changing direction as you go, to secure it against future wear.
Blocking
This design relies heavily on open lace and chain spaces, which is precisely why blocking has a noticeable effect on the final result. Wash or steam the piece according to your yarn label’s care instructions, then pin it to the finished measurements — 27.5 cm / 10.6 in tall and 53 cm / 20.9 in wide — and allow it to dry completely before removing the pins. Blocking evens out any inconsistencies in tension, opens the chain spaces so the lace pattern reads clearly, and gives the finished piece a noticeably more polished, professional appearance.
(Photo suggestion: the finished, blocked bandana, laid flat to show the full lace structure.)
Final Thoughts
This pattern is a good example of how a handful of basic stitches, applied with structure and repetition, can produce a result that looks far more advanced than any individual step. What you’ve practiced here — motif construction, mirrored rows, loop-specific joining, chain-space lace, and back-loop-only texture — are transferable skills you’ll recognize in many other crochet patterns going forward.
If you’d like to build on what you’ve learned, try the same pattern in a solid, high-contrast color to make the shell-stitch structure more visually apparent, or in a variegated yarn to see how color interacts with the open lace spaces.
🧶 Download the FREE Crochet Bandana PDF
Loved this pattern? Get the free printable PDF so you can save it, print it, and follow the pattern anytime.
Enter your email below and I’ll send the PDF straight to your inbox.